在前面文章我们分析了四大组件中的两个:Broadcast和Activity,这章我们分析四大组件中的服务(Service)的启动过程。Service的启动方式有两种:一种是startService,一种是bindService;第一种通常是开启一个服务执行后台任务,不进行通信,第二章通过是启动服务进行通信。下面我们就根据这两种启动方式来讲Service的启动流程以及unbindService和stopService流程。
Service启动流程-startService 首先来看启动流程时序图:
Step0.ContextImpl.startService 1 2 3 4 5 @Override public ComponentName startService (Intent service) { warnIfCallingFromSystemProcess(); return startServiceCommon(service, mUser); }
调用当前类中的startServiceCommon方法。
Step1.ContextImpl.startServiceCommon 1 2 3 4 5 6 7 8 9 10 11 12 13 14 15 16 private ComponentName startServiceCommon (Intent service, UserHandle user) { try { validateServiceIntent(service); service.prepareToLeaveProcess(this ); ComponentName cn = ActivityManagerNative.getDefault().startService( mMainThread.getApplicationThread(), service, service.resolveTypeIfNeeded( getContentResolver()), getOpPackageName(), user.getIdentifier()); ... return cn; } catch (RemoteException e) { ... } }
首先验证Intent中传递的组件名是否为空,为什么判断下面我们介绍,接着通过代理对象ActivityManagerProxy,通过Binder调用AMS(ActivityManagerService)中的对应方法startService。我们先看包名验证。
Step2.ContextImpl.validateServiceIntent 1 2 3 4 5 6 7 8 9 10 11 12 private void validateServiceIntent (Intent service) { if (service.getComponent() == null && service.getPackage() == null ) { if (getApplicationInfo().targetSdkVersion >= Build.VERSION_CODES.LOLLIPOP) { IllegalArgumentException ex = new IllegalArgumentException ( "Service Intent must be explicit: " + service); throw ex; } else { Log.w(TAG, "Implicit intents with startService are not safe: " + service + " " + Debug.getCallers(2 , 3 )); } } }
这里给出了如果系统在Android5.0及以上版本,启动服务必须为显式启动,否则抛出异常,这个情况我们在刚开始在高于5.0系统都会遇到过,限制就在这里,所以,5.0及以上系统必须用显式的方式启动服务。
3.AMP.startService 1 2 3 4 5 6 7 8 9 public ComponentName startService (IApplicationThread caller, Intent service, String resolvedType, String callingPackage, int userId) throws RemoteException { ... mRemote.transact(START_SERVICE_TRANSACTION, data, reply, 0 ); ... return res; }
看过前面文章的对这一段代码应该很熟悉了,这个就是通过Binder调用AMS中对应方法的。所以我们直接看AMS。
4.AMS.startService 1 2 3 4 5 6 7 8 9 10 11 12 13 public ComponentName startService (IApplicationThread caller, Intent service, String resolvedType, String callingPackage, int userId) throws TransactionTooLargeException { ... synchronized (this ) { ... ComponentName res = mServices.startServiceLocked(caller, service, resolvedType, callingPid, callingUid, callingPackage, userId); Binder.restoreCallingIdentity(origId); return res; } }
这里的mServices是ActiveServices,因此调用的是ActiveServices中的startServiceLocked方法。
5.ActiveServices.startServiceLocked 1 2 3 4 5 6 7 8 9 10 11 12 13 14 15 16 17 18 19 20 21 22 23 24 25 26 27 28 29 30 31 32 33 34 ComponentName startServiceLocked (IApplicationThread caller, Intent service, String resolvedType, int callingPid, int callingUid, String callingPackage, final int userId) throws TransactionTooLargeException { ... ServiceLookupResult res = retrieveServiceLocked(service, resolvedType, callingPackage, callingPid, callingUid, userId, true , callerFg, false ); ... ServiceRecord r = res.record; ... r.pendingStarts.add(new ServiceRecord .StartItem(r, false , r.makeNextStartId(), service, neededGrants)); final ServiceMap smap = getServiceMap(r.userId); boolean addToStarting = false ; if (!callerFg && r.app == null && mAm.mUserController.hasStartedUserState(r.userId)) { ProcessRecord proc = mAm.getProcessRecordLocked(r.processName, r.appInfo.uid, false ); ... } else if (DEBUG_DELAYED_STARTS) { ... } return startServiceInnerLocked(smap, service, r, callerFg, addToStarting); }
这里做的主要是启动服务前的准备工作,首先是解析Intent携带的参数,并将这些内容保存在用来描述Service的ServiceRecord对象中保存起来,并将该对象放到等待启动服务的列表中。然后调用startServiceInnerLocked启动服务。在上面调用retrieveServiceLocked函数解析的过程中先去判断AMS中是否存在参数为service对应的ServiceRecord对象,如果存在说明已经启动过该服务,如果不存在,说明是第一次启动该服务。
8.ActiveServices.startServiceInnerLocked 1 2 3 4 5 6 7 8 9 10 11 12 13 ComponentName startServiceInnerLocked (ServiceMap smap, Intent service, ServiceRecord r, boolean callerFg, boolean addToStarting) throws TransactionTooLargeException { ServiceState stracker = r.getTracker(); ... r.callStart = false ; ... String error = bringUpServiceLocked(r, service.getFlags(), callerFg, false , false ); ... return r.name; }
这里比较简单主要是调用bringUpServiceLocked唤起服务。
Step9.ActiveServices.bringUpServiceLocked 1 2 3 4 5 6 7 8 9 10 11 12 13 14 15 16 17 18 19 20 21 22 23 24 25 26 27 28 29 30 31 32 33 34 35 36 37 38 39 40 41 42 43 44 45 46 47 48 49 50 51 52 53 54 55 56 57 58 59 60 61 62 63 64 65 66 67 68 69 70 71 72 73 74 75 76 77 78 79 80 81 private String bringUpServiceLocked (ServiceRecord r, int intentFlags, boolean execInFg, boolean whileRestarting, boolean permissionsReviewRequired) throws TransactionTooLargeException { if (r.app != null && r.app.thread != null ) { sendServiceArgsLocked(r, execInFg, false ); return null ; } ... if (!mAm.mUserController.hasStartedUserState(r.userId)) { ... bringDownServiceLocked(r); return msg; } ... final boolean isolated = (r.serviceInfo.flags & ServiceInfo.FLAG_ISOLATED_PROCESS) != 0 ; final String procName = r.processName; ProcessRecord app; if (!isolated) { app = mAm.getProcessRecordLocked(procName, r.appInfo.uid, false ); if (app != null && app.thread != null ) { try { ... realStartServiceLocked(r, app, execInFg); return null ; } catch (TransactionTooLargeException e) { ... } } } else { ... } if (app == null && !permissionsReviewRequired) { if ((app = mAm.startProcessLocked(procName, r.appInfo, true , intentFlags, "service" , r.name, false , isolated, false )) == null ) { ... bringDownServiceLocked(r); return msg; } ... } ... if (r.delayedStop) { r.delayedStop = false ; if (r.startRequested) { stopServiceLocked(r); } } return null ; }
这里是启动服务最重要的部分,根据不同的情况进行不同的处理。首先是判断服务所在进程是否存在,如果存在调用sendServiceArgsLocked方法,最终根据条件,如果服务存在调用服务的onStartCommand方法;然后判断被启动服务的用户是否已经被启动,如果没有则停止服务,也就是调用bringDownServiceLocked方法,最终调用服务的onDestroy方法;然后判断非独立进程的服务,如果进程存在并且服务未启动的开始正式启动服务,调用realStartServiceLocked方法,最终调用onCreate方法;然后判断如果进程不存在,要启动进程,并且在app启动后启动服务,这里会调用启动失败,停止启动,因为进程启动后会启动该服务,这个过程在前面我们讲过,这里不再分析这种情况。最后是如果是延迟停止的服务这里直接停止该服务。下面我们按顺序分析这几种情况。
Step10.ActiveServices.sendServiceArgsLocked 1 2 3 4 5 6 7 8 9 10 11 12 13 14 15 16 17 18 19 20 21 22 private final void sendServiceArgsLocked (ServiceRecord r, boolean execInFg, boolean oomAdjusted) throws TransactionTooLargeException { final int N = r.pendingStarts.size(); if (N == 0 ) { return ; } while (r.pendingStarts.size() > 0 ) { ... try { .. bumpServiceExecutingLocked(r, execInFg, "start" ); ... r.app.thread.scheduleServiceArgs(r, si.taskRemoved, si.id, flags, si.intent); } catch (TransactionTooLargeException e) { ... } } }
上面Step5提到启动的服务都要先放到等待启动服务列表中,因此这里先判断服务列表是否存在要启动的服务,如果不存在则不再继续执行,如果存在,循环启动服务,这里调用scheduleServiceArgs方法,其实在前面分析了很多遍,最终会发送消息ActivityThread中的Handler中的handleMessage中进行处理,然后调用ActivityThread中的handleServiceArgs方法。
Step13.ActivityThread.handleServiceArgs 1 2 3 4 5 6 7 8 9 10 11 12 13 14 15 16 17 18 19 private void handleServiceArgs (ServiceArgsData data) { Service s = mServices.get(data.token); if (s != null ) { try { ... if (!data.taskRemoved) { res = s.onStartCommand(data.args, data.flags, data.startId); } else { s.onTaskRemoved(data.args); res = Service.START_TASK_REMOVED_COMPLETE; } ... } catch (Exception e) { ... } } }
根据Service对应的token去缓存中获取服务,如果有该服务那么调用服务的onStartCommand方法,如果不存在那么就要继续往下走创建服务。
Step15.ActiveServices.bringDownServiceLocked 这个方法主要是处理停止服务的方法,里面主要是断开连接,解除绑定,然后销毁服务,因为这个过程是在服务停止时会调用,所以在后面介绍,这里先不介绍了。
Step16.ActiveServices.realStartServiceLocked 1 2 3 4 5 6 7 8 9 10 11 12 13 14 15 16 17 18 19 20 21 22 23 24 25 private final void realStartServiceLocked (ServiceRecord r, ProcessRecord app, boolean execInFg) throws RemoteException { ... boolean created = false ; ... app.thread.scheduleCreateService(r, r.serviceInfo, mAm.compatibilityInfoForPackageLocked(r.serviceInfo.applicationInfo), app.repProcState); ... requestServiceBindingsLocked(r, execInFg); ... sendServiceArgsLocked(r, execInFg, true ); ... }
启动服务调用三个方法,首先是通过app.thread.scheduleCreateService方法调用onCreate方法,然后通过requestServiceBindingsLocked方法调用Service.onBind方法,然后通过sendServiceArgsLocked方法调用Service.onStartCommand方法,其中最后一个方法我们分析过了,所以我们只分析前两个。第一很简单了,最终调用ActivityThread中的handleCreateService方法。
Step18.ActivityThread.handleCreateService 1 2 3 4 5 6 7 8 9 10 11 12 13 14 15 16 17 18 19 20 21 22 23 24 25 26 27 28 29 30 31 32 33 34 35 36 private void handleCreateService (CreateServiceData data) { ... LoadedApk packageInfo = getPackageInfoNoCheck( data.info.applicationInfo, data.compatInfo); Service service = null ; ... java.lang.ClassLoader cl = packageInfo.getClassLoader(); service = (Service) cl.loadClass(data.info.name).newInstance(); ... ContextImpl context = ContextImpl.createAppContext(this , packageInfo); context.setOuterContext(service); Application app = packageInfo.makeApplication(false , mInstrumentation); service.attach(context, this , data.info.name, data.token, app, ActivityManagerNative.getDefault()); service.onCreate(); mServices.put(data.token, service); ... } catch (Exception e) { ... } }
首先获取LoadedApk对象,然后通过类加载器加载Service类,初始化Context,获取对应的Application,如果存在直接返回,如果该应用还没启动则直接创建该Application,然后通过Service的attach方法将对应的信息放置到Service中,这里面就包含ActivityThread,因此我们在Step9中可以通过这个来判断Service是不是被启动了,然后调用onCreate方法,创建完成后,将该服务以token为键,Service为值放入到缓存中,这样我们前面获取的时候就只从这里获取的,因此如果服务启动了换粗就会存在,否则不存在。下面我们分析onBind方法。
Step20.ActiveServices.requestServiceBindingsLocked 1 2 3 4 5 6 7 8 9 10 11 12 private final void requestServiceBindingsLocked (ServiceRecord r, boolean execInFg) throws TransactionTooLargeException { for (int i = r.bindings.size() - 1 ; i >= 0 ; i--) { IntentBindRecord ibr = r.bindings.valueAt(i); if (!requestServiceBindingLocked(r, ibr, execInFg, false )) { break ; } } }
for循环调用onBind。
Step21.ActiveServices.requestServiceBindingLocked 1 2 3 4 5 6 7 8 9 10 11 12 13 14 15 16 17 18 19 20 21 22 private final boolean requestServiceBindingLocked (ServiceRecord r, IntentBindRecord i, boolean execInFg, boolean rebind) throws TransactionTooLargeException { ... if ((!i.requested || rebind) && i.apps.size() > 0 ) { try { ... r.app.thread.scheduleBindService(r, i.intent.getIntent(), rebind, r.app.repProcState); if (!rebind) { i.requested = true ; } ... } } return true ; }
这里通过调用r.app.thread.scheduleBindService方法,最终调用到ActivityThread中的handleBindService方法。
Step23.ActivityThread.handleBindService 1 2 3 4 5 6 7 8 9 10 11 12 13 14 15 16 17 18 19 20 private void handleBindService (BindServiceData data) { Service s = mServices.get(data.token); if (s != null ) { try { ... if (!data.rebind) { IBinder binder = s.onBind(data.intent); ... } else { s.onRebind(data.intent); ... } ... } catch (Exception e) { ... } } }
现获取服务,然后判断是再次绑定还是首次绑定,如果是首次绑定调用Service.onBind方法,如果是再次绑定调用Service.onRebind方法。到这里服务的启动就完成了,其他一些操作就不分析了。下面我们先分析另外一个启动流程bindService,最后分析停止服务流程。
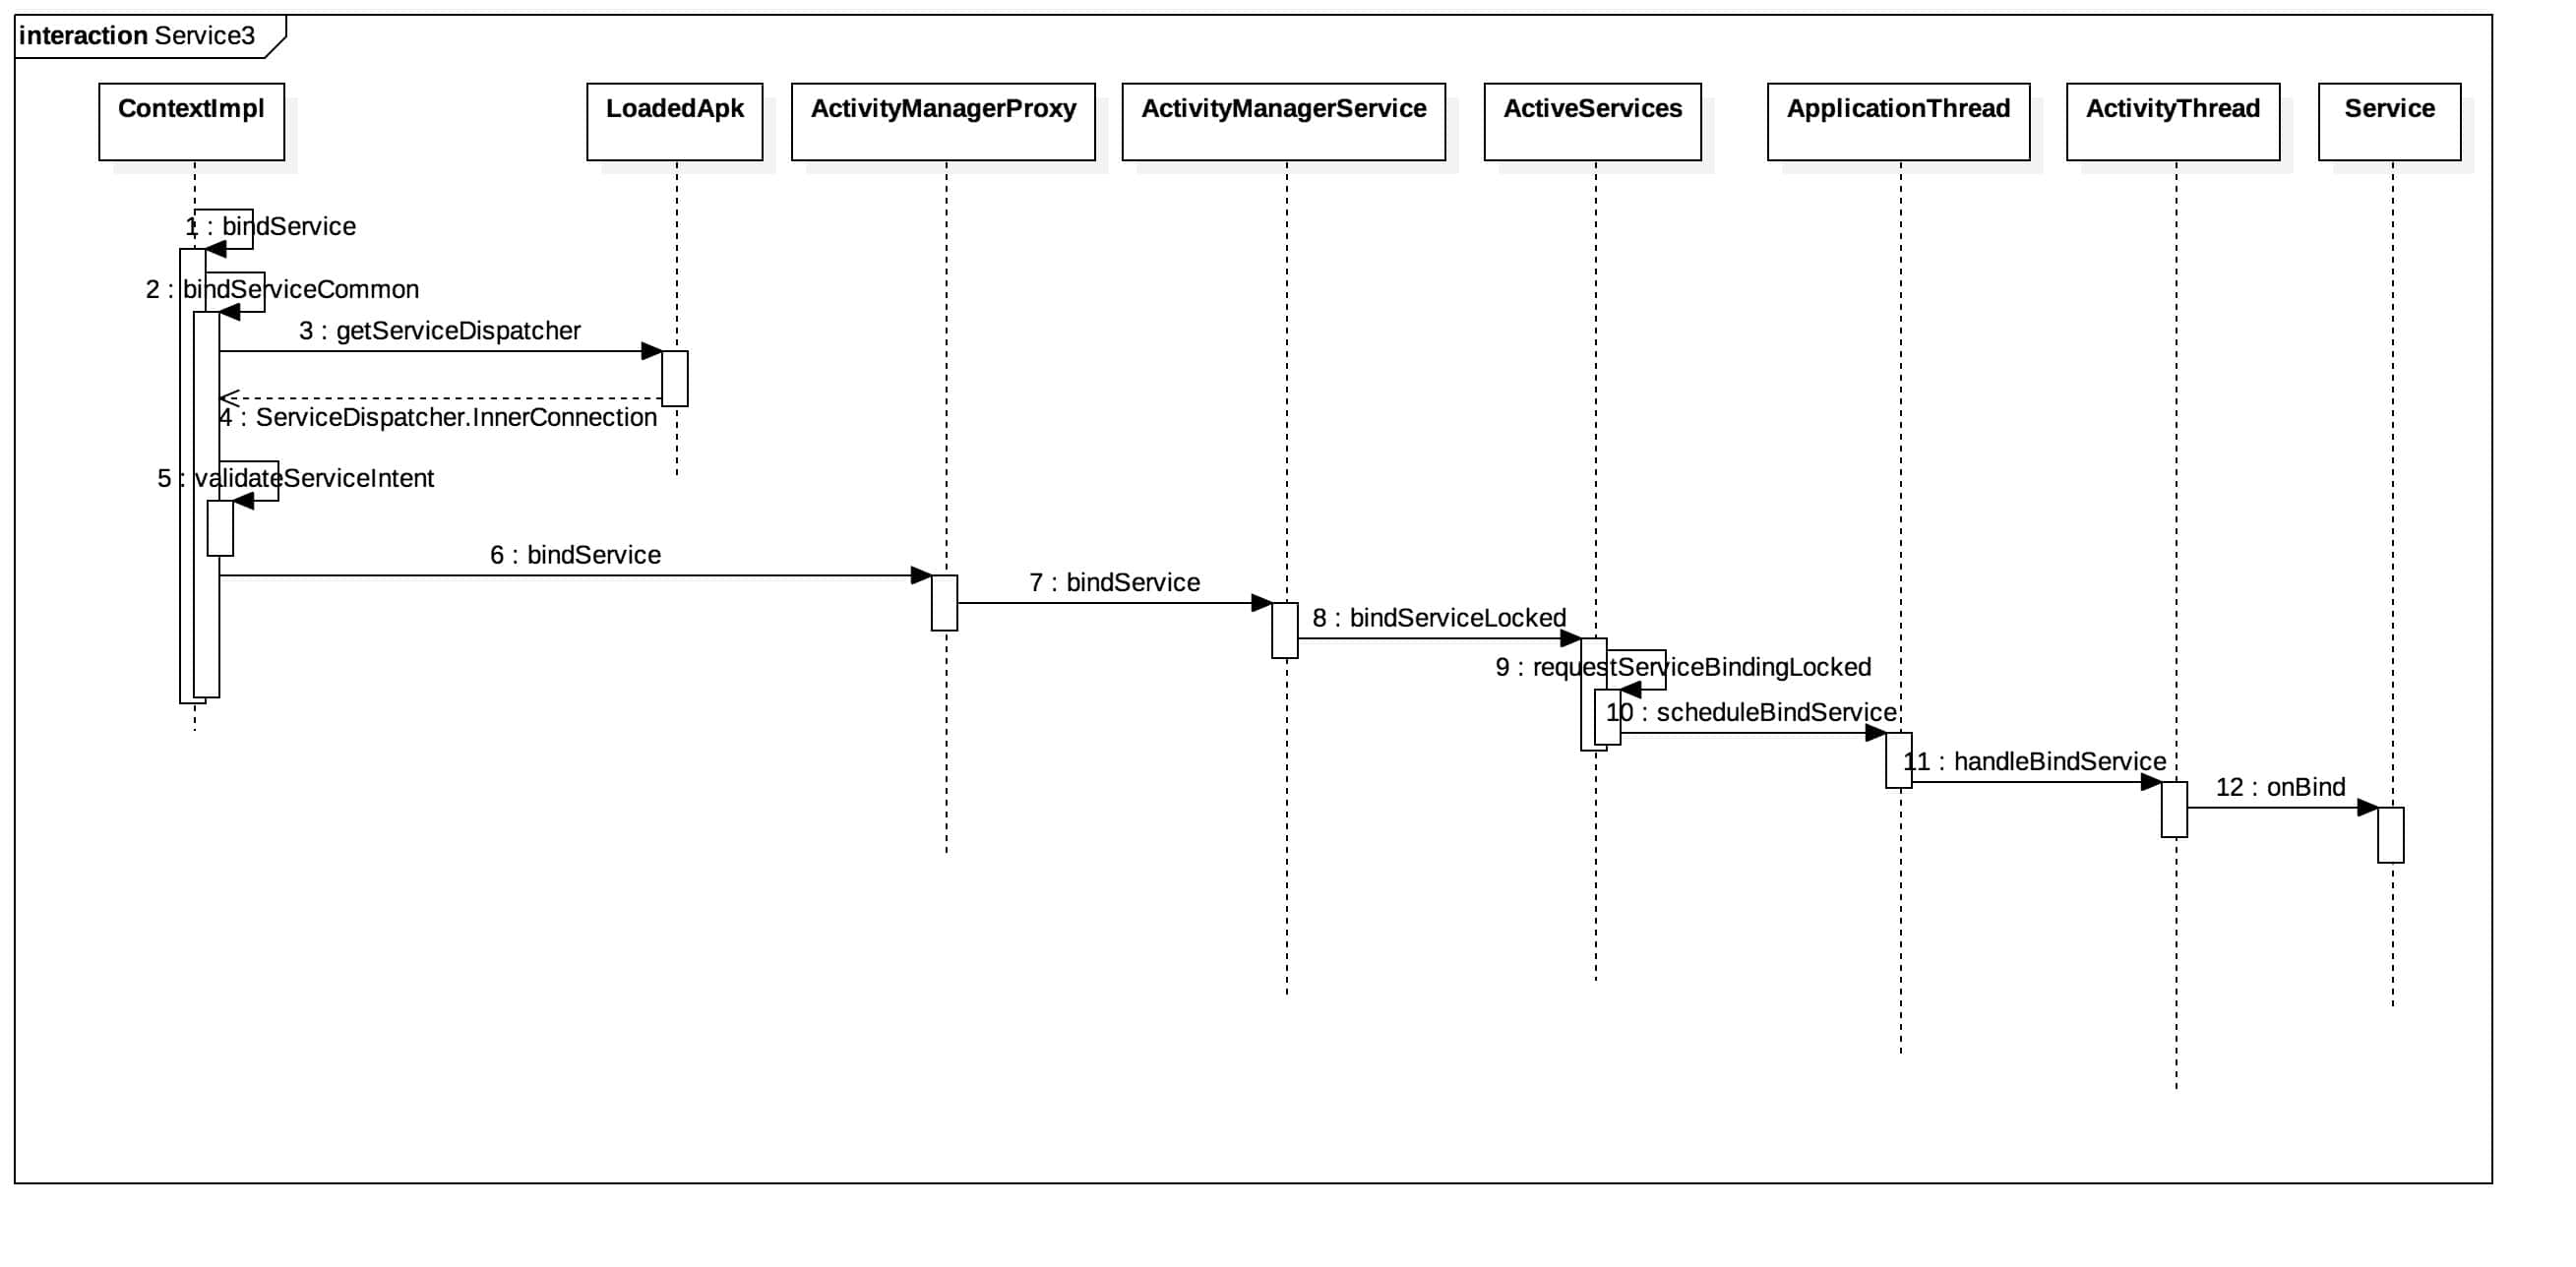
Service启动流程-bindService 首先来看绑定流程时序图:
Step1.ContextImpl.bindService 1 2 3 4 5 6 public boolean bindService (Intent service, ServiceConnection conn, int flags) { warnIfCallingFromSystemProcess(); return bindServiceCommon(service, conn, flags, mMainThread.getHandler(), Process.myUserHandle()); }
这里是绑定服务的入口位置,调用bindServiceCommon方法。
Step2.ContextImpl.bindServiceCommon 1 2 3 4 5 6 7 8 9 10 11 12 13 14 15 16 17 18 19 20 21 22 23 24 25 26 27 private boolean bindServiceCommon (Intent service, ServiceConnection conn, int flags, Handler handler, UserHandle user) { IServiceConnection sd; ... if (mPackageInfo != null ) { sd = mPackageInfo.getServiceDispatcher(conn, getOuterContext(), handler, flags); } else { ... } ... try { IBinder token = getActivityToken(); ... int res = ActivityManagerNative.getDefault().bindService( mMainThread.getApplicationThread(), getActivityToken(), service, service.resolveTypeIfNeeded(getContentResolver()), sd, flags, getOpPackageName(), user.getIdentifier()); ... return res != 0 ; } catch (RemoteException e) { throw e.rethrowFromSystemServer(); } }
首先调用LoadedApk中的getServiceDispatcher方法获取实现IServiceConnection接口的Binder对象ServiceDispatcher.InnerConnection。然后调用AMP中的bindService方法,然后通过Binder通信调用AMS中的bindService方法。
Step3.LoadedApk.getServiceDispatcher 1 2 3 4 5 6 7 8 9 10 11 12 13 14 15 16 17 18 19 20 21 22 23 24 25 26 27 public final IServiceConnection getServiceDispatcher (ServiceConnection c, Context context, Handler handler, int flags) { synchronized (mServices) { LoadedApk.ServiceDispatcher sd = null ; ArrayMap<ServiceConnection, LoadedApk.ServiceDispatcher> map = mServices.get(context); if (map != null ) { sd = map.get(c); } if (sd == null ) { sd = new ServiceDispatcher (c, context, handler, flags); if (map == null ) { map = new ArrayMap <ServiceConnection, LoadedApk.ServiceDispatcher>(); mServices.put(context, map); } map.put(c, sd); } else { sd.validate(context, handler); } return sd.getIServiceConnection(); } }
首先根据ServiceConnection取缓存中获取,如果没有要初始化一个ServiceDispatcher对象,然后获取ServiceDispatcher.InnerConnection对象并且返回。
Step6.AMP.bindService 1 2 3 4 5 6 7 8 9 public int bindService (IApplicationThread caller, IBinder token, Intent service, String resolvedType, IServiceConnection connection, int flags, String callingPackage, int userId) throws RemoteException { ... mRemote.transact(BIND_SERVICE_TRANSACTION, data, reply, 0 ); ... return res; }
这里通过Binder调用AMS中对应的方法。
Step7.AMS.bindService 1 2 3 4 5 6 7 8 9 10 public int bindService (IApplicationThread caller, IBinder token, Intent service, String resolvedType, IServiceConnection connection, int flags, String callingPackage, int userId) throws TransactionTooLargeException { ... synchronized (this ) { return mServices.bindServiceLocked(caller, token, service, resolvedType, connection, flags, callingPackage, userId); } }
这里调用ActiveServices.bindServiceLocked方法。
Step8.ActiveServices.bindServiceLocked 1 2 3 4 5 6 7 8 9 10 11 12 13 14 15 16 17 18 19 20 21 22 23 24 25 26 27 28 29 30 31 32 33 34 35 36 37 38 39 40 41 42 43 44 45 46 47 48 49 50 51 52 53 54 55 56 57 58 59 60 61 62 63 64 65 66 67 68 69 70 71 72 73 74 75 76 77 78 79 80 81 82 83 84 85 86 87 88 89 90 91 92 93 94 95 96 97 98 99 100 101 102 103 104 105 106 107 108 109 110 111 112 113 114 115 116 117 118 119 120 int bindServiceLocked (IApplicationThread caller, IBinder token, Intent service, String resolvedType, final IServiceConnection connection, int flags, String callingPackage, final int userId) throws TransactionTooLargeException { if (DEBUG_SERVICE) Slog.v(TAG_SERVICE, "bindService: " + service + " type=" + resolvedType + " conn=" + connection.asBinder() + " flags=0x" + Integer.toHexString(flags)); final ProcessRecord callerApp = mAm.getRecordForAppLocked(caller); ... ActivityRecord activity = null ; if (token != null ) { activity = ActivityRecord.isInStackLocked(token); if (activity == null ) { Slog.w(TAG, "Binding with unknown activity: " + token); return 0 ; } } ... final boolean callerFg = callerApp.setSchedGroup != ProcessList.SCHED_GROUP_BACKGROUND; final boolean isBindExternal = (flags & Context.BIND_EXTERNAL_SERVICE) != 0 ; ServiceLookupResult res = retrieveServiceLocked(service, resolvedType, callingPackage, Binder.getCallingPid(), Binder.getCallingUid(), userId, true , callerFg, isBindExternal); ... AppBindRecord b = s.retrieveAppBindingLocked(service, callerApp); ConnectionRecord c = new ConnectionRecord (b, activity, connection, flags, clientLabel, clientIntent); IBinder binder = connection.asBinder(); ArrayList<ConnectionRecord> clist = s.connections.get(binder); if (clist == null ) { clist = new ArrayList <ConnectionRecord>(); s.connections.put(binder, clist); } clist.add(c); b.connections.add(c); if (activity != null ) { if (activity.connections == null ) { activity.connections = new HashSet <ConnectionRecord>(); } activity.connections.add(c); } ... clist = mServiceConnections.get(binder); if (clist == null ) { clist = new ArrayList <ConnectionRecord>(); mServiceConnections.put(binder, clist); } clist.add(c); if ((flags & Context.BIND_AUTO_CREATE) != 0 ) { s.lastActivity = SystemClock.uptimeMillis(); if (bringUpServiceLocked(s, service.getFlags(), callerFg, false , permissionsReviewRequired) != null ) { return 0 ; } } ... if (s.app != null && b.intent.received) { try { c.conn.connected(s.name, b.intent.binder); } catch (Exception e) { Slog.w(TAG, "Failure sending service " + s.shortName + " to connection " + c.conn.asBinder() + " (in " + c.binding.client.processName + ")" , e); } if (b.intent.apps.size() == 1 && b.intent.doRebind) { requestServiceBindingLocked(s, b.intent, callerFg, true ); } } else if (!b.intent.requested) { requestServiceBindingLocked(s, b.intent, callerFg, false ); } getServiceMap(s.userId).ensureNotStartingBackground(s); } finally { Binder.restoreCallingIdentity(origId); } return 1 ; }
这里代码比较多,所以写的注释也比较多,前面主要是判断是否绑定过该服务,并对InnerConnection进行缓存,放置到各个列表中,让Activity,Service进行联系。最后调用requestServiceBindingLocked方法,这个方法调用两次,一次是首次绑定,一个是重新绑定。
Step9.AMS.requestServiceBindingLocked 1 2 3 4 5 6 7 8 9 10 11 12 13 14 15 16 17 18 19 20 21 22 23 24 private final boolean requestServiceBindingLocked (ServiceRecord r, IntentBindRecord i, boolean execInFg, boolean rebind) throws TransactionTooLargeException { ... if ((!i.requested || rebind) && i.apps.size() > 0 ) { try { bumpServiceExecutingLocked(r, execInFg, "bind" ); r.app.forceProcessStateUpTo(ActivityManager.PROCESS_STATE_SERVICE); r.app.thread.scheduleBindService(r, i.intent.getIntent(), rebind, r.app.repProcState); if (!rebind) { i.requested = true ; } i.hasBound = true ; i.doRebind = false ; ... } return true ; }
这里是判断首次绑定还是重新绑定,这两种绑定都会执行绑定步骤,这里有个参数i.requested,代表是否是首次绑定,如果默认值是false,如果不是重新绑定,那么执行完绑定就会设置为true。然后调用thread.scheduleBindServic方法,这个方法讲了很多次了,最终调用ApplicationThread.scheduleBindService方法,然后通过handler调用ActivityThread.handleBindService方法。
Step10.ActivityThread.handleBindService 1 2 3 4 5 6 7 8 9 10 11 12 13 14 15 16 private void handleBindService (BindServiceData data) { Service s = mServices.get(data.token); ... if (!data.rebind) { IBinder binder = s.onBind(data.intent); ActivityManagerNative.getDefault().publishService( data.token, data.intent, binder); } else { s.onRebind(data.intent); ActivityManagerNative.getDefault().serviceDoneExecuting( data.token, SERVICE_DONE_EXECUTING_ANON, 0 , 0 ); } }
这里如果是首次绑定调用onBind方法,否则调用onRebind方法,在首次调用绑定后还有publishService方法,自己看一下,不在详细分析了。这样绑定流程就分析完了,难度不大。下面我们开分析解绑过程。
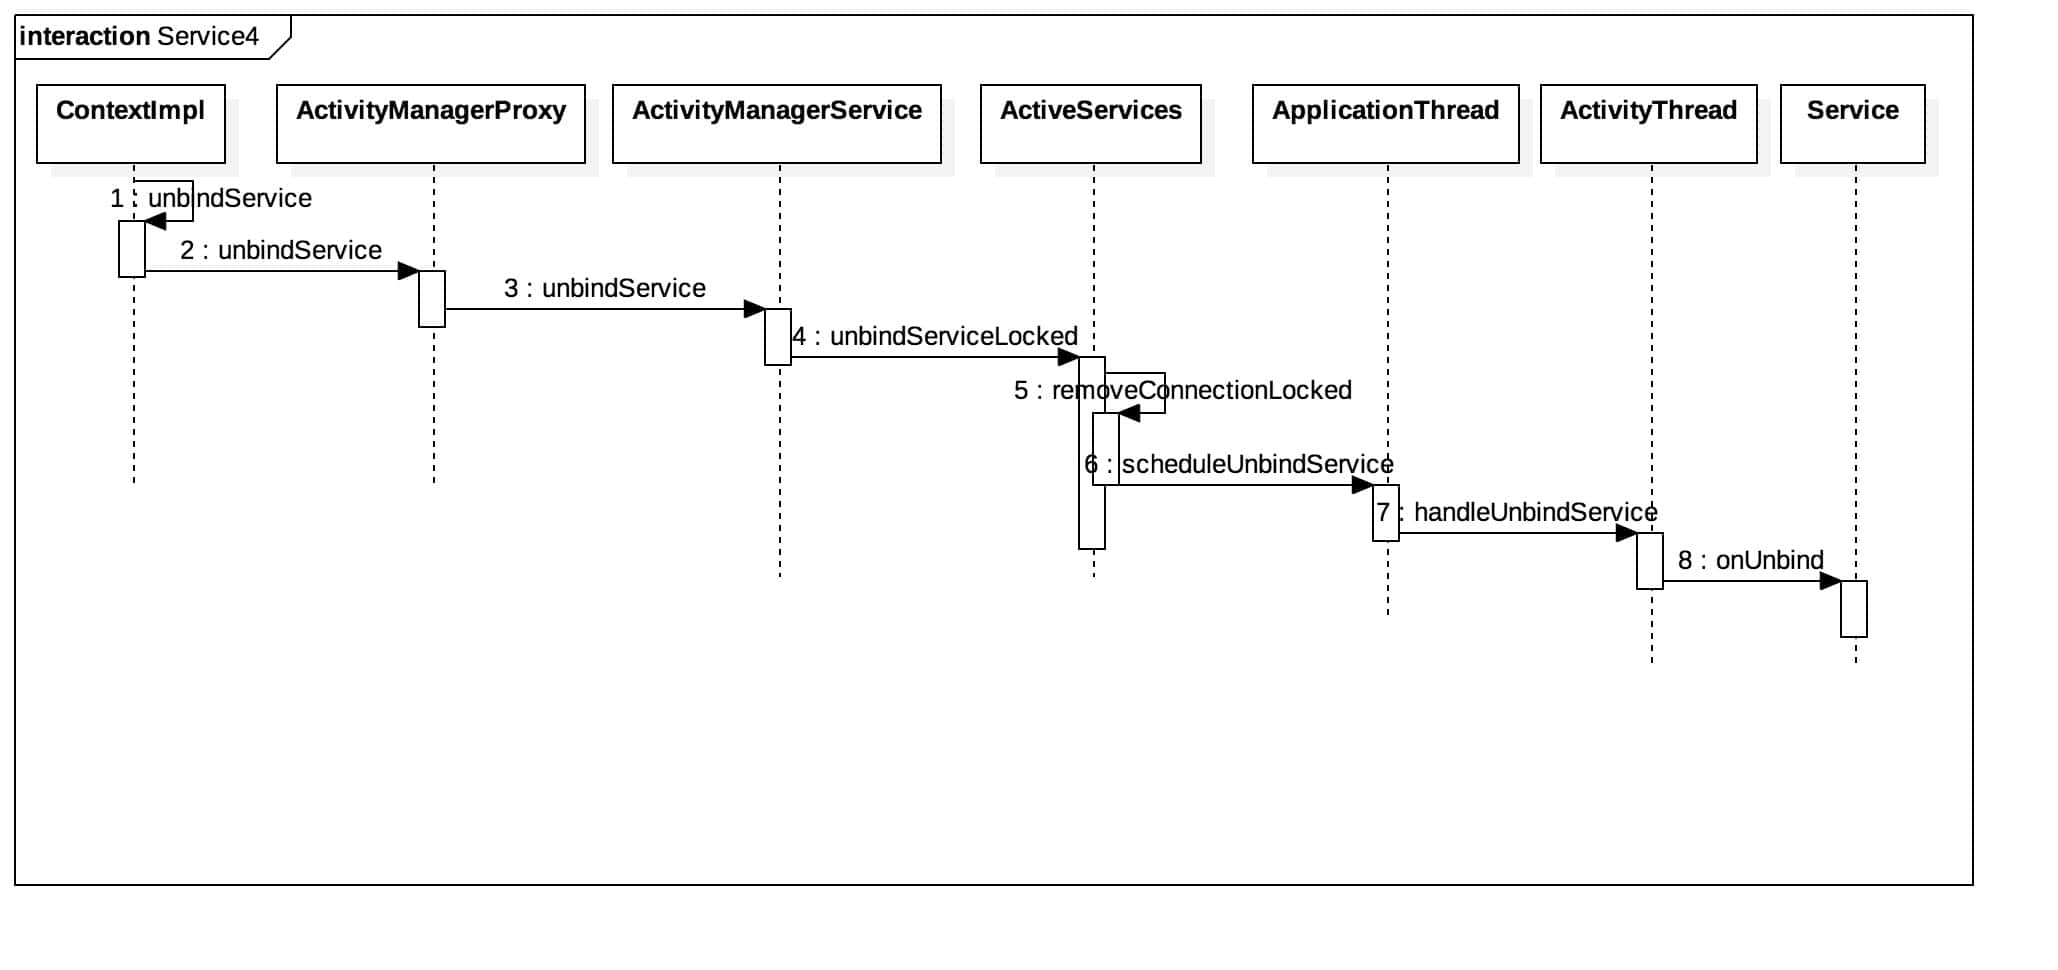
Service解绑流程-unbindService 首先来看解绑流程时序图:
Step1.ContextImpl.unbindService 1 2 3 4 5 6 7 8 9 10 11 12 13 14 15 16 public void unbindService (ServiceConnection conn) { ... if (mPackageInfo != null ) { IServiceConnection sd = mPackageInfo.forgetServiceDispatcher( getOuterContext(), conn); try { ActivityManagerNative.getDefault().unbindService(sd); } catch (RemoteException e) { throw e.rethrowFromSystemServer(); } } else { throw new RuntimeException ("Not supported in system context" ); } }
IServiceConnection对象的获取我们前面分析过了,这里直接过,然后调用AMP.unbindService方法,最终调用AMS.unbindService方法。
Step3.AMS.unbindService 1 2 3 4 5 public boolean unbindService (IServiceConnection connection) { synchronized (this ) { return mServices.unbindServiceLocked(connection); } }
这里调用ActiveServices.unbindServiceLocked方法。
Step4.ActiveServices.unbindServiceLocked 1 2 3 4 5 6 7 8 9 10 11 12 13 14 15 16 17 18 19 20 21 22 23 boolean unbindServiceLocked (IServiceConnection connection) { IBinder binder = connection.asBinder(); ArrayList<ConnectionRecord> clist = mServiceConnections.get(binder); ... try { while (clist.size() > 0 ) { ConnectionRecord r = clist.get(0 ); removeConnectionLocked(r, null , null ); if (clist.size() > 0 && clist.get(0 ) == r) { Slog.wtf(TAG, "Connection " + r + " not removed for binder " + binder); clist.remove(0 ); } .... } } finally { Binder.restoreCallingIdentity(origId); } return true ; }
首先从AMS中获取绑定过的列表,如果存在说明绑定过,然后调用removeConnectionLocked移除连接。
Step5.ActiveServices.removeConnectionLocked 1 2 3 4 5 6 7 8 9 10 11 12 13 14 15 16 17 18 19 20 21 22 23 24 25 26 27 28 29 30 31 32 33 34 35 36 37 38 39 40 41 42 43 44 45 46 47 48 49 50 51 void removeConnectionLocked ( ConnectionRecord c, ProcessRecord skipApp, ActivityRecord skipAct) { IBinder binder = c.conn.asBinder(); AppBindRecord b = c.binding; ServiceRecord s = b.service; ArrayList<ConnectionRecord> clist = s.connections.get(binder); if (clist != null ) { clist.remove(c); if (clist.size() == 0 ) { s.connections.remove(binder); } } b.connections.remove(c); ... clist = mServiceConnections.get(binder); if (clist != null ) { clist.remove(c); if (clist.size() == 0 ) { mServiceConnections.remove(binder); } } mAm.stopAssociationLocked(b.client.uid, b.client.processName, s.appInfo.uid, s.name); if (b.connections.size() == 0 ) { b.intent.apps.remove(b.client); } if (!c.serviceDead) { if (s.app != null && s.app.thread != null && b.intent.apps.size() == 0 && b.intent.hasBound) { try { ... b.intent.doRebind = false ; s.app.thread.scheduleUnbindService(s, b.intent.intent.getIntent()); } catch (Exception e) { Slog.w(TAG, "Exception when unbinding service " + s.shortName, e); serviceProcessGoneLocked(s); } } ... } }
在绑定服务的时候进行各种缓存,加入各种列表,那么在接触绑定的时候就有从之前加入的列表中删除,然后执行接触绑定。
Step7.ActivityThread.handleUnbindService 1 2 3 4 5 6 7 8 9 10 11 12 private void handleUnbindService (BindServiceData data) { Service s = mServices.get(data.token); if (s != null ) { try { ... boolean doRebind = s.onUnbind(data.intent); ... } catch (Exception e) { ... } } }
调用Service的onUnbind接触绑定。到这里接触绑定就分析完了,过程比较简单,只是上面的各种列表搞清楚要多看看。最后就剩下了stopService,我们一口气就将它分析完。
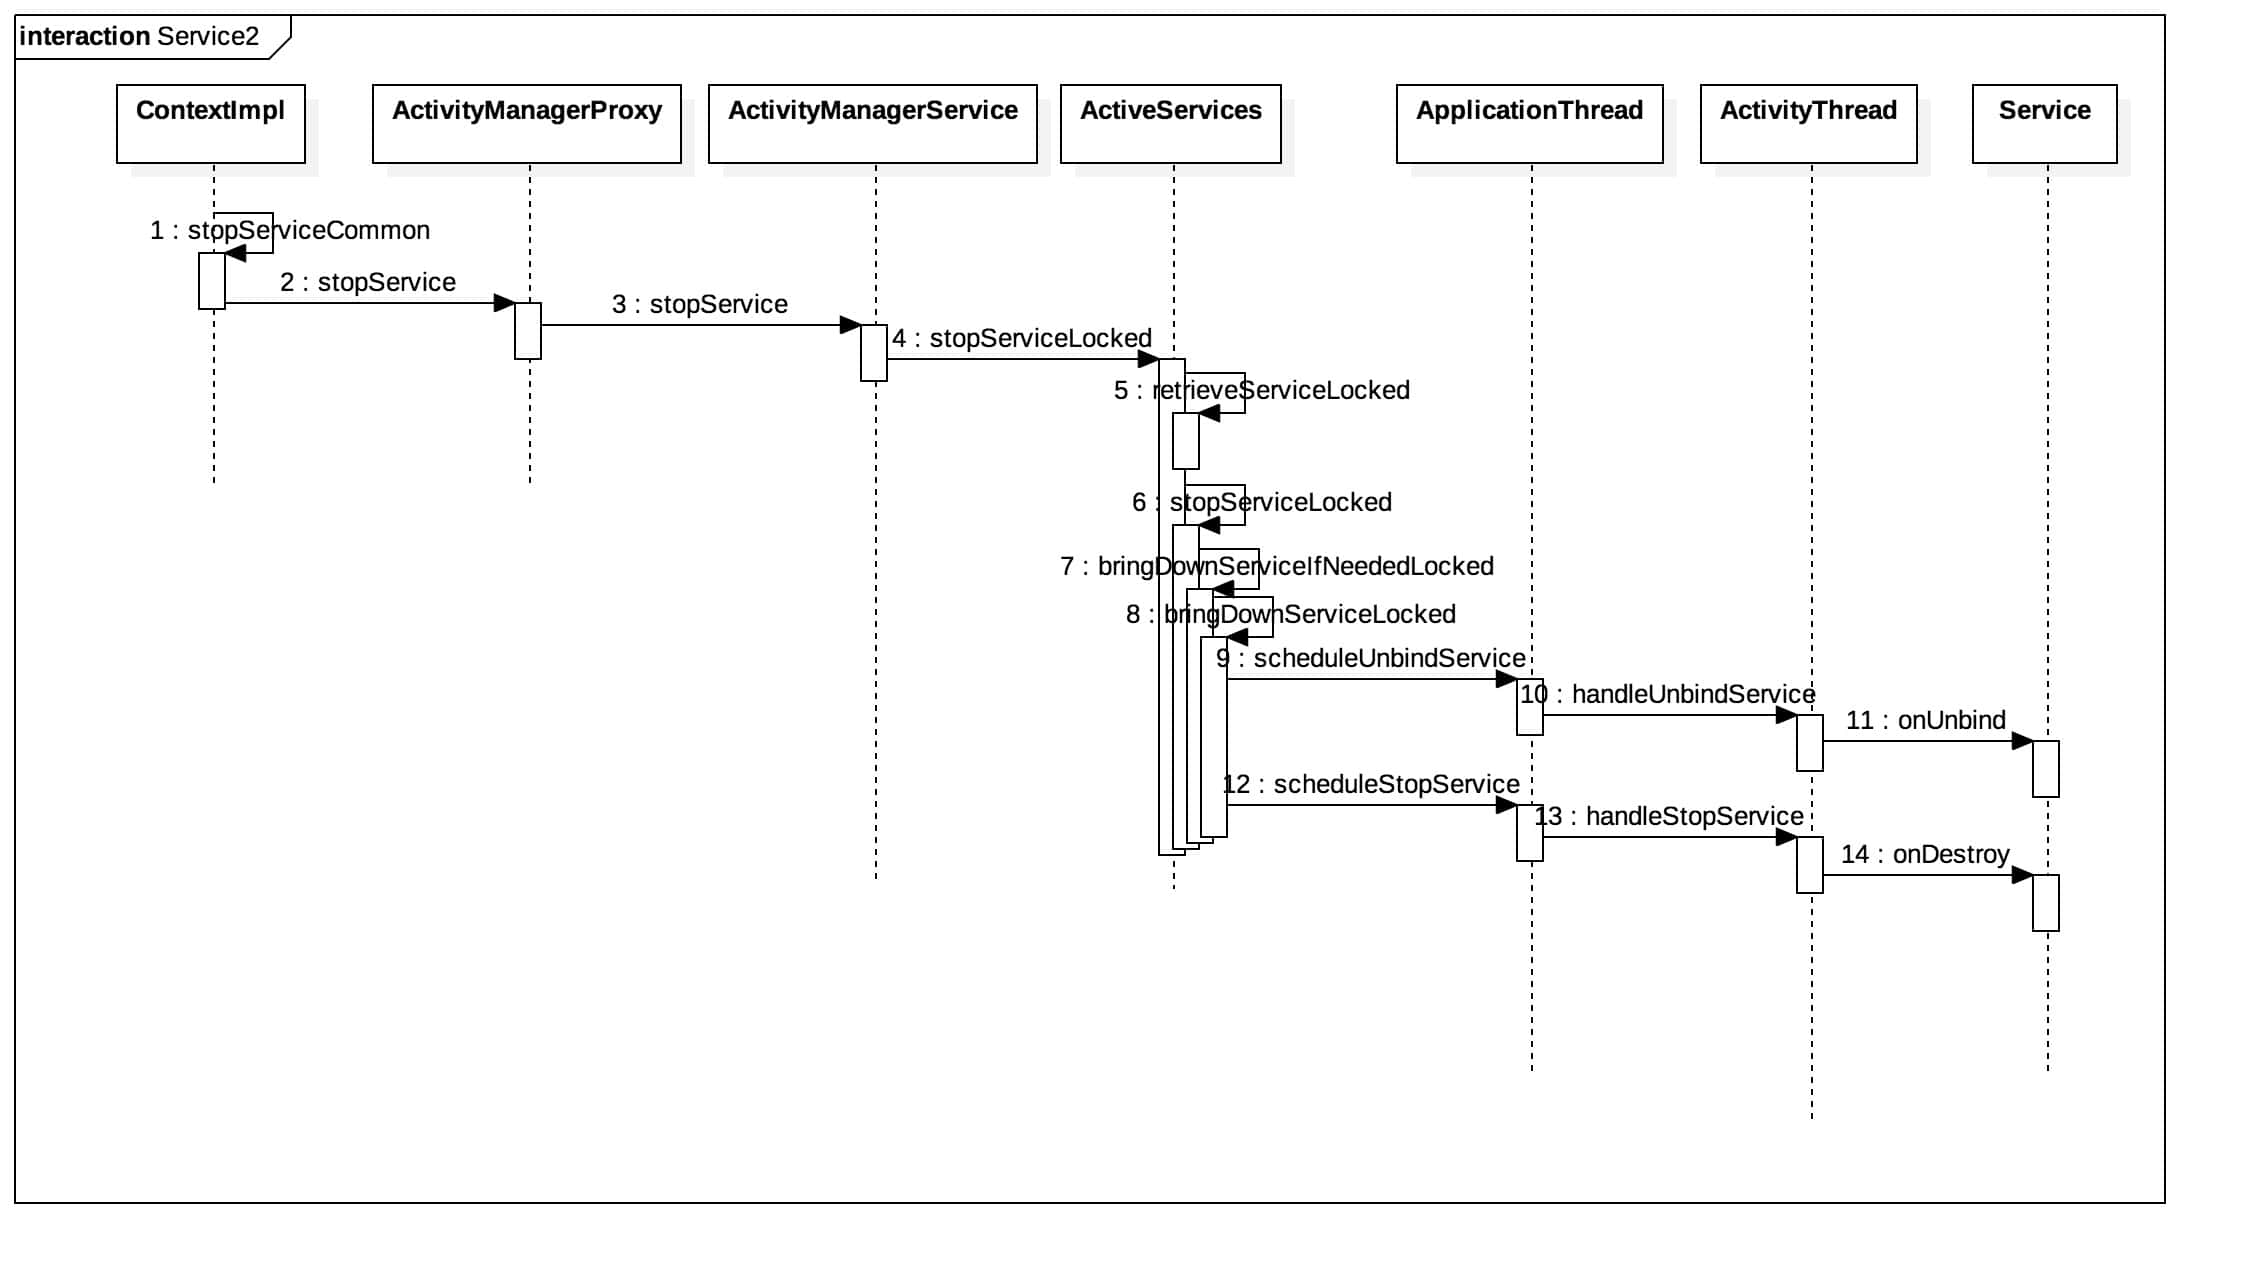
Service停止流程-stopService 首先来看停止服务流程时序图:
Step1.ContextImpl.stopSevice 1 2 3 4 5 6 @Override public boolean stopService (Intent service) { warnIfCallingFromSystemProcess(); return stopServiceCommon(service, mUser); }
调用stopServiceCommon停止服务。
Step2.ContextImpl.stopServiceCommon 1 2 3 4 5 6 7 8 9 10 11 12 13 14 private boolean stopServiceCommon (Intent service, UserHandle user) { try { validateServiceIntent(service); service.prepareToLeaveProcess(this ); int res = ActivityManagerNative.getDefault().stopService( mMainThread.getApplicationThread(), service, service.resolveTypeIfNeeded(getContentResolver()), user.getIdentifier()); ... return res != 0 ; } catch (RemoteException e) { throw e.rethrowFromSystemServer(); } }
这里最终调用AMS的stopService方法。
Step3.AMS.stopService 1 2 3 4 5 6 7 8 public int stopService (IApplicationThread caller, Intent service, String resolvedType, int userId) { ... synchronized (this ) { return mServices.stopServiceLocked(caller, service, resolvedType, userId); } }
这里就是简单的调用ActiveServices.stopServiceLocked方法。
Step4.ActiveServices.stopServiceLocked 1 2 3 4 5 6 7 8 9 10 11 12 13 14 15 int stopServiceLocked (IApplicationThread caller, Intent service, String resolvedType, int userId) { final ProcessRecord callerApp = mAm.getRecordForAppLocked(caller); ... if (r != null ) { ... stopServiceLocked(r.record); ... return -1 ; } return 0 ; }
简单的调用了stopServiceLocked方法。
Step6.ActiveServices.stopServiceLocked 1 2 3 4 private void stopServiceLocked (ServiceRecord service) { ... bringDownServiceIfNeededLocked(service, false , false ); }
我们前面分析过bringUp的是启动服务,因此对应的bringDown的是结束服务。
Step7.ActiveServices.bringDownServiceIfNeededLocked 1 2 3 4 5 6 7 private final void bringDownServiceIfNeededLocked (ServiceRecord r, boolean knowConn, boolean hasConn) { ... bringDownServiceLocked(r); }
这里只是简单的调用了bringDownServiceLocked方法,这个方法我们在服务启动时也遇到过,只是没有分析,我们放到了停止服务的流程中来分析,下面我们看看详细代码。
Step8.ActiveServices.bringDownServiceLocked 1 2 3 4 5 6 7 8 9 10 11 12 13 14 15 16 17 18 19 20 21 22 23 24 25 26 27 28 29 30 31 32 33 34 35 36 37 38 39 40 41 42 43 private final void bringDownServiceLocked (ServiceRecord r) { for (int conni = r.connections.size() - 1 ; conni >= 0 ; conni--) { ArrayList<ConnectionRecord> c = r.connections.valueAt(conni); for (int i = 0 ; i < c.size(); i++) { ... cr.conn.connected(r.name, null ); ... } } if (r.app != null && r.app.thread != null ) { for (int i = r.bindings.size() - 1 ; i >= 0 ; i--) { IntentBindRecord ibr = r.bindings.valueAt(i); if (ibr.hasBound) { try { ... r.app.thread.scheduleUnbindService(r, ibr.intent.getIntent()); } catch (Exception e) { ... } } } } ... if (r.app != null ) { ... if (r.app.thread != null ) { updateServiceForegroundLocked(r.app, false ); try { ... r.app.thread.scheduleStopService(r); } catch (Exception e) { ... ... }
这里主要有三步,第一步,断开服务连接,这个方法我们前面提到过,可以根据前面提到的去看看如何断开连接的;第二步,如果已经绑定了服务要解除绑定,这个在上面解除绑定的时候分析了该过程,因此这里就不再重复了;第三步,如果服务存在,则停止服务。我们开始分析第三步,第三步这里最终调用ActivityThread的handleStopService方法。
Step13.ActivityThread.handleStopService 1 2 3 4 5 6 private void handleStopService (IBinder token) { Service s = mServices.remove(token); ... s.onDestroy(); ... }
这里如果服务存在则调用服务的onDestroy方法,到这里服务的停止也就结束了。从上面看服务的整个流程相对于Activity简单的多。很容易就看懂了。其实还有一个IntentService,整个服务继承Service,只不过里面多了一个Handler,我们看看这段代码:
1 2 3 4 5 6 7 8 9 10 11 private final class ServiceHandler extends Handler { public ServiceHandler (Looper looper) { super (looper); } @Override public void handleMessage (Message msg) { onHandleIntent((Intent)msg.obj); stopSelf(msg.arg1); } }
如果有Handler就有发送消息的地方,那么发送消息在哪里呢,我们知道当你调用服务的时候会走onStartCommand方法:
1 2 3 4 public int onStartCommand (@Nullable Intent intent, int flags, int startId) { onStart(intent, startId); return mRedelivery ? START_REDELIVER_INTENT : START_NOT_STICKY; }
这里会调用onStart方法:
1 2 3 4 5 6 public void onStart (@Nullable Intent intent, int startId) { Message msg = mServiceHandler.obtainMessage(); msg.arg1 = startId; msg.obj = intent; mServiceHandler.sendMessage(msg); }
这里就是发送消息的时候,消息发出后会由上面的ServiceHandler来处理,我们看到构造函数里传入了一个Looper,这个是在onCreate方法中初始化的:
1 2 3 4 5 6 7 8 9 10 11 12 public void onCreate () { super .onCreate(); HandlerThread thread = new HandlerThread ("IntentService[" + mName + "]" ); thread.start(); mServiceLooper = thread.getLooper(); mServiceHandler = new ServiceHandler (mServiceLooper); }
这里创建了一个Handler线程,并且获取了它的Looper,用来循环处理消息,因此我们知道同时只能处理一个消息,等前一个消息处理完了才会处理第二个,以此类推,因此需要同时处理的不能用这个Service,另外在ServiceHandler中有个stopSelf用来在消息处理完成后停止自己,因此该服务可以说是用完自动停止,不会一直存在,占用资源。
代码地址: 直接拉取导入开发工具(Intellij idea或者Android studio)
Android_Framework_Source
注 Android开发群:192508518
微信公众账号:Code-MX
注:本文原创,转载请注明出处,多谢。