距离上一篇博客进程的加载过了很久的时间,这中间换了一份工作,加入了新的团队,也开始了新的项目,比较忙,所以最近才有时间将四大组件之一的广播原理看完,最近一段时间会相继把四大组件分析写完,让我们对四大组件有更深的了解。本来想一篇把广播的内容写完,但是发现要解释的代码比较多,所以还是分开来讲,那么这篇先分析广播的注册和注销,下一篇再分析广播的发送。
Broadcast的注册
Step-1:注册广播入口ContextImpl.registerReceiver: 1 2 3 4 @Override public Intent registerReceiver (BroadcastReceiver receiver, IntentFilter filter) { return registerReceiver(receiver, filter, null , null ); }
然后调用registerReceiver复写方法:
1 2 3 4 5 6 @Override public Intent registerReceiver (BroadcastReceiver receiver, IntentFilter filter, String broadcastPermission, Handler scheduler) { return registerReceiverInternal(receiver, getUserId(), filter, broadcastPermission, scheduler, getOuterContext()); }
Step-2:调用registerReceiverInternal方法: 1 2 3 4 5 6 7 8 9 10 11 12 13 14 15 16 17 18 19 20 21 22 23 24 25 26 27 28 29 30 31 32 33 34 35 36 37 private Intent registerReceiverInternal (BroadcastReceiver receiver, int userId, IntentFilter filter, String broadcastPermission, Handler scheduler, Context context) { IIntentReceiver rd = null ; if (receiver != null ) { if (mPackageInfo != null && context != null ) { if (scheduler == null ) { scheduler = mMainThread.getHandler(); } rd = mPackageInfo.getReceiverDispatcher( receiver, context, scheduler, mMainThread.getInstrumentation(), true ); } else { if (scheduler == null ) { scheduler = mMainThread.getHandler(); } rd = new LoadedApk .ReceiverDispatcher( receiver, context, scheduler, null , true ).getIIntentReceiver(); } } try { final Intent intent = ActivityManagerNative.getDefault().registerReceiver( mMainThread.getApplicationThread(), mBasePackageName, rd, filter, broadcastPermission, userId); ... return intent; } catch (RemoteException e) { ... } }
mPackageInfo是LoadedApk类型对象,这个对象是在一个应用启动的时候创建的。
Step-3:LoadedApk.getReceiverDispatcher方法: 1 2 3 4 5 6 7 8 9 10 11 12 13 14 15 16 17 18 19 20 21 22 23 24 25 26 27 28 29 30 31 32 33 34 35 36 37 38 39 public IIntentReceiver getReceiverDispatcher (BroadcastReceiver r, Context context, Handler handler, Instrumentation instrumentation, boolean registered) { synchronized (mReceivers) { LoadedApk.ReceiverDispatcher rd = null ; ArrayMap<BroadcastReceiver, LoadedApk.ReceiverDispatcher> map = null ; if (registered) { map = mReceivers.get(context); if (map != null ) { rd = map.get(r); } } if (rd == null ) { rd = new ReceiverDispatcher (r, context, handler, instrumentation, registered); if (registered) { if (map == null ) { map = new ArrayMap <BroadcastReceiver, LoadedApk.ReceiverDispatcher>(); mReceivers.put(context, map); } map.put(r, rd); } } else { rd.validate(context, handler); } rd.mForgotten = false ; return rd.getIIntentReceiver(); } }
这里主要是将广播接收者receiver封装成一个实现了IIntentReceiver接口的Binder对象rd,然后将其放置到LoadedApk对象中的mReceivers中保存起来。
再回到上面代码中,将生成的实现了IIntentReceiver接口的Binder对象rd通过mRemote.transact方法传递到ActivityManagerService中的registerReceiver方法,因为四大组件的消息传递都是通过这种方式实现的。
Step-7:ActivityManagerProxy.registerReceiver 1 2 3 4 5 6 7 8 9 10 public Intent registerReceiver (IApplicationThread caller, String packageName, IIntentReceiver receiver, IntentFilter filter, String perm, int userId) throws RemoteException { ... mRemote.transact(REGISTER_RECEIVER_TRANSACTION, data, reply, 0 ); ... return intent; }
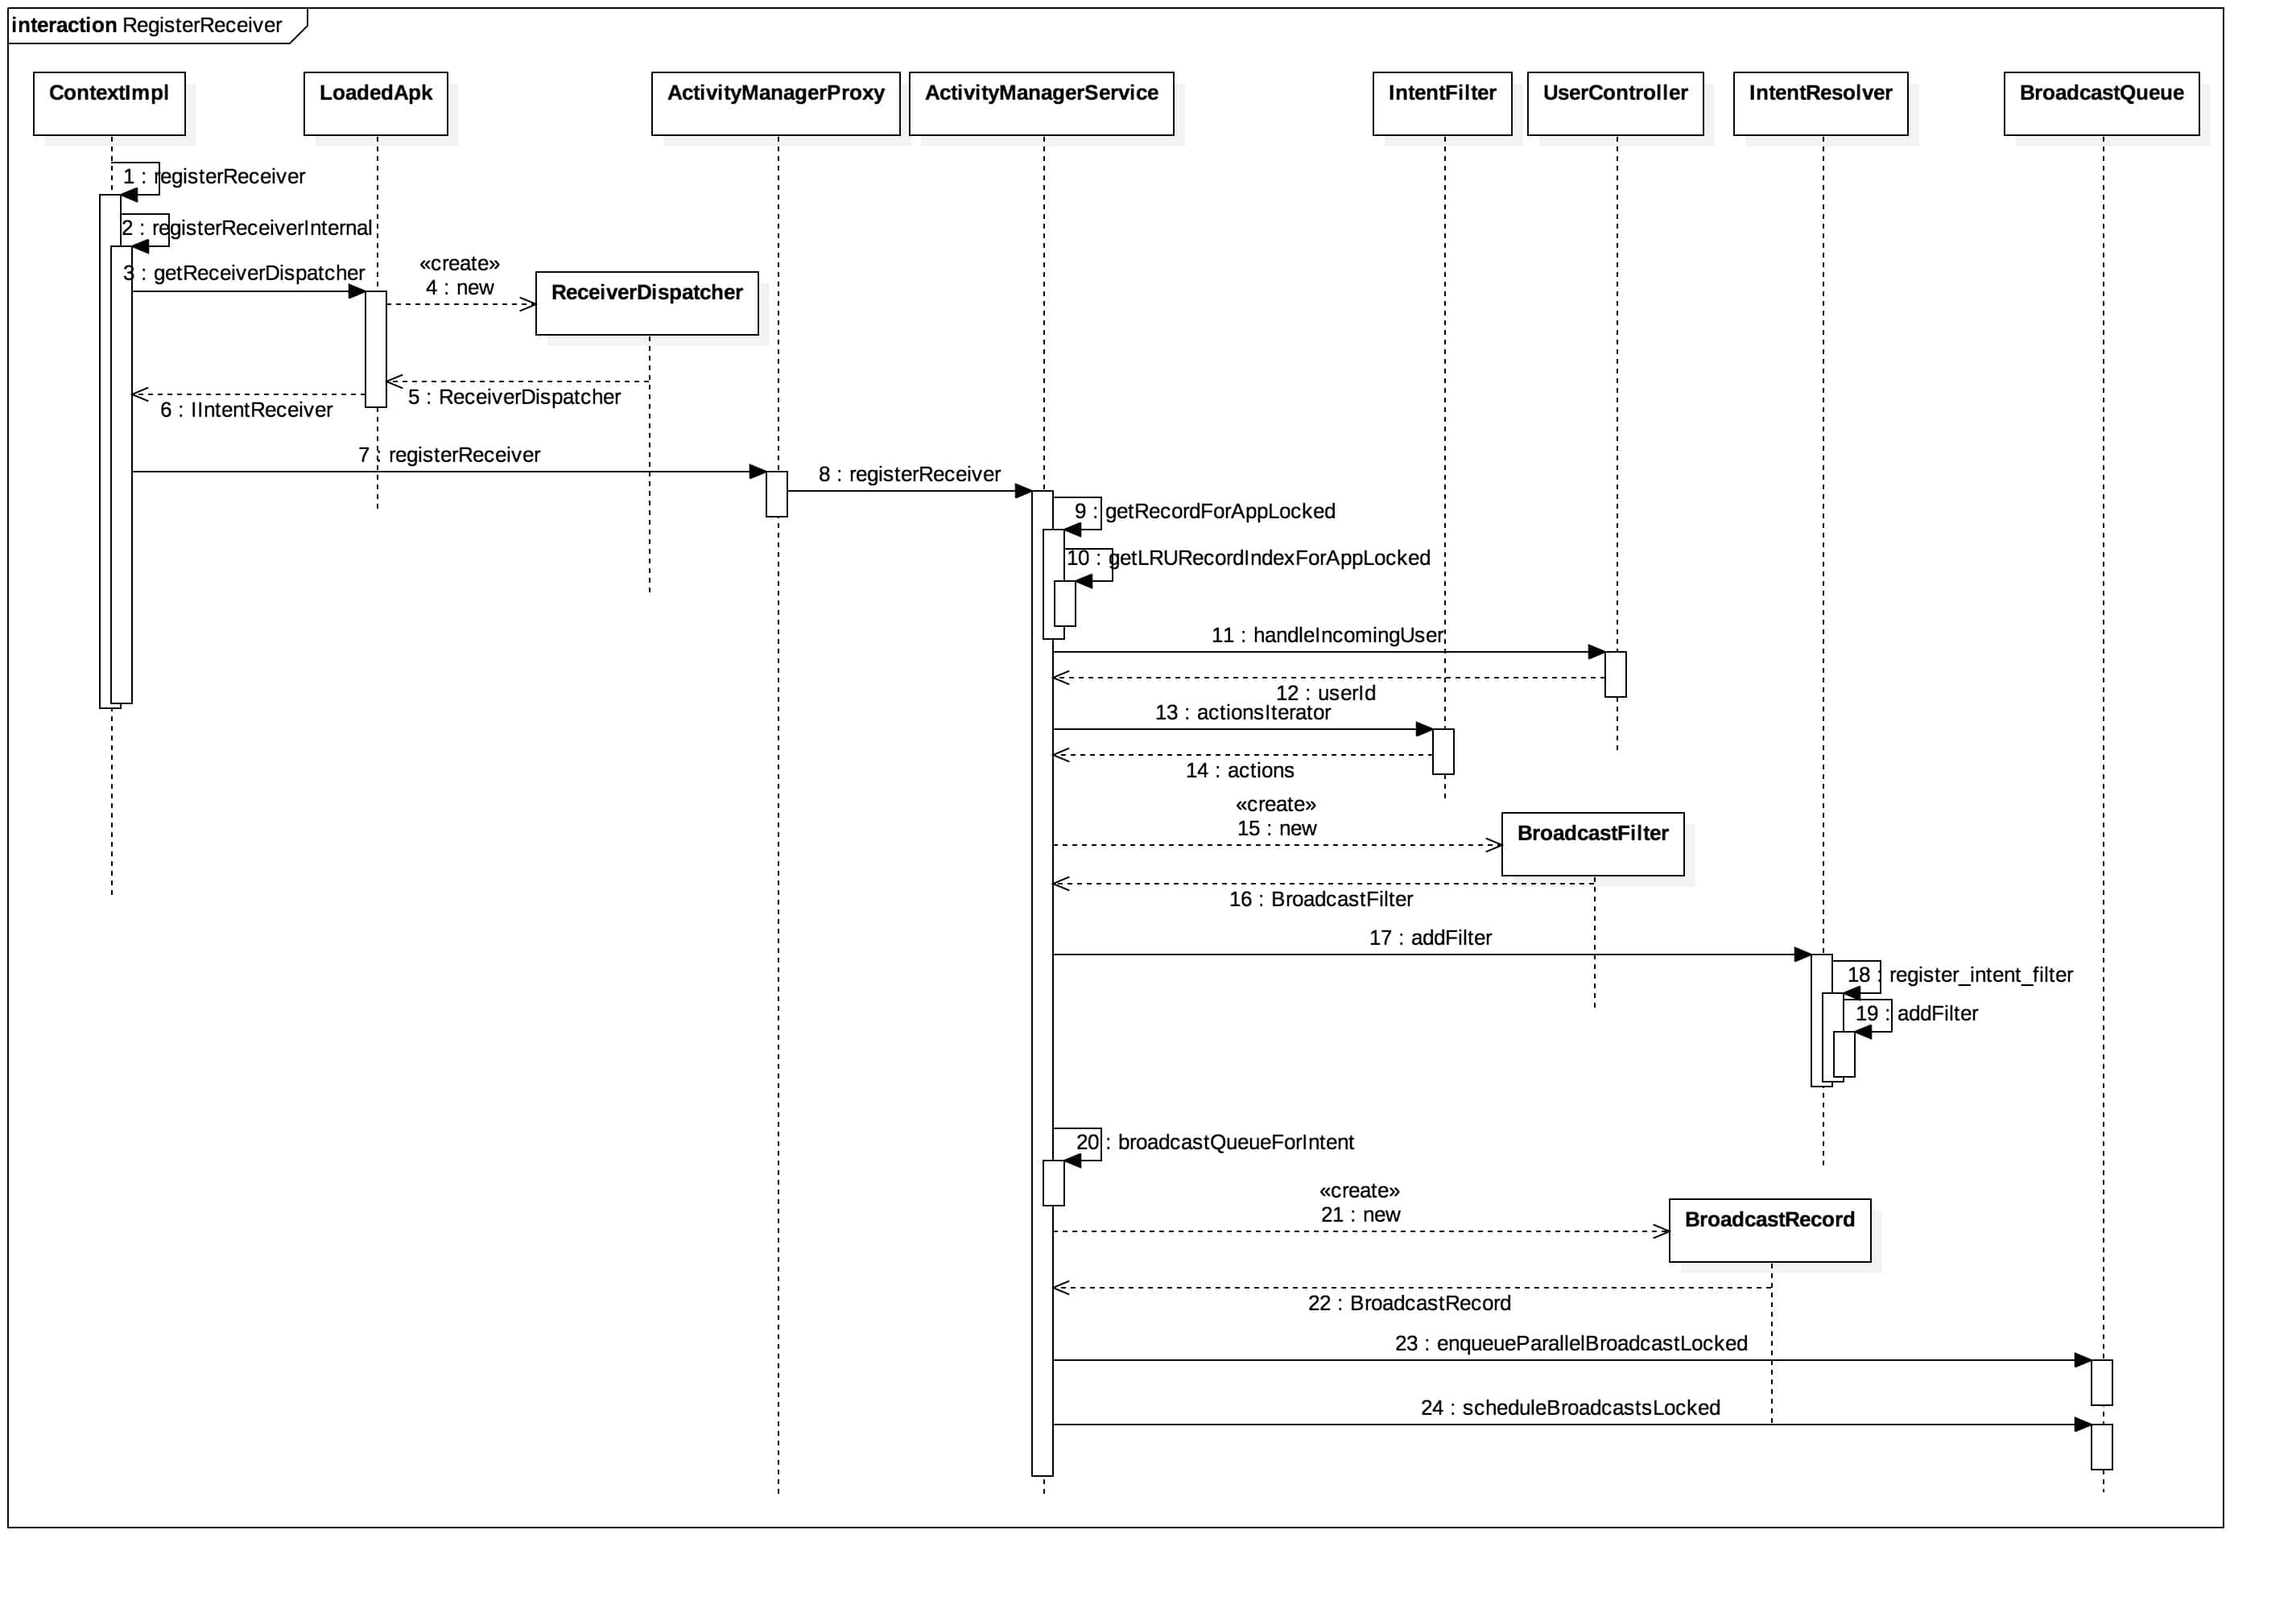
Step-8:ActivityManagerService.registerReceiver 通过上面的mRemote.transact方法传递到ActivityManagerService中对应的方法:
1 2 3 4 5 6 7 8 9 10 11 12 13 14 15 16 17 18 19 20 21 22 23 24 25 26 27 28 29 30 31 32 33 34 35 36 37 38 39 40 41 42 43 44 45 46 47 48 49 50 51 52 53 54 55 56 57 58 59 60 61 62 63 64 65 66 67 68 69 70 71 72 73 74 75 76 77 78 79 80 81 82 83 84 85 86 87 88 89 90 91 92 93 94 95 96 97 98 99 100 101 102 103 104 105 106 107 108 109 110 111 112 113 114 115 116 117 118 119 120 121 122 123 124 125 126 127 128 129 130 131 132 133 134 135 136 137 138 139 140 141 142 143 144 145 146 147 148 149 150 151 152 153 154 155 156 157 158 159 160 161 public Intent registerReceiver (IApplicationThread caller, String callerPackage, IIntentReceiver receiver, IntentFilter filter, String permission, int userId) { ... ArrayList<Intent> stickyIntents = null ; ProcessRecord callerApp = null ; int callingUid; int callingPid; synchronized (this ) { if (caller != null ) { callerApp = getRecordForAppLocked(caller); if (callerApp == null ) { ... } ... } else { ... } userId = mUserController.handleIncomingUser(callingPid, callingUid, userId, true , ALLOW_FULL_ONLY, "registerReceiver" , callerPackage); Iterator<String> actions = filter.actionsIterator(); if (actions == null ) { ArrayList<String> noAction = new ArrayList <String>(1 ); noAction.add(null ); actions = noAction.iterator(); } int [] userIds = {UserHandle.USER_ALL, UserHandle.getUserId(callingUid)}; while (actions.hasNext()) { String action = actions.next(); for (int id : userIds) { ArrayMap<String, ArrayList<Intent>> stickies = mStickyBroadcasts.get(id); if (stickies != null ) { ArrayList<Intent> intents = stickies.get(action); if (intents != null ) { if (stickyIntents == null ) { stickyIntents = new ArrayList <Intent>(); } stickyIntents.addAll(intents); } } } } } ArrayList<Intent> allSticky = null ; if (stickyIntents != null ) { final ContentResolver resolver = mContext.getContentResolver(); for (int i = 0 , N = stickyIntents.size(); i < N; i++) { Intent intent = stickyIntents.get(i); if (filter.match(resolver, intent, true , TAG) >= 0 ) { if (allSticky == null ) { allSticky = new ArrayList <Intent>(); } allSticky.add(intent); } } } ... if (receiver == null ) { return sticky; } synchronized (this ) { if (callerApp != null && (callerApp.thread == null || callerApp.thread.asBinder() != caller.asBinder())) { return null ; } ReceiverList rl = mRegisteredReceivers.get(receiver.asBinder()); if (rl == null ) { rl = new ReceiverList (this , callerApp, callingPid, callingUid, userId, receiver); if (rl.app != null ) { rl.app.receivers.add(rl); } else { ... } mRegisteredReceivers.put(receiver.asBinder(), rl); } ... BroadcastFilter bf = new BroadcastFilter (filter, rl, callerPackage, permission, callingUid, userId); rl.add(bf); ... mReceiverResolver.addFilter(bf); if (allSticky != null ) { ArrayList receivers = new ArrayList (); receivers.add(bf); final int stickyCount = allSticky.size(); for (int i = 0 ; i < stickyCount; i++) { Intent intent = allSticky.get(i); BroadcastQueue queue = broadcastQueueForIntent(intent); BroadcastRecord r = new BroadcastRecord (queue, intent, null , null , -1 , -1 , null , null , AppOpsManager.OP_NONE, null , receivers, null , 0 , null , null , false , true , true , -1 ); queue.enqueueParallelBroadcastLocked(r); queue.scheduleBroadcastsLocked(); } } return sticky; } }
上面时注册广播的核心代码,主要是先判断注册的广播的Action是不是已经存在AMS(ActivityManagerService)中的粘性广播中,如果存在就将这些Intent单独保存到一个列表中,然后处理广播接收器,上面代码和注释写的很清楚了,广播注册不是直接将receiver保存在AMS中,而是先将其封装到实现IIntentReceiver接口的Binder对象rd中,然后将这个对象放到ReceiverList对象中,这个ReceiverList对象是一个对应receiver的IntentFilter列表,但是这个列表对象也包含了该receiver对象,也就是将receiver以及其对应的IntentFilter列表封装到了ReceiverList对象中,这样每个广播接收者以及其Action都封装好了,然后将其放到该应用所在进程的ReceiverList对象列表中,这样整个广播注册就完成了。
其实缕清了这个结构就看懂广播注册了:首先是一个进程对象ProcessRecord,里面有一个广播的列表ArraySet,这个列表表示改进程注册的所有广播接收者,每个ReceiverList对象包含了一个广播接收者(实现了IIntentReceiver接口的Binder对象)封装和与该广播接收者对应的多个Action对应的IntentFilter对象的封装BroadcastFilter列表,这个ReceiverList对象是将注册的广播接收者以及对应的多个Action对应起来,这样就能查找对应的广播接收者,怎么调用我们下一篇发送广播会详细讲解。
Step-9:getRecordForAppLocked 1 2 3 4 5 6 7 8 9 final ProcessRecord getRecordForAppLocked ( IApplicationThread thread) { if (thread == null ) { return null ; } int appIndex = getLRURecordIndexForAppLocked(thread); return appIndex >= 0 ? mLruProcesses.get(appIndex) : null ; }
这里是根据IApplicationThread获取是否存在了该进程,这里调用getLRURecordIndexForAppLocked获取该进程对应的index
Step-10:getLRURecordIndexForAppLocked 1 2 3 4 5 6 7 8 9 10 11 private final int getLRURecordIndexForAppLocked (IApplicationThread thread) { IBinder threadBinder = thread.asBinder(); for (int i = mLruProcesses.size() - 1 ; i >= 0 ; i--) { ProcessRecord rec = mLruProcesses.get(i); if (rec.thread != null && rec.thread.asBinder() == threadBinder) { return i; } } return -1 ; }
这里主要通过for循环来从mLruProcesses列表中遍历是否存在该IApplicationThread,如果存在返回对应的Index,否则返回-1.
Step-11:UserController.handleIncomingUser 1 2 3 4 5 6 7 8 9 10 11 12 13 14 15 16 17 18 19 20 21 22 23 24 25 26 27 28 29 30 31 32 int handleIncomingUser (int callingPid, int callingUid, int userId, boolean allowAll, int allowMode, String name, String callerPackage) { final int callingUserId = UserHandle.getUserId(callingUid); if (callingUserId == userId) { return userId; } ... int targetUserId = unsafeConvertIncomingUserLocked(userId); if (callingUid != 0 && callingUid != SYSTEM_UID) { final boolean allow; if (mService.checkComponentPermission(INTERACT_ACROSS_USERS_FULL, callingPid, callingUid, -1 , true ) == PackageManager.PERMISSION_GRANTED) { allow = true ; } ... if (!allow) { if (userId == UserHandle.USER_CURRENT_OR_SELF) { targetUserId = callingUserId; } else { ... } } } ... return targetUserId; }
这里主要获取callingPid等参数对应的用户id。
Step-24:BroadcastQueue.scheduleBroadcastsLocked 1 2 3 4 5 6 7 8 9 10 11 12 13 14 15 16 17 public void scheduleBroadcastsLocked () { if (DEBUG_BROADCAST) Slog.v(TAG_BROADCAST, "Schedule broadcasts [" + mQueueName + "]: current=" + mBroadcastsScheduled); if (mBroadcastsScheduled) { return ; } mHandler.sendMessage(mHandler.obtainMessage(BROADCAST_INTENT_MSG, this )); mBroadcastsScheduled = true ; }
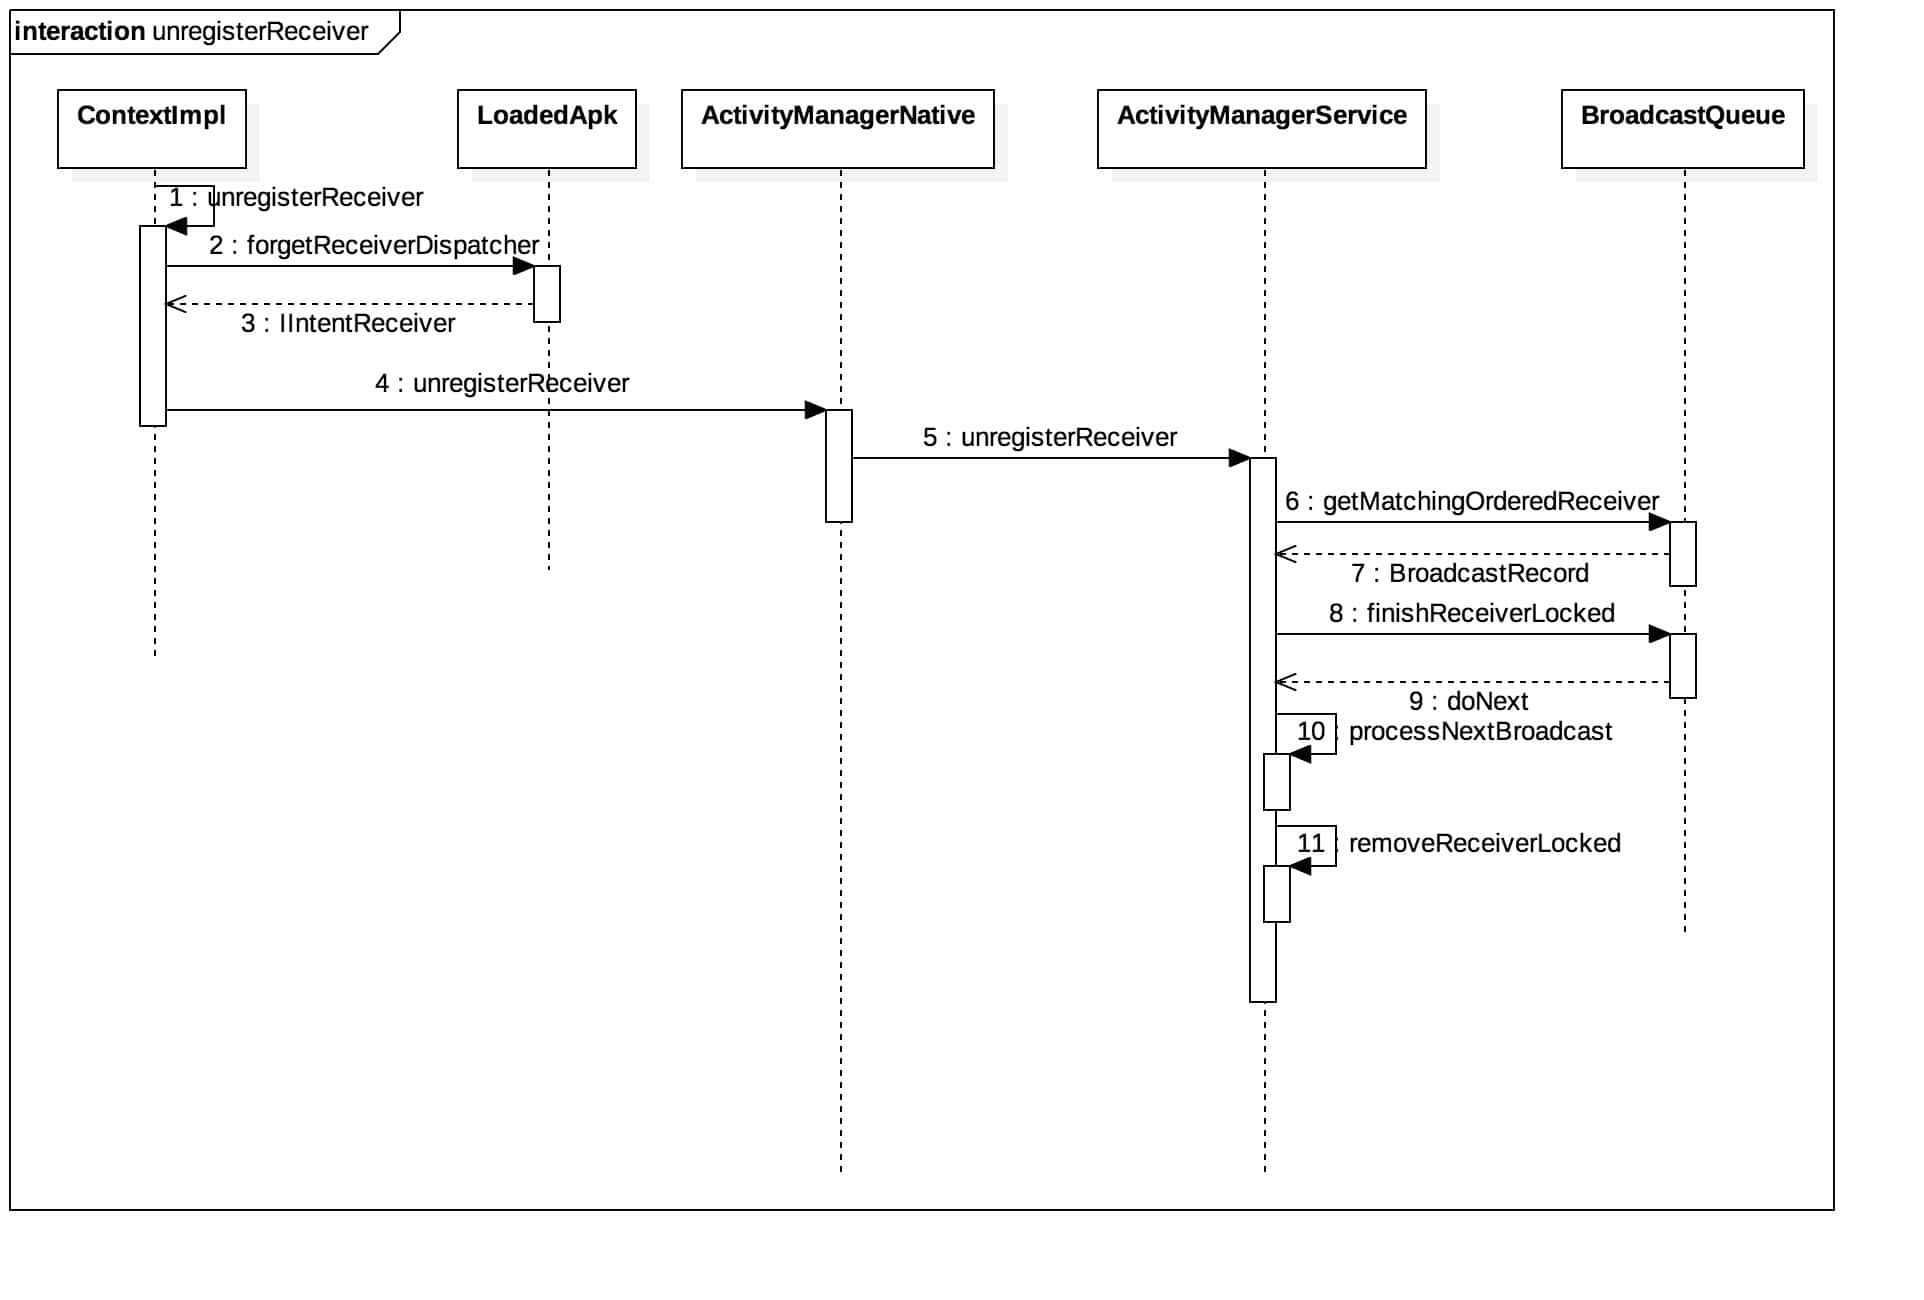
Broadcast的注销 了解了广播注册,广播注销就很简单了,就是从列表中删除对应的广播对象封装。
Step-1:unregisterReceiver 1 2 3 4 5 6 7 8 9 10 11 12 13 public void unregisterReceiver (BroadcastReceiver receiver) { if (mPackageInfo != null ) { IIntentReceiver rd = mPackageInfo.forgetReceiverDispatcher( getOuterContext(), receiver); try { ActivityManagerNative.getDefault().unregisterReceiver(rd); } catch (RemoteException e) { throw e.rethrowFromSystemServer(); } } else { ... } }
首先通过LoadedApk.forgetReceiverDispatcher方法获取与该注销广播接收者对应的实现IIntentReceiver接口的Binder对象。
Step-2:LoadedApk.forgetReceiverDispatcher 1 2 3 4 5 6 7 8 9 10 11 12 13 14 15 16 17 18 19 public IIntentReceiver forgetReceiverDispatcher (Context context, BroadcastReceiver r) { synchronized (mReceivers) { ArrayMap<BroadcastReceiver, LoadedApk.ReceiverDispatcher> map = mReceivers.get(context); LoadedApk.ReceiverDispatcher rd = null ; if (map != null ) { rd = map.get(r); if (rd != null ) { map.remove(r); if (map.size() == 0 ) { mReceivers.remove(context); } ... return rd.getIIntentReceiver(); } } ... } }
首先去mReceivers中获取,我们从上面注册知道,注册时会将实现了IIntentReceiver接口的广播接收者的封装放到mReceivers保存,所以这里先去获取有没有,注册了肯定是有的,因此将其移除。
Step-4:ActivityManagerProxy.unregisterReceiver 1 2 3 4 5 public void unregisterReceiver (IIntentReceiver receiver) throws RemoteException { ... mRemote.transact(UNREGISTER_RECEIVER_TRANSACTION, data, reply, 0 ); ... }
上面注册广播我们分析过调用ActivityManagerProxy这里的方法,然后通过Binder传递到AMS中对应的方法中
Step-5:ActivityManagerService.unregisterReceiver 1 2 3 4 5 6 7 8 9 10 11 12 13 14 15 16 17 18 19 20 21 22 23 24 25 26 27 28 29 30 31 32 33 34 35 36 37 38 39 40 41 42 43 44 45 46 public void unregisterReceiver (IIntentReceiver receiver) { ... try { boolean doTrim = false ; synchronized (this ) { ReceiverList rl = mRegisteredReceivers.get(receiver.asBinder()); if (rl != null ) { final BroadcastRecord r = rl.curBroadcast; if (r != null && r == r.queue.getMatchingOrderedReceiver(r)) { final boolean doNext = r.queue.finishReceiverLocked( r, r.resultCode, r.resultData, r.resultExtras, r.resultAbort, false ); if (doNext) { doTrim = true ; r.queue.processNextBroadcast(false ); } } if (rl.app != null ) { rl.app.receivers.remove(rl); } removeReceiverLocked(rl); if (rl.linkedToDeath) { rl.linkedToDeath = false ; rl.receiver.asBinder().unlinkToDeath(rl, 0 ); } } } if (doTrim) { trimApplications(); return ; } } finally { Binder.restoreCallingIdentity(origId); } }
找到对应的注册广播对象ReceiverList,然后将其移除。
Step-6:BroadcastQueue.getMatchingOrderedReceiver 1 2 3 4 5 6 7 8 9 public BroadcastRecord getMatchingOrderedReceiver (IBinder receiver) { if (mOrderedBroadcasts.size() > 0 ) { final BroadcastRecord r = mOrderedBroadcasts.get(0 ); if (r != null && r.receiver == receiver) { return r; } } return null ; }
从队列中找到对应的BroadcastRecord对象然后返回。
Step-8:BroadcastQueue.finishReceiverLocked 1 2 3 4 5 6 7 8 9 10 11 12 13 14 15 16 17 18 19 20 21 22 23 24 25 26 27 28 29 30 31 32 33 34 35 public boolean finishReceiverLocked (BroadcastRecord r, int resultCode, String resultData, Bundle resultExtras, boolean resultAbort, boolean waitForServices) { final int state = r.state; final ActivityInfo receiver = r.curReceiver; r.state = BroadcastRecord.IDLE; ... if (waitForServices && r.curComponent != null && r.queue.mDelayBehindServices && r.queue.mOrderedBroadcasts.size() > 0 && r.queue.mOrderedBroadcasts.get(0 ) == r) { ActivityInfo nextReceiver; if (r.nextReceiver < r.receivers.size()) { Object obj = r.receivers.get(r.nextReceiver); nextReceiver = (obj instanceof ActivityInfo) ? (ActivityInfo) obj : null ; } else { nextReceiver = null ; } if (receiver == null || nextReceiver == null || receiver.applicationInfo.uid != nextReceiver.applicationInfo.uid || !receiver.processName.equals(nextReceiver.processName)) { if (mService.mServices.hasBackgroundServices(r.userId)) { r.state = BroadcastRecord.WAITING_SERVICES; return false ; } } } r.curComponent = null ; return state == BroadcastRecord.APP_RECEIVE || state == BroadcastRecord.CALL_DONE_RECEIVE; }
这里判断是否结束广播接收,如果结束则处理下一条广播。
Step-10:BroadcastQueue.processNextBroadcast 这个是处理下一条广播的,也是广播的核心部分,这个我们在下一篇发送广播时会详细讲解。
Step-11:removeReceiverLocked 1 2 3 4 5 6 void removeReceiverLocked (ReceiverList rl) { mRegisteredReceivers.remove(rl.receiver.asBinder()); for (int i = rl.size() - 1 ; i >= 0 ; i--) { mReceiverResolver.removeFilter(rl.get(i)); } }
这个就是通过for循环删除对应的BroadcastFilter对象,这样就注销了广播。
主要的基本都分析了,还有以下其他不重要的大家想要了解自己看看代码。
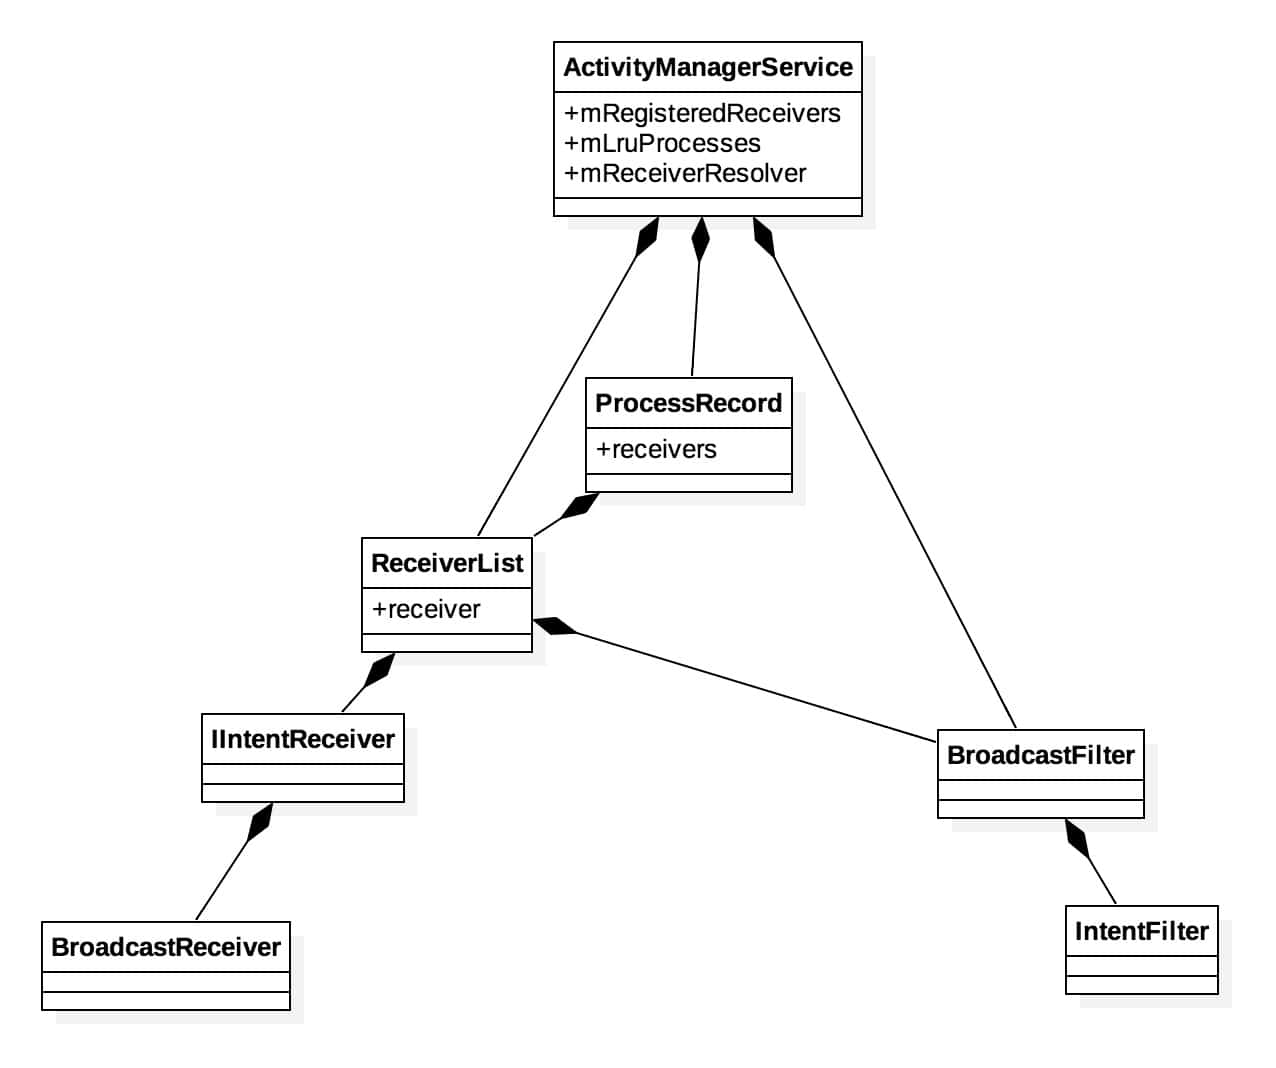
广播注册结构
最后这里我们再加一个广播注册结构的总结,上面是一个广播注册时的结构图,也就是广播以及对应的IntentFilter列表封装,整个过程是由下向上注册。首先是将BroadcastReceiver封装成Binder对象IIntentReceiver,将IntentFilter封装成BroadcastFilter对象,ReceiverList继承的是ArrayList<BroadcastFilter>,因此它本身就是一个用来盛放BroadcastFilter对象列表的ArrayList对象,同时ReceiverList对象还放入了IntentFilter列表对应的BroadcastReceiver的封装对象IIntentReceiver,这样就将BroadcastReceiver和IntentFilter绑定到一起了,然后将ReceiverList放到mRegisteredReceivers中,保存在ActivityManagerService(AMS)中,同时将ReceiverList放置到该广播所在进程的receivers中,而该进程保存在AMS中的mLruProcesses中,同时将IntentFilter的封装对象BroadcastReceiver放置到AMS中的mReceiverResolver中,这样就注册完成了。
这样从整个机构来说就非常清楚了,其实里面还有一些相互引用的情况,我没有完全画出来,只画了主要的部分,相对清晰一些。
代码地址: 直接拉取导入开发工具(Intellij idea或者Android studio)
Android_Framework_Source
注 Android开发群:192508518
微信公众账号:Code-MX
注:本文原创,转载请注明出处,多谢。