按计划本来从这章开始写四大组件的启动过程的,但是看看源码结构发现为了说的更明白还是先写一点系统framework层启动的内容,帮助理解四大组件的启动以及管理过程。我们知道四大组件管理是通过一些服务以及线程实现的,所以先把一些基本概念弄清楚比较好,比如AMS(ActivityManagerService)、PMS(PackageManagerService)等系统服务的作用以及调用方式,了解这些之后再看四大组件相对容易些,因此我们本章先介绍系统启动、部分系统服务的作用。
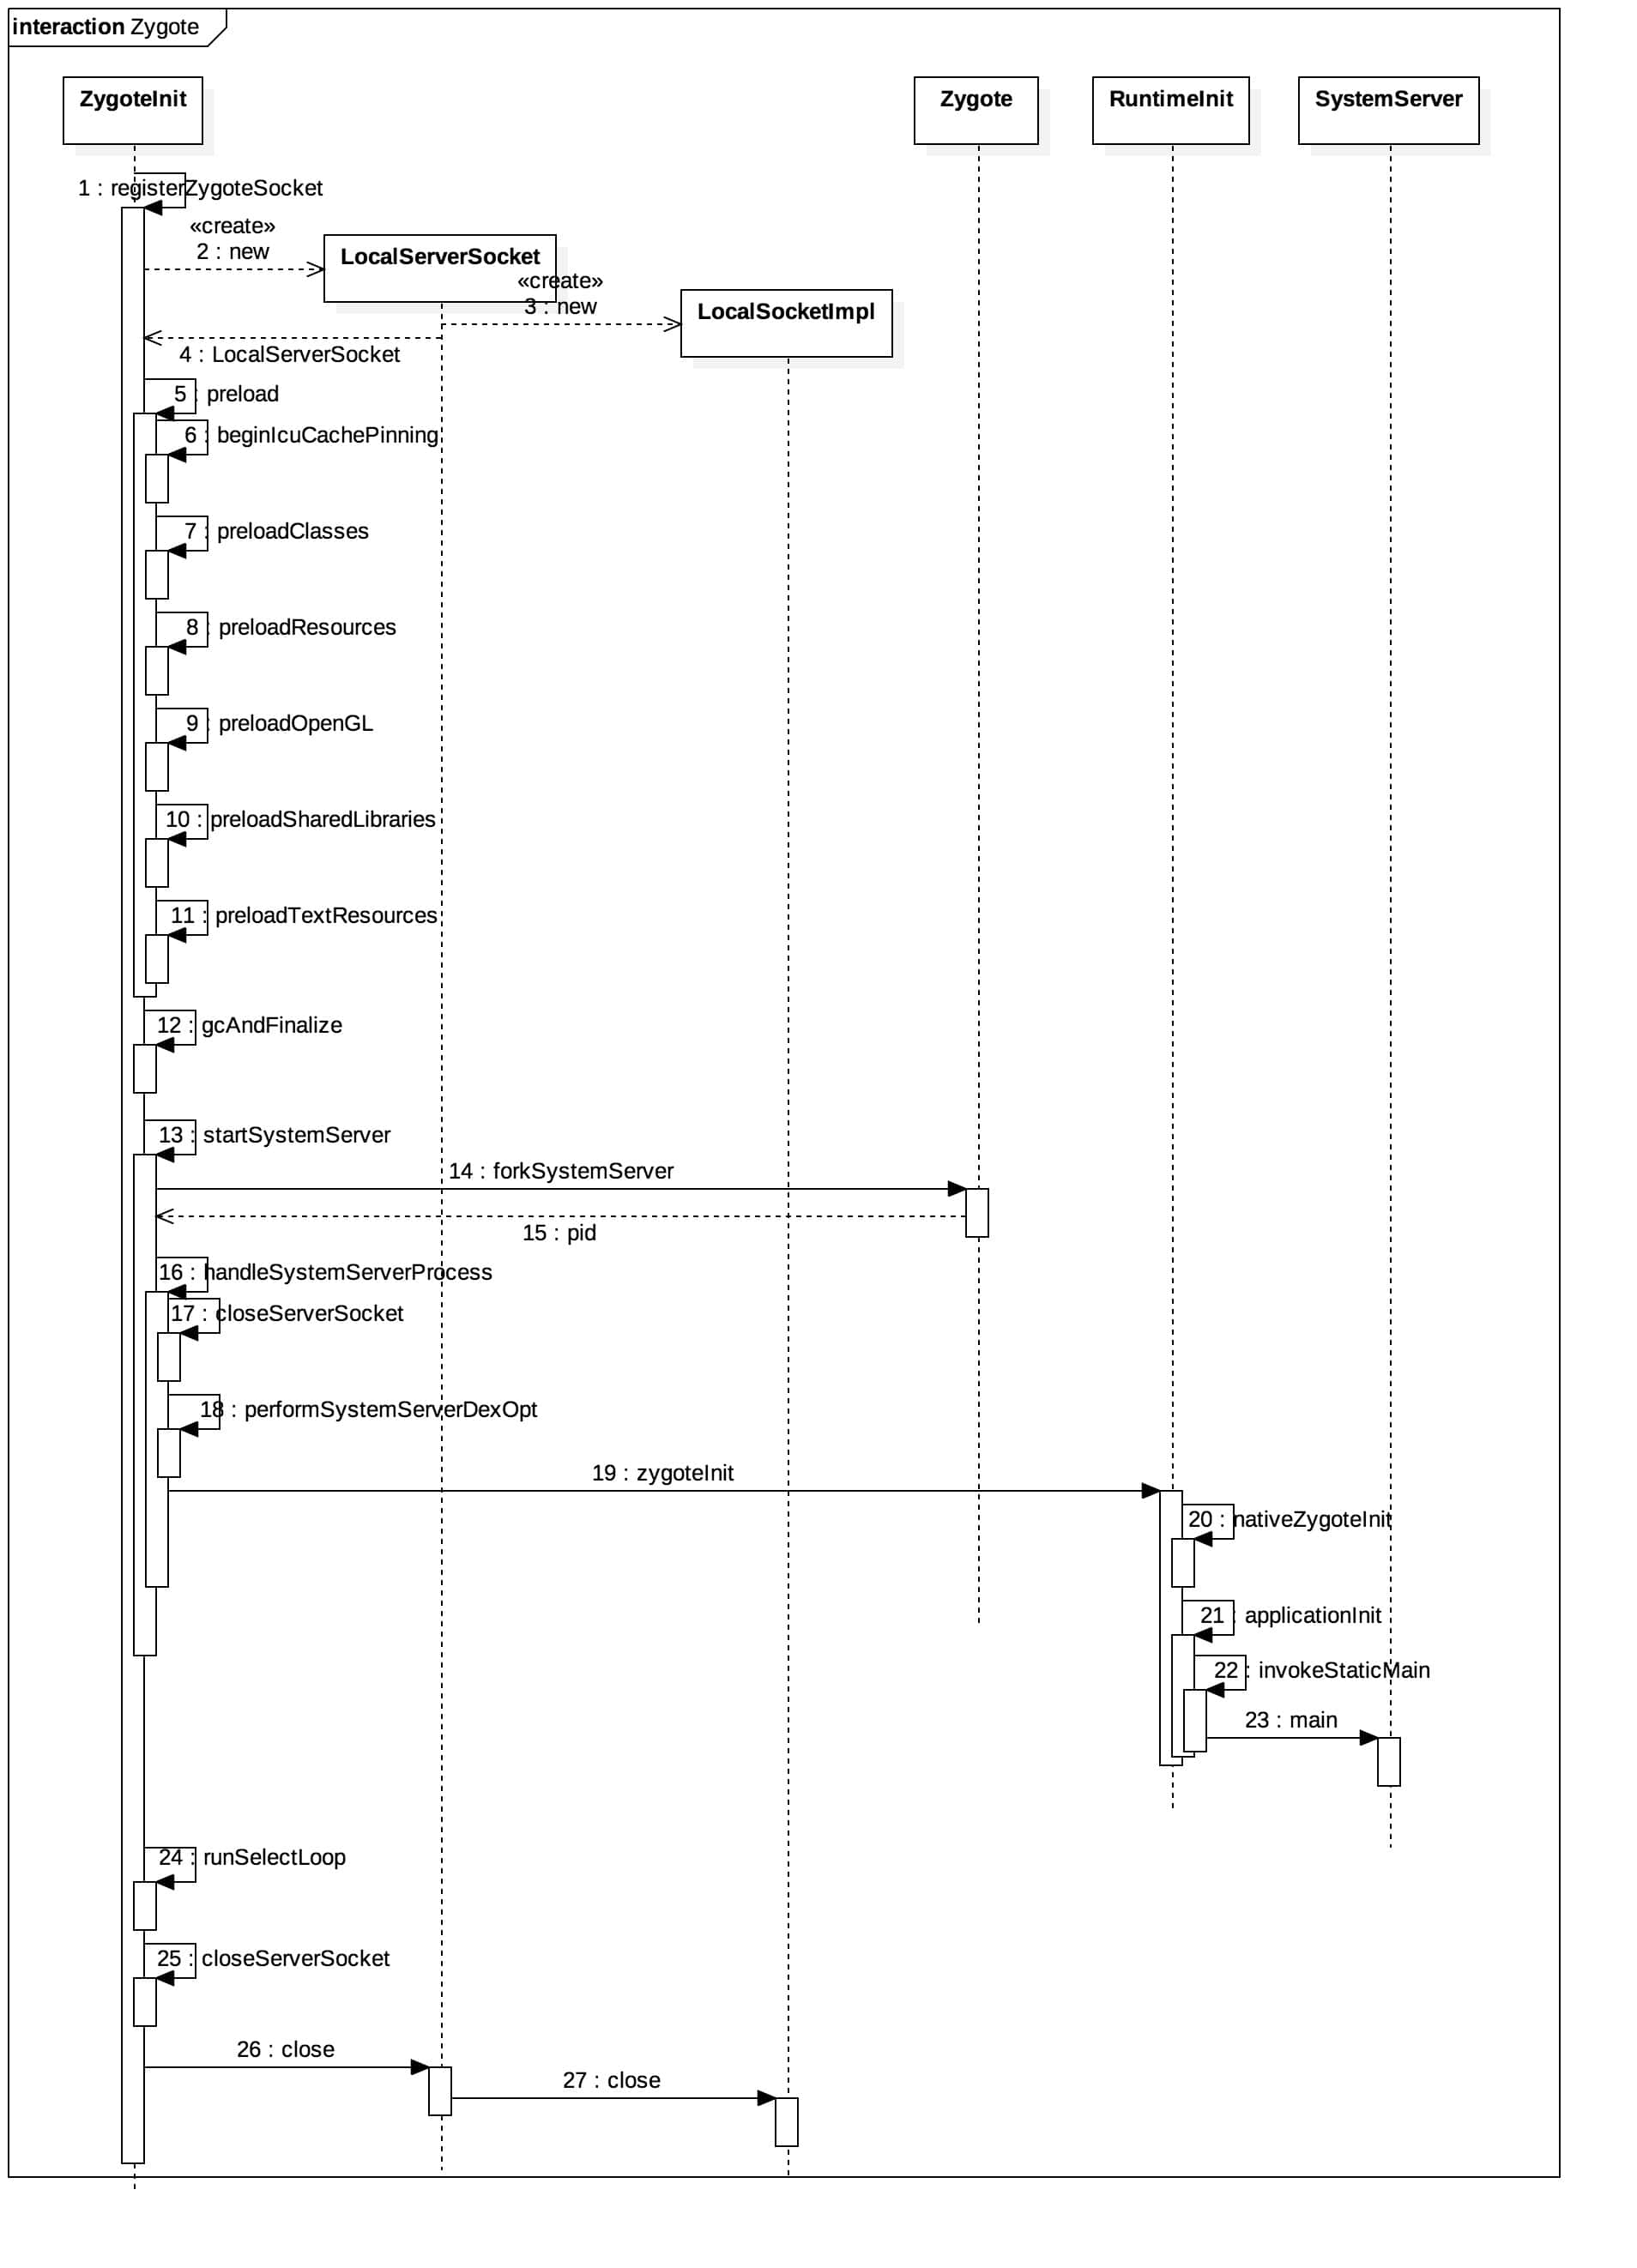
Zygote启动过程 Zygote是一个孕育器,Android系统所有的应用进程以及系统服务SystemServer都是有Zygote进程孕育(fork)而生的,因此Zygote在Android启动过程中起着决定作用。Zygote的启动是从它的main函数开始的,因此我们从这个函数开始分析。整个过程看下面的时序图。
下面我们开始根据时序图进行分析。
Step 0.ZygoteInit.main
1
2
3
4
5
6
7
8
9
10
11
12
13
14
15
16
17
18
19
20
21
22
23
24
25
26
27
28
29
30
public static void main (String argv[]) { ... try { ... registerZygoteSocket(socketName); ... preload(); ... gcAndFinalize(); ... if (startSystemServer) { startSystemServer(abiList, socketName); } runSelectLoop(abiList); closeServerSocket(); } catch (MethodAndArgsCaller caller) { ... } catch (Throwable ex) { ... } }
首先调用registerZygoteSocket方法,创建一个socket接口,用来和ActivityManagerService通讯,然后调用preload方法预加载一些资源等;然后调用gcAndFinalize方法释放一些内存;然后调用startSystemServer方法启动SystemServer组件,然后调用runSelectLoop方法,创建一个无限循环,在socket接口上等待ActivityManagerService请求创建新的应用程序进程;最后调用closeServerSocket方法关闭上面创建的socket。
Step 1.ZygoteInit.registerZygoteSocket
1
2
3
4
5
6
7
8
9
10
11
12
13
14
15
16
17
18
19
20
21
private static void registerZygoteSocket (String socketName) { if (sServerSocket == null ) { int fileDesc; final String fullSocketName = ANDROID_SOCKET_PREFIX + socketName; try { String env = System.getenv(fullSocketName); fileDesc = Integer.parseInt(env); } catch (RuntimeException ex) { ... } try { FileDescriptor fd = new FileDescriptor (); fd.setInt$(fileDesc); sServerSocket = new LocalServerSocket (fd); } catch (IOException ex) { throw new RuntimeException ( "Error binding to local socket '" + fileDesc + "'" , ex); } } }
这个sServerSocket是通过传入FileDescriptor(文件描述者)通过new一个来LocalServerSocket创建的。
Step 2.LocalServerSocket
1
2
3
4
5
6
public LocalServerSocket (FileDescriptor fd) throws IOException{ impl = new LocalSocketImpl (fd); impl.listen(LISTEN_BACKLOG); localAddress = impl.getSockAddress(); }
在LocalServerSocket构造函数中又new了一个LocalSocketImpl,然后调用LocalSocketImpl的listen方法,最后通过getSockAddress方法获取LocalSocketAddress对象。
Step 3.LocalSocketImpl
1 2 3 4 LocalSocketImpl(FileDescriptor fd) throws IOException { this .fd = fd; }
这里只是传入了FileDescriptor(文件描述者)。
Step 5.ZygoteInit.preload
1
2
3
4
5
6
7
8
9
10
11
12
13
14
static void preload () { ... beginIcuCachePinning(); ... preloadClasses(); ... preloadResources(); ... preloadOpenGL(); ... preloadSharedLibraries(); preloadTextResources(); ... }
这里主要是预加载,1.预加载ICU缓存,2.执行Zygote进程初始化,预加载一些普通类,3.预加载mResources,4.预加载OpenGL,5.预加载共享库,6.预加载TextView的字体缓存。
Step 12.ZygoteInit.gcAndFinalize
1 2 3 4 5 6 7 static void gcAndFinalize () { final VMRuntime runtime = VMRuntime.getRuntime(); ... System.gc(); runtime.runFinalizationSync(); System.gc(); }
这里主要是调用System.gc来释放一部分内存。
Step 13.ZygoteInit.startSystemServer
1
2
3
4
5
6
7
8
9
10
11
12
13
14
15
16
17
18
19
20
21
22
23
24
25
26
27
28
29
30
31
32
private static boolean startSystemServer (String abiList, String socketName) throws MethodAndArgsCaller, RuntimeException { ... int pid; try { ... pid = Zygote.forkSystemServer( parsedArgs.uid, parsedArgs.gid, parsedArgs.gids, parsedArgs.debugFlags, null , parsedArgs.permittedCapabilities, parsedArgs.effectiveCapabilities); } catch (IllegalArgumentException ex) { ... } if (pid == 0 ) { if (hasSecondZygote(abiList)) { waitForSecondaryZygote(socketName); } handleSystemServerProcess(parsedArgs); } return true ; }
首先Zygote会通过调用Zygote.forkSystemServer方法来创建一个新的进程来启动SystemServer,并且返回这个进程的pid,如果pid为0,并且有另外一个Zygote则会执行waitForSecondaryZygote关闭另外的Zygote进程,然后调用handleSystemServerProcess方法。
Step 16.ZygoteInit.handleSystemServerProcess
1
2
3
4
5
6
7
8
9
10
11
12
13
14
15
16
17
18
19
20
private static void handleSystemServerProcess ( ZygoteConnection.Arguments parsedArgs) throws ZygoteInit.MethodAndArgsCaller { closeServerSocket(); ... final String systemServerClasspath = Os.getenv("SYSTEMSERVERCLASSPATH" ); if (systemServerClasspath != null ) { performSystemServerDexOpt(systemServerClasspath); } if (parsedArgs.invokeWith != null ) { ... } else { ... RuntimeInit.zygoteInit(parsedArgs.targetSdkVersion, parsedArgs.remainingArgs, cl); } }
首先调用closeServerSocket方法关闭socket,然后调用performSystemServerDexOpt来创建安装连接InstallerConnection,最后调用RuntimeInit.zygoteInit方法。
Step 19.RuntimeInit.zygoteInit
1
2
3
4
5
6
public static final void zygoteInit (int targetSdkVersion, String[] argv, ClassLoader classLoader) throws ZygoteInit.MethodAndArgsCaller { ... nativeZygoteInit(); applicationInit(targetSdkVersion, argv, classLoader); }
首先调用nativeZygoteInit函数来执行一个Binder进程间通讯机制初始化工作,然后就可以在进程间进行通讯了,然后执行applicationInit方法。
Step 21.RuntimeInit.applicationInit
1
2
3
4
5
private static void applicationInit (int targetSdkVersion, String[] argv, ClassLoader classLoader) throws ZygoteInit.MethodAndArgsCaller { ... invokeStaticMain(args.startClass, args.startArgs, classLoader); }
这里主要是执行一个invokeStaticMain方法来调用SystemServer的main方法。
Step 24.ZygoteInit.runSelectLoop
1
2
3
4
5
6
7
8
9
10
11
12
13
14
15
16
17
18
19
20
21
22
23
24
25
26
27
28
29
30
31
32
private static void runSelectLoop (String abiList) throws MethodAndArgsCaller { ArrayList<FileDescriptor> fds = new ArrayList <FileDescriptor>(); ArrayList<ZygoteConnection> peers = new ArrayList <ZygoteConnection>(); fds.add(sServerSocket.getFileDescriptor()); peers.add(null ); while (true ) { ... try { Os.poll(pollFds, -1 ); } catch (ErrnoException ex) { ... } for (int i = pollFds.length - 1 ; i >= 0 ; --i) { if ((pollFds[i].revents & POLLIN) == 0 ) { continue ; } if (i == 0 ) { ZygoteConnection newPeer = acceptCommandPeer(abiList); peers.add(newPeer); fds.add(newPeer.getFileDesciptor()); } else { boolean done = peers.get(i).runOnce(); if (done) { peers.remove(i); fds.remove(i); } } } } }
这里通过acceptCommandPeer来创建ActivityManagerService与Socket的连接,然后调用ZygoteConnection.runOnce方法来创建新的应用程序。
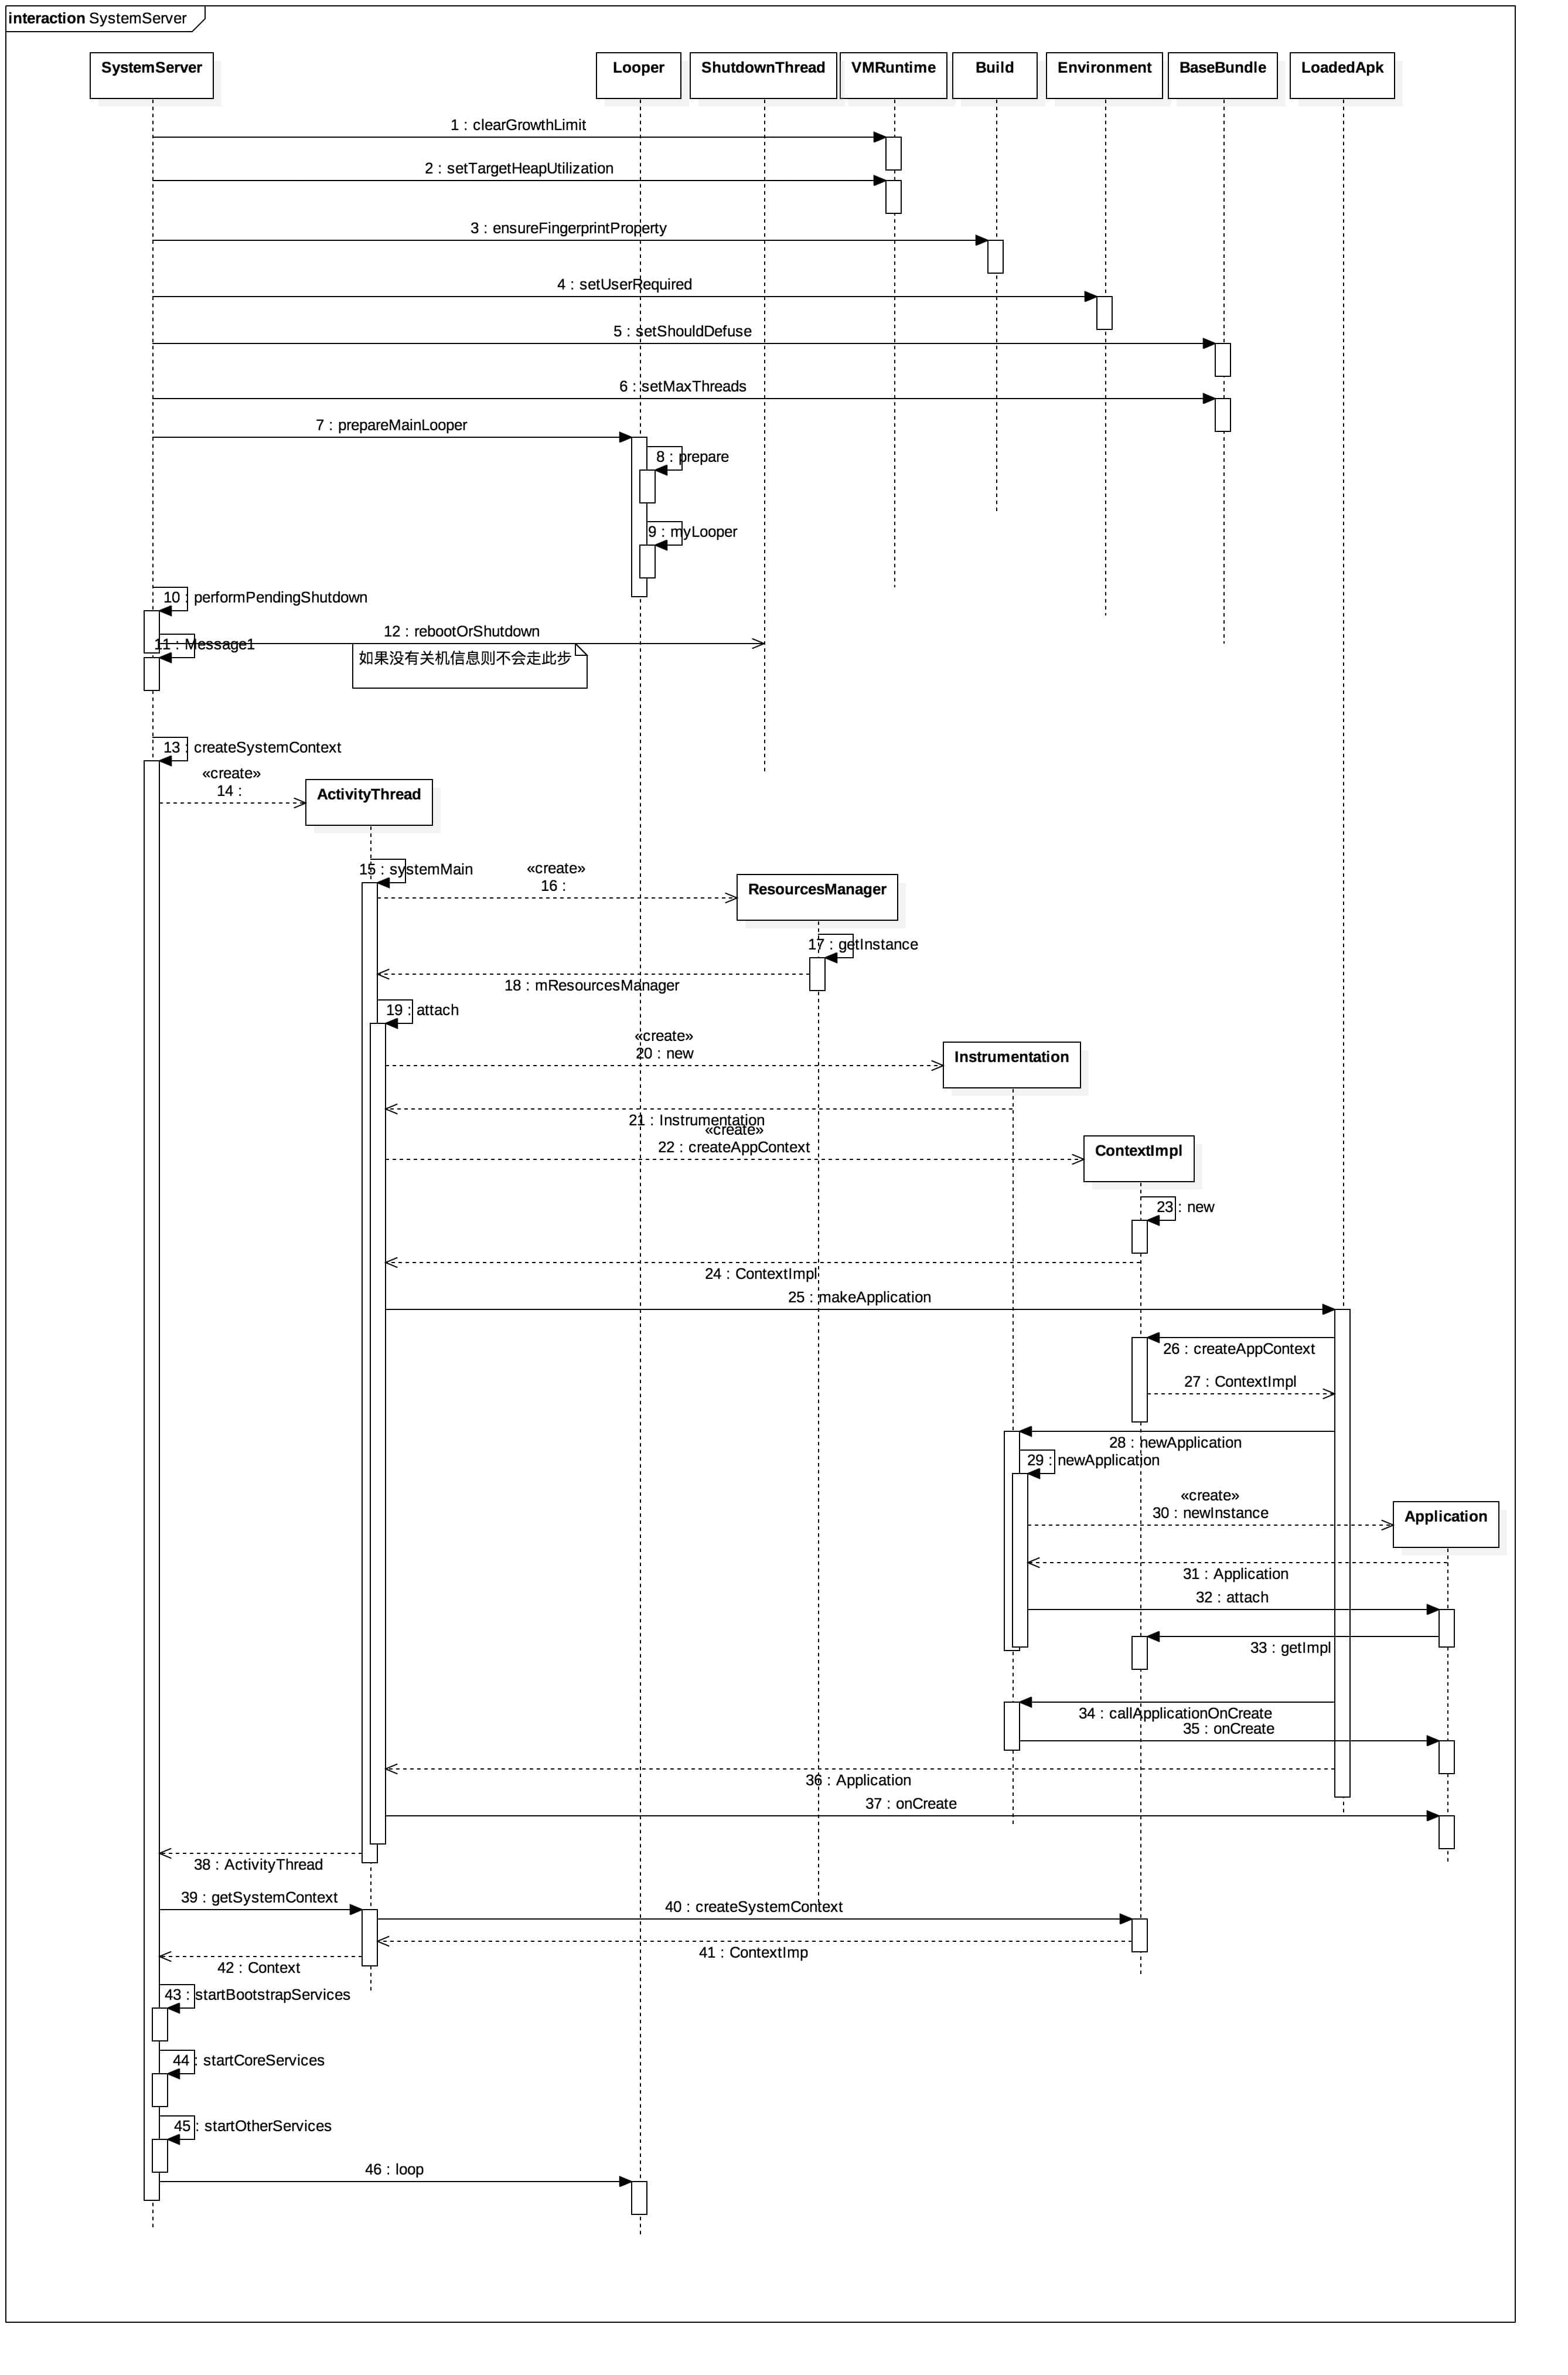
SystemServer启动过程 我们从上面的Step 13 知道了SystemServer的main函数调用位置,下面我们分析一下SystemServer的启动过程。
在main方法中new了一个SystemServer然后调用它的run方法:
1
2
3
4
5
6
7
8
9
10
11
12
13
14
15
16
17
18
19
20
21
22
23
24
25
26
27
28
29
30
31
32
33
34
35
36
37
38
39
40
41
42
43
44
45
46
47
48
49
50
51
52
53
54
55
56
57
58
59
60
61
62
63
64
65
66
67
68
69
70
71
72
73
74
75
76
private void run () { try { ... VMRuntime.getRuntime().clearGrowthLimit(); VMRuntime.getRuntime().setTargetHeapUtilization(0.8f ); Build.ensureFingerprintProperty(); Environment.setUserRequired(true ); BaseBundle.setShouldDefuse(true ); BinderInternal.disableBackgroundScheduling(true ); BinderInternal.setMaxThreads(sMaxBinderThreads); ... Looper.prepareMainLooper(); System.loadLibrary("android_servers" ); performPendingShutdown(); createSystemContext(); mSystemServiceManager = new SystemServiceManager (mSystemContext); LocalServices.addService(SystemServiceManager.class, mSystemServiceManager); } finally { ... } try { ... startBootstrapServices(); startCoreServices(); startOtherServices(); } catch (Throwable ex) { ... } finally { ... } ... Looper.loop(); ... }
Step 3.Build.ensureFingerprintProperty
1
2
3
4
5
6
7
8
9
public static void ensureFingerprintProperty () { if (TextUtils.isEmpty(SystemProperties.get("ro.build.fingerprint" ))) { try { SystemProperties.set("ro.build.fingerprint" , FINGERPRINT); } catch (IllegalArgumentException e) { Slog.e(TAG, "Failed to set fingerprint property" , e); } } }
确认设备的指纹属性。
Step 7.Looper.prepareMainLooper()
1
2
3
4
5
6
7
8
9
public static void prepareMainLooper () { prepare(false ); synchronized (Looper.class) { if (sMainLooper != null ) { throw new IllegalStateException ("The main Looper has already been prepared." ); } sMainLooper = myLooper(); } }
准备main looper,这个详细的过程我们下一章再讲,这里先看一下流程。
Step 10.SystemServer.performPendingShutdown
1
2
3
4
5
6
7
8
9
10
11
12
13
14
15
16
17
18
19
20
21
22
23
24
25
26
27
28
29
30
31
32
33
34
35
private void performPendingShutdown () { final String shutdownAction = SystemProperties.get( ShutdownThread.SHUTDOWN_ACTION_PROPERTY, "" ); if (shutdownAction != null && shutdownAction.length() > 0 ) { boolean reboot = (shutdownAction.charAt(0 ) == '1' ); final String reason; if (shutdownAction.length() > 1 ) { reason = shutdownAction.substring(1 , shutdownAction.length()); } else { reason = null ; } if (PowerManager.REBOOT_RECOVERY_UPDATE.equals(reason)) { File packageFile = new File (UNCRYPT_PACKAGE_FILE); if (packageFile.exists()) { String filename = null ; try { filename = FileUtils.readTextFile(packageFile, 0 , null ); } catch (IOException e) { Slog.e(TAG, "Error reading uncrypt package file" , e); } if (filename != null && filename.startsWith("/data" )) { if (!new File (BLOCK_MAP_FILE).exists()) { ... return ; } } } } ShutdownThread.rebootOrShutdown(null , reboot, reason); } }
这里主要是通过关机的action来判断是否重启或者关机。
Step 13.SystemServer.createSystemContext
1
2
3
4
5
6
private void createSystemContext () { ActivityThread activityThread = ActivityThread.systemMain(); mSystemContext = activityThread.getSystemContext(); mSystemContext.setTheme(DEFAULT_SYSTEM_THEME); }
首先调用ActivityThread.systemMain方法创建ActivityThread对象然后获取mSystemContext,并且设置默认系统主题。
Step 15.ActivityThread.systemMain
1
2
3
4
5
6
public static ActivityThread systemMain () { ... ActivityThread thread = new ActivityThread (); thread.attach(true ); return thread; }
创建ActivityThread对象,并调用attach方法。
Step 17.ResourcesManager.getInstance
1
2
3
4
5
6
7
8
public static ResourcesManager getInstance () { synchronized (ResourcesManager.class) { if (sResourcesManager == null ) { sResourcesManager = new ResourcesManager (); } return sResourcesManager; }
单例模式创建ResourcesManager对象并且返回。
Step 19.ActivityThread.attach
1
2
3
4
5
6
7
8
9
10
11
12
13
14
15
16
17
18
19
20
private void attach (boolean system) { sCurrentActivityThread = this ; mSystemThread = system; if (!system) { ... } else { ... try { mInstrumentation = new Instrumentation (); ContextImpl context = ContextImpl.createAppContext( this , getSystemContext().mPackageInfo); mInitialApplication = context.mPackageInfo.makeApplication(true , null ); mInitialApplication.onCreate(); } catch (Exception e) { ... } } ... }
因为参数传入的是true,表明是系统的线程,所以执行else里面的内容,首先创建Instrumentation,然后调用ContextImpl.createAppContext方法创建ContextImpl,然后通过调用LoadedApk.makeApplication方法创建Application,然后调用Application.onCreate方法。
Step 22.ContextImpl.createAppContext
1
2
3
4
5
static ContextImpl createAppContext (ActivityThread mainThread, LoadedApk packageInfo) { if (packageInfo == null ) throw new IllegalArgumentException ("packageInfo" ); return new ContextImpl (null , mainThread, packageInfo, null , null , 0 , null , null , Display.INVALID_DISPLAY); }
通过new ContextImpl来创建ContextImpl对象。
Step 22.LoadedApk.makeApplication
1
2
3
4
5
6
7
8
9
10
11
12
13
14
15
16
17
18
19
20
21
22
23
24
25
26
27
28
29
30
31
public Application makeApplication (boolean forceDefaultAppClass, Instrumentation instrumentation) { ... Application app = null ; ... try { ... ContextImpl appContext = ContextImpl.createAppContext(mActivityThread, this ); app = mActivityThread.mInstrumentation.newApplication( cl, appClass, appContext); appContext.setOuterContext(app); } catch (Exception e) { ... } ... if (instrumentation != null ) { try { instrumentation.callApplicationOnCreate(app); } catch (Exception e) { ... } } ... return app; }
通过ContextImpl.createAppContext方法创建ContextImpl对象,然后调用mActivityThread.mInstrumentation.newApplication方法创建Application对象,然后调用instrumentation.callApplicationOnCreate方法。
Step 23.ContextImpl.createAppContext
1
2
3
4
5
static ContextImpl createAppContext (ActivityThread mainThread, LoadedApk packageInfo) { if (packageInfo == null ) throw new IllegalArgumentException ("packageInfo" ); return new ContextImpl (null , mainThread, packageInfo, null , null , 0 , null , null , Display.INVALID_DISPLAY); }
创建ContextImpl对象并返回。
Step 26.Instrumentation.createAppContext
1
2
3
4
5
public Application newApplication (ClassLoader cl, String className, Context context) throws InstantiationException, IllegalAccessException, ClassNotFoundException { return newApplication(cl.loadClass(className), context); }
这里主要是调用newApplication方法返回Application。
Step 28.Instrumentation.newApplication
1
2
3
4
5
6
7
static public Application newApplication (Class<?> clazz, Context context) throws InstantiationException, IllegalAccessException, ClassNotFoundException { Application app = (Application)clazz.newInstance(); app.attach(context); return app; }
调用class.newInstance方法创建Application,然后调用Application.attach方法,向Application中传入context。
Step 32.Application.attach
1 2 3 4 final void attach (Context context) { attachBaseContext(context); mLoadedApk = ContextImpl.getImpl(context).mPackageInfo; }
通过ContextImpl.getImpl方法获取LoadedApk对象。
Step 34.Instrumentation.callApplicationOnCreate
1
2
3
public void callApplicationOnCreate (Application app) { app.onCreate(); }
这里开始调用Application的onCreate方法。
Step 39.ActivityThread.getSystemContext
1
2
3
4
5
6
7
8
public ContextImpl getSystemContext () { synchronized (this ) { if (mSystemContext == null ) { mSystemContext = ContextImpl.createSystemContext(this ); } return mSystemContext; } }
通过ContextImpl.createSystemContext创建mSystemContext。
Step 40.ContextImpl.createSystemContext
1
2
3
4
5
6
7
8
static ContextImpl createSystemContext (ActivityThread mainThread) { LoadedApk packageInfo = new LoadedApk (mainThread); ContextImpl context = new ContextImpl (null , mainThread, packageInfo, null , null , 0 , null , null , Display.INVALID_DISPLAY); context.mResources.updateConfiguration(context.mResourcesManager.getConfiguration(), context.mResourcesManager.getDisplayMetrics()); return context; }
创建ContextImpl并且返回。
Step 43.SystemServer.startBootstrapServices
1
2
3
4
5
6
7
8
9
10
11
12
13
14
15
16
17
18
19
20
21
22
23
24
25
26
27
28
29
30
31
32
33
34
35
36
37
38
39
40
41
42
43
44
private void startBootstrapServices () { ... Installer installer = mSystemServiceManager.startService(Installer.class); mActivityManagerService = mSystemServiceManager.startService( ActivityManagerService.Lifecycle.class).getService(); mActivityManagerService.setSystemServiceManager(mSystemServiceManager); mActivityManagerService.setInstaller(installer); ... mPowerManagerService = mSystemServiceManager.startService(PowerManagerService.class); ... mSystemServiceManager.startService(LightsService.class); mDisplayManagerService = mSystemServiceManager.startService(DisplayManagerService.class); mSystemServiceManager.startBootPhase(SystemService.PHASE_WAIT_FOR_DEFAULT_DISPLAY); mPackageManagerService = PackageManagerService.main(mSystemContext, installer, mFactoryTestMode != FactoryTest.FACTORY_TEST_OFF, mOnlyCore); mFirstBoot = mPackageManagerService.isFirstBoot(); mPackageManager = mSystemContext.getPackageManager(); ... mSystemServiceManager.startService(UserManagerService.LifeCycle.class); Trace.traceEnd(Trace.TRACE_TAG_SYSTEM_SERVER); AttributeCache.init(mSystemContext); mActivityManagerService.setSystemProcess(); startSensorService(); }
这里主要是启动系统引导服务。
Step 44.SystemServer.startCoreServices
1
2
3
4
5
6
7
8
9
10
11
12
private void startCoreServices () { mSystemServiceManager.startService(BatteryService.class); mSystemServiceManager.startService(UsageStatsService.class); mActivityManagerService.setUsageStatsManager( LocalServices.getService(UsageStatsManagerInternal.class)); mWebViewUpdateService = mSystemServiceManager.startService(WebViewUpdateService.class); }
启动核心服务。
Step 45.SystemServer.startOtherServices
这里代码就不贴了,都是启动服务的代码,这里有很多服务,我简单列一下服务并说一下服务基本功能。
服务
名称
服务
名称
SchedulingPolicyService
CameraService
TelecomLoaderService
AccountManagerService.Lifecycle
ContentService.Lifecycle
VibratorService
ConsumerIrService
AlarmManagerService
InputManagerService
WindowManagerService
VrManagerService
PersistentDataBlockService
MetricsLoggerService
IpConnectivityMetrics
PinnerService
InputMethodManagerService.Lifecycle
MountService.Lifecycle
UiModeManagerService
LockSettingsService.Lifecycle
BluetoothService
DeviceIdleController
NsdService
StatusBarManagerService
ClipboardService
NetworkManagementService
WifiService
NetworkScoreService
NetworkStatsService
NetworkPolicyManagerService
WifiNanService
WifiP2pService
TextServicesManagerService.Lifecycle
WifiScanningService
ConnectivityService
RttService
DevicePolicyManagerService.Lifecycle
UpdateLockService
RecoverySystemService
NotificationManagerService
DeviceStorageMonitorService
LocationManagerService
CountryDetectorService
SearchManagerService.Lifecycle
DropBoxManagerService
AudioService.Lifecycle
DockObserver
ThermalObserver
MidiService.Lifecycle
UsbService.Lifecycle
SerialService
HardwarePropertiesManagerService
NightDisplayService
JobSchedulerService
SoundTriggerService
BackupManagerService.Lifecycle
AppWidgetService
VoiceInteractionManagerService
GestureLauncherService
SensorNotificationService
ContextHubSystemService
DiskStatsService
SamplingProfilerService
NetworkTimeUpdateService
CommonTimeManagementService
EmergencyAffordanceService
DreamManagerService
AssetAtlasService
GraphicsStatsService
PrintManagerService
RestrictionsManagerService
MediaSessionService
HdmiControlService
TvInputManagerService
MediaResourceMonitorService
TvRemoteService
MediaRouterService
TrustManagerService
FingerprintService
ShortcutService.Lifecycle
LauncherAppsService
MediaProjectionManagerService
WearBluetoothService
WearWifiMediatorService
WearTimeService
MmsServiceBroker
RetailDemoModeService
NsdService
WallpaperManagerService.Lifecycle
代码地址: 直接拉取导入开发工具(Intellij idea或者Android studio)
Android_Framework_Source
参考: Android系统启动-SystemServer下篇 Android系统进程Zygote启动过程的源代码分析
注 Android开发群:192508518
微信公众账号:Code-MX
注:本文原创,转载请注明出处,多谢。