由于四大组件的启动都涉及到进程的启动,因此我们这章先讲一下进程启动流程,然后再讲四大组件的启动流程。
基础知识 Android应用程序框架层创建的应用程序进程具有两个特点,一是进程的入口函数是ActivityThread.main,二是进程天然支持Binder进程间通信机制;这两个特点都是在进程的初始化过程中实现的。(引用自老罗安卓之旅-Android应用程序进程启动过程的源代码分析 )
进程按照重要性可以分为下面五类:
前台进程(Foreground process)
可见进程(Visible process)
服务进程(Service process)
后台进程(Background process)
空进程(Empty process)
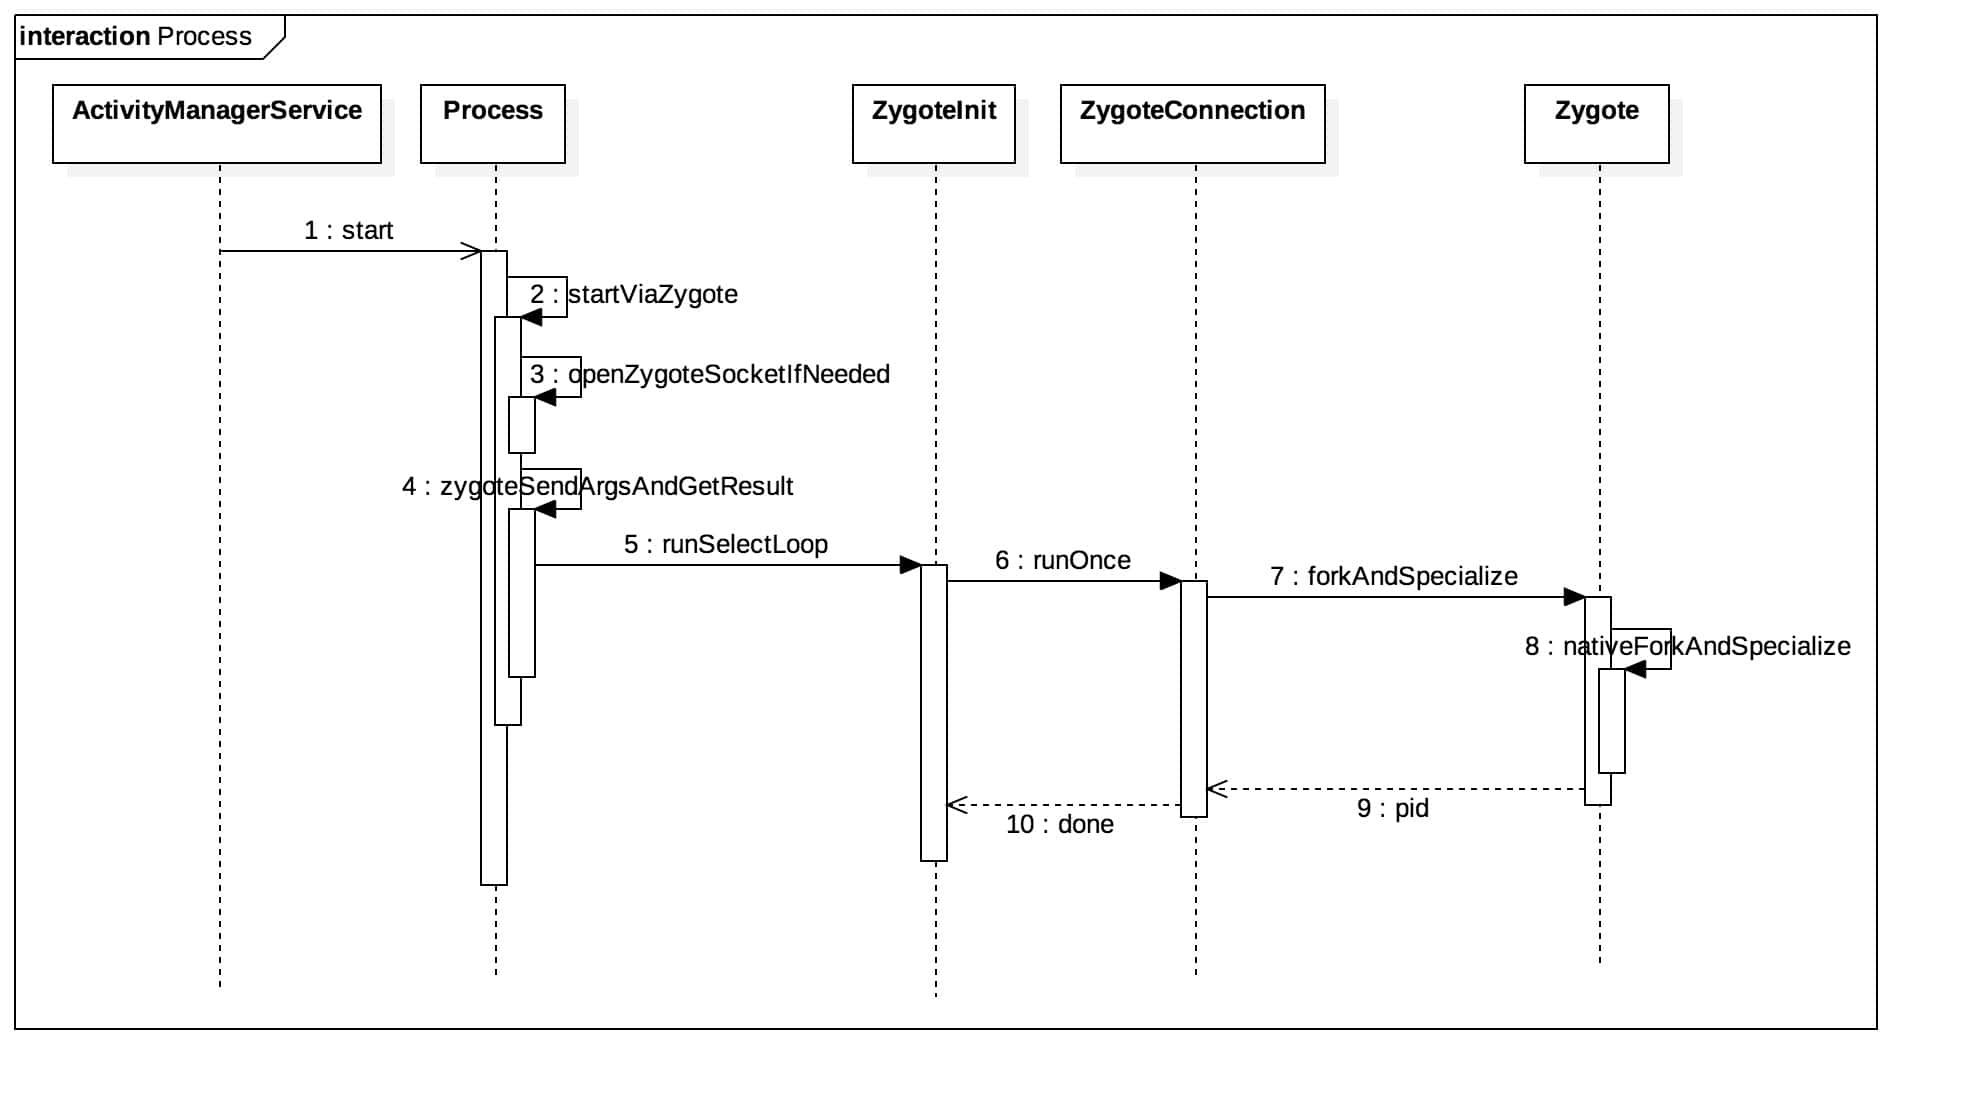
进程启动流程 AMS(ActivityMagagerService)启动进程是从其成员函数startProcessLocked开始调用Process.start方法开始的。我们先看一下进程启动的时序图:
1. Process.start方法: 1 2 3 4 5 6 7 8 9 10 11 12 13 14 15 16 17 18 19 20 21 22 public static final ProcessStartResult start (final String processClass, final String niceName, int uid, int gid, int [] gids, int debugFlags, int mountExternal, int targetSdkVersion, String seInfo, String abi, String instructionSet, String appDataDir, String[] zygoteArgs) { try { return startViaZygote(processClass, niceName, uid, gid, gids, debugFlags, mountExternal, targetSdkVersion, seInfo, abi, instructionSet, appDataDir, zygoteArgs); } catch (ZygoteStartFailedEx ex) { Log.e(LOG_TAG, "Starting VM process through Zygote failed" ); throw new RuntimeException ( "Starting VM process through Zygote failed" , ex); } }
注意:传入的第一个参数是“android.app.ActivityThread”,这是进程初始化要加载的类,这个类加载到进程之后,就会把这个类的静态成员方法main作为进程的入口。然后调用startViaZygote方法。
2. startViaZygote方法: 1 2 3 4 5 6 7 8 9 10 11 12 13 14 15 16 17 18 19 20 21 22 23 24 25 26 27 28 private static ProcessStartResult startViaZygote (final String processClass, final String niceName, final int uid, final int gid, final int [] gids, int debugFlags, int mountExternal, int targetSdkVersion, String seInfo, String abi, String instructionSet, String appDataDir, String[] extraArgs) throws ZygoteStartFailedEx { synchronized (Process.class) { ArrayList<String> argsForZygote = new ArrayList <String>(); ... ... ... return zygoteSendArgsAndGetResult(openZygoteSocketIfNeeded(abi), argsForZygote); } }
这个方法主要是保存信息到argsForZygote中,然后调用openZygoteSocketIfNeeded,然后根据返回的值调用zygoteSendArgsAndGetResult方法,首先先看openZygoteSocketIfNeeded方法。
3. openZygoteSocketIfNeeded方法: 1 2 3 4 5 6 7 8 9 10 11 12 13 14 15 16 17 18 19 20 21 22 23 24 25 26 27 28 29 30 private static ZygoteState openZygoteSocketIfNeeded (String abi) throws ZygoteStartFailedEx { if (primaryZygoteState == null || primaryZygoteState.isClosed()) { try { primaryZygoteState = ZygoteState.connect(ZYGOTE_SOCKET); } catch (IOException ioe) { throw new ZygoteStartFailedEx ("Error connecting to primary zygote" , ioe); } } if (primaryZygoteState.matches(abi)) { return primaryZygoteState; } if (secondaryZygoteState == null || secondaryZygoteState.isClosed()) { try { secondaryZygoteState = ZygoteState.connect(SECONDARY_ZYGOTE_SOCKET); } catch (IOException ioe) { throw new ZygoteStartFailedEx ("Error connecting to secondary zygote" , ioe); } } if (secondaryZygoteState.matches(abi)) { return secondaryZygoteState; } throw new ZygoteStartFailedEx ("Unsupported zygote ABI: " + abi); }
通过ZygoteState.connect放创建primaryZygoteState对象,如果第一次创建不成功,创建第二次。connect方法代码如下:
4. ZygoteState.connect方法: 1 2 3 4 5 6 7 8 9 10 11 12 13 14 15 16 17 18 19 20 21 22 23 24 25 26 27 28 29 30 31 32 public static ZygoteState connect (String socketAddress) throws IOException { DataInputStream zygoteInputStream = null ; BufferedWriter zygoteWriter = null ; final LocalSocket zygoteSocket = new LocalSocket (); try { zygoteSocket.connect(new LocalSocketAddress (socketAddress, LocalSocketAddress.Namespace.RESERVED)); zygoteInputStream = new DataInputStream (zygoteSocket.getInputStream()); zygoteWriter = new BufferedWriter (new OutputStreamWriter ( zygoteSocket.getOutputStream()), 256 ); } catch (IOException ex) { ... } String abiListString = getAbiList(zygoteWriter, zygoteInputStream); Log.i("Zygote" , "Process: zygote socket opened, supported ABIS: " + abiListString); return new ZygoteState (zygoteSocket, zygoteInputStream, zygoteWriter, Arrays.asList(abiListString.split("," ))); }
首先创建一个LocalSocket对象,这个LocalSocket对象是在ZygoteInit中的runSelectLoop函数进行监听的。然后通过connect方法并且传入连接地址连接该Socket,连接以后会获取输入流DataInputStream,以便获得Zygote进程发送过来的通信数据,然后又获取BufferedWriter输入流,以便向Zygote进程发送通信数据。最后会返回一个ZygoteState对象。下面我们看一下LocalSocket.connect方法。
5. LocalSocket.connect方法: 1 2 3 4 5 6 7 8 9 10 11 12 public void connect (LocalSocketAddress endpoint) throws IOException { synchronized (this ) { if (isConnected) { throw new IOException ("already connected" ); } implCreateIfNeeded(); impl.connect(endpoint, 0 ); isConnected = true ; isBound = true ; } }
如果已经连接,抛出异常,因为连接完成后,会关闭连接,使用时在打开连接。最后调用native方法连接socket,并且改变连接标签。
6. 回到第二步,调用完openZygoteSocketIfNeeded返回参数ZygoteState传入到zygoteSendArgsAndGetResult方法中: 1 2 3 4 5 6 7 8 9 10 11 12 13 14 15 16 17 18 19 20 21 22 23 24 25 26 27 28 29 30 31 32 33 34 35 36 37 38 39 40 41 42 43 44 45 46 47 private static ProcessStartResult zygoteSendArgsAndGetResult ( ZygoteState zygoteState, ArrayList<String> args) throws ZygoteStartFailedEx { try { int sz = args.size(); for (int i = 0 ; i < sz; i++) { if (args.get(i).indexOf('\n' ) >= 0 ) { throw new ZygoteStartFailedEx ("embedded newlines not allowed" ); } } final BufferedWriter writer = zygoteState.writer; final DataInputStream inputStream = zygoteState.inputStream; writer.write(Integer.toString(args.size())); writer.newLine(); for (int i = 0 ; i < sz; i++) { String arg = args.get(i); writer.write(arg); writer.newLine(); } writer.flush(); ProcessStartResult result = new ProcessStartResult (); result.pid = inputStream.readInt(); result.usingWrapper = inputStream.readBoolean(); if (result.pid < 0 ) { throw new ZygoteStartFailedEx ("fork() failed" ); } return result; } catch (IOException ex) { zygoteState.close(); throw new ZygoteStartFailedEx (ex); } }
这方法通过Socket流的方式将启动进程的信息发送出去,从步骤4可知,这个Socket的监听是ZygoteInit类中的runSelectLoop方法,我们接着看这个方法。
7. ZygoteInit.runSelectLoop方法: 1 2 3 4 5 6 7 8 9 10 11 12 13 14 15 16 17 18 19 20 21 22 23 24 25 26 27 28 29 30 31 32 33 34 35 36 37 private static void runSelectLoop (String abiList) throws MethodAndArgsCaller { ArrayList<FileDescriptor> fds = new ArrayList <FileDescriptor>(); ArrayList<ZygoteConnection> peers = new ArrayList <ZygoteConnection>(); fds.add(sServerSocket.getFileDescriptor()); peers.add(null ); while (true ) { StructPollfd[] pollFds = new StructPollfd [fds.size()]; for (int i = 0 ; i < pollFds.length; ++i) { pollFds[i] = new StructPollfd (); pollFds[i].fd = fds.get(i); pollFds[i].events = (short ) POLLIN; } try { Os.poll(pollFds, -1 ); } catch (ErrnoException ex) { throw new RuntimeException ("poll failed" , ex); } for (int i = pollFds.length - 1 ; i >= 0 ; --i) { if ((pollFds[i].revents & POLLIN) == 0 ) { continue ; } if (i == 0 ) { ZygoteConnection newPeer = acceptCommandPeer(abiList); peers.add(newPeer); fds.add(newPeer.getFileDesciptor()); } else { boolean done = peers.get(i).runOnce(); if (done) { peers.remove(i); fds.remove(i); } } } } }
数据通过Socket发送以后,Zygote进程接收到后会调用peers.get(i).runOnce()方法。这个peers.get(i)是获取ZygoteConnection对象,表示一个Socket连接,然后调用它的runOnce方法。
8. ZygoteConnection.runOnce方法: 1 2 3 4 5 6 7 8 9 10 11 12 13 14 15 16 17 18 19 20 21 22 23 24 25 26 27 28 29 30 31 32 33 34 35 36 37 38 39 40 41 42 43 44 45 46 47 48 49 50 51 52 53 54 55 56 57 58 59 60 61 62 63 64 65 66 67 68 boolean runOnce () throws ZygoteInit.MethodAndArgsCaller { String args[]; Arguments parsedArgs = null ; FileDescriptor[] descriptors; try { args = readArgumentList(); descriptors = mSocket.getAncillaryFileDescriptors(); } catch (IOException ex) { Log.w(TAG, "IOException on command socket " + ex.getMessage()); closeSocket(); return true ; } ... PrintStream newStderr = null ; if (descriptors != null && descriptors.length >= 3 ) { newStderr = new PrintStream ( new FileOutputStream (descriptors[2 ])); } int pid = -1 ; FileDescriptor childPipeFd = null ; FileDescriptor serverPipeFd = null ; try { parsedArgs = new Arguments (args); if (parsedArgs.abiListQuery) { return handleAbiListQuery(); } ... pid = Zygote.forkAndSpecialize(parsedArgs.uid, parsedArgs.gid, parsedArgs.gids, parsedArgs.debugFlags, rlimits, parsedArgs.mountExternal, parsedArgs.seInfo, parsedArgs.niceName, fdsToClose, parsedArgs.instructionSet, parsedArgs.appDataDir); } catch (ErrnoException ex) { ... } catch (IllegalArgumentException ex) { ... } catch (ZygoteSecurityException ex) { ... } try { if (pid == 0 ) { ... handleChildProc(parsedArgs, descriptors, childPipeFd, newStderr); return true ; } else { ... return handleParentProc(pid, descriptors, serverPipeFd, parsedArgs); } } finally { ... } }
首先通过Zygote.forkAndSpecialize方法来创建一个新的进程,并且返回其pid。因为我们在分心新建进程,因此我们只分析pid为0的情况,pid为0时会调用handleChildProc方法,
9. handleChildProc方法: 1 2 3 4 5 6 7 8 9 10 11 12 13 14 15 16 17 18 private void handleChildProc (Arguments parsedArgs, FileDescriptor[] descriptors, FileDescriptor pipeFd, PrintStream newStderr) throws ZygoteInit.MethodAndArgsCaller { ... Trace.traceEnd(Trace.TRACE_TAG_ACTIVITY_MANAGER); if (parsedArgs.invokeWith != null ) { WrapperInit.execApplication(parsedArgs.invokeWith, parsedArgs.niceName, parsedArgs.targetSdkVersion, VMRuntime.getCurrentInstructionSet(), pipeFd, parsedArgs.remainingArgs); } else { RuntimeInit.zygoteInit(parsedArgs.targetSdkVersion, parsedArgs.remainingArgs, null ); } }
由于我们之前加入参数是没有parsedArgs.invokeWith这个参数,因此这里是null,因此会走else里面的代码,执行RuntimeInit.zygoteInit方法。
10. RuntimeInit.zygoteInit方法: 1 2 3 4 5 6 7 8 9 10 11 12 13 public static final void zygoteInit (int targetSdkVersion, String[] argv, ClassLoader classLoader) throws ZygoteInit.MethodAndArgsCaller { if (DEBUG) Slog.d(TAG, "RuntimeInit: Starting application from zygote" ); Trace.traceBegin(Trace.TRACE_TAG_ACTIVITY_MANAGER, "RuntimeInit" ); redirectLogStreams(); commonInit(); nativeZygoteInit(); applicationInit(targetSdkVersion, argv, classLoader); }
首先调用nativeZygoteInit函数,这是一个native函数,函数的目的是在新创建的应用程序进程中启动一个Binder线程池然后进行进程间通信。然后调用applicationInit函数
11. applicationInit函数: 1 2 3 4 5 6 7 8 9 private static void applicationInit (int targetSdkVersion, String[] argv, ClassLoader classLoader) throws ZygoteInit.MethodAndArgsCaller { ... invokeStaticMain(args.startClass, args.startArgs, classLoader); }
我们在前面讲过args.startClass传入进来的是”android.app.ActivityThread”,表示要执行”android.app.ActivityThread”的main函数。
12. invokeStaticMain函数: 1 2 3 4 5 6 7 8 9 10 11 12 13 14 15 16 17 18 19 20 21 22 23 24 25 26 27 28 29 30 31 32 33 34 35 36 37 38 39 40 41 42 43 44 45 46 47 private static void invokeStaticMain (String className, String[] argv, ClassLoader classLoader) throws ZygoteInit.MethodAndArgsCaller { Class<?> cl; try { cl = Class.forName(className, true , classLoader); } catch (ClassNotFoundException ex) { ... } Method m; try { m = cl.getMethod("main" , new Class [] { String[].class }); } catch (NoSuchMethodException ex) { ... } catch (SecurityException ex) { ... } ... throw new ZygoteInit .MethodAndArgsCaller(m, argv); }
这个就是通过类加载器加载ActivityThread,然后调用起main方法。然后抛出异常,通过ZygoteInit中main函数中的catch来捕获异常。
13. ZygoteInit.main函数: 1 2 3 4 5 6 7 8 9 10 public static void main (String argv[]) { ... } catch (MethodAndArgsCaller caller) { caller.run(); } catch (Throwable ex) { ... } }
通过步骤12可知抛出的异常是MethodAndArgsCaller异常,因此会执行caller.run方法。
14. MethodAndArgsCaller.run: 1 2 3 4 5 6 7 8 9 10 11 12 13 14 15 16 17 18 19 20 21 22 23 24 25 public void run () { try { mMethod.invoke(null , new Object []{mArgs}); } catch (IllegalAccessException ex) { throw new RuntimeException (ex); } catch (InvocationTargetException ex) { Throwable cause = ex.getCause(); if (cause instanceof RuntimeException) { throw (RuntimeException) cause; } else if (cause instanceof Error) { throw (Error) cause; } throw new RuntimeException (ex); } }
通过mMethod.invoke方法调用ActivityThread的main方法。
15. ActivityThread.mian方法: 1 2 3 4 5 6 7 8 9 10 11 12 13 14 15 16 17 18 19 20 21 22 23 24 25 26 27 28 29 30 31 public static void main (String[] args) { ... Looper.prepareMainLooper(); ActivityThread thread = new ActivityThread (); thread.attach(false ); if (sMainThreadHandler == null ) { sMainThreadHandler = thread.getHandler(); } ... Looper.loop(); throw new RuntimeException ("Main thread loop unexpectedly exited" ); }
这里主要是创建该线程的looper,然后创建ActivityThread对象,然后进入消息循环。然后我们就可以启动Activity或者Service了。
代码地址: 直接拉取导入开发工具(Intellij idea或者Android studio)
Android_Framework_Source
注 Android开发群:192508518
微信公众账号:Code-MX
注:本文原创,转载请注明出处,多谢。