上一篇墨香带你学Launcher之(一)- 概述 ,我已经介绍了Launcher的布局以及相关的界面跳转,今天我们继续学习,按照计划,我们开始学习Launcher启动之数据加载,主要是图标、Widget和文件夹的加载.
1.基础知识 在介绍加载之前我先介绍一点需要用的相关知识:
Launcher:继承Activity,是桌面的主界面,因此可知,桌面其实就是一个activity,只是和平常的应用不同,他用来显示图标、Widget和文件夹等;
LauncherModel:继承BroadcastReceiver,由此可知他是一个广播接收器,用来接收广播,另外,LauncherModel还主要加载数据;
LauncherProvider:继承ContentProvider,主要是处理数据库操作;
LauncherAppState:单例模式的全局管理类,主要是初始化一些对象,注册广播等.
Compat:兼容包,带有这个后缀的都是做兼容处理的类.
2.默认图标配置 我们在买回新的手机或者第一次安装新的Launcher后,会发现手机的第一页已经有了一些应用的图标和时钟或者天气插件,那么这个是怎么实现的呢?其实,手机在出厂的时候或者Launcher发到市场的时候已经默认排布了一些应用,在第一启动时就会加载并且判断手机中是否有这些图标,如果有则显示到固定位置,这个位置其实是已经写好的.下面我们看看这个位置到底在哪里写好的.
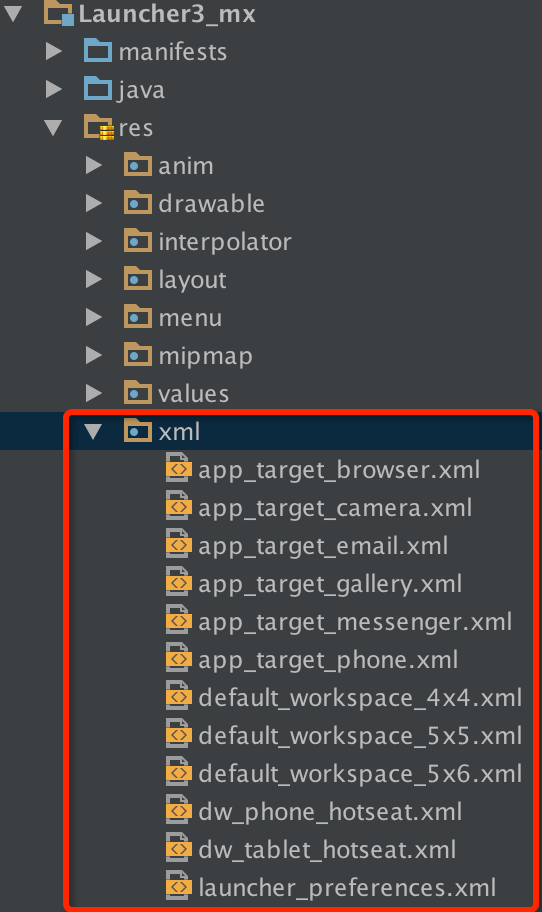
下面是Launcher的资源文件,我们看这个比我们平时的多一个xml文件夹,里面有很多xml文件,那么这些是做什么用的,我来解释一下,有三个文件,分别为default_workspace_4x4.xml,default_workspace_5x5.xml和default_workspace_5x6.xml,这三个文件就是我们默认的布局文件,后面的跟着的4x4、5x5和5x6表示桌面图标的列数和行数,也就是4行4列,5行5列,5行6列,这个怎么用我们后面再说.
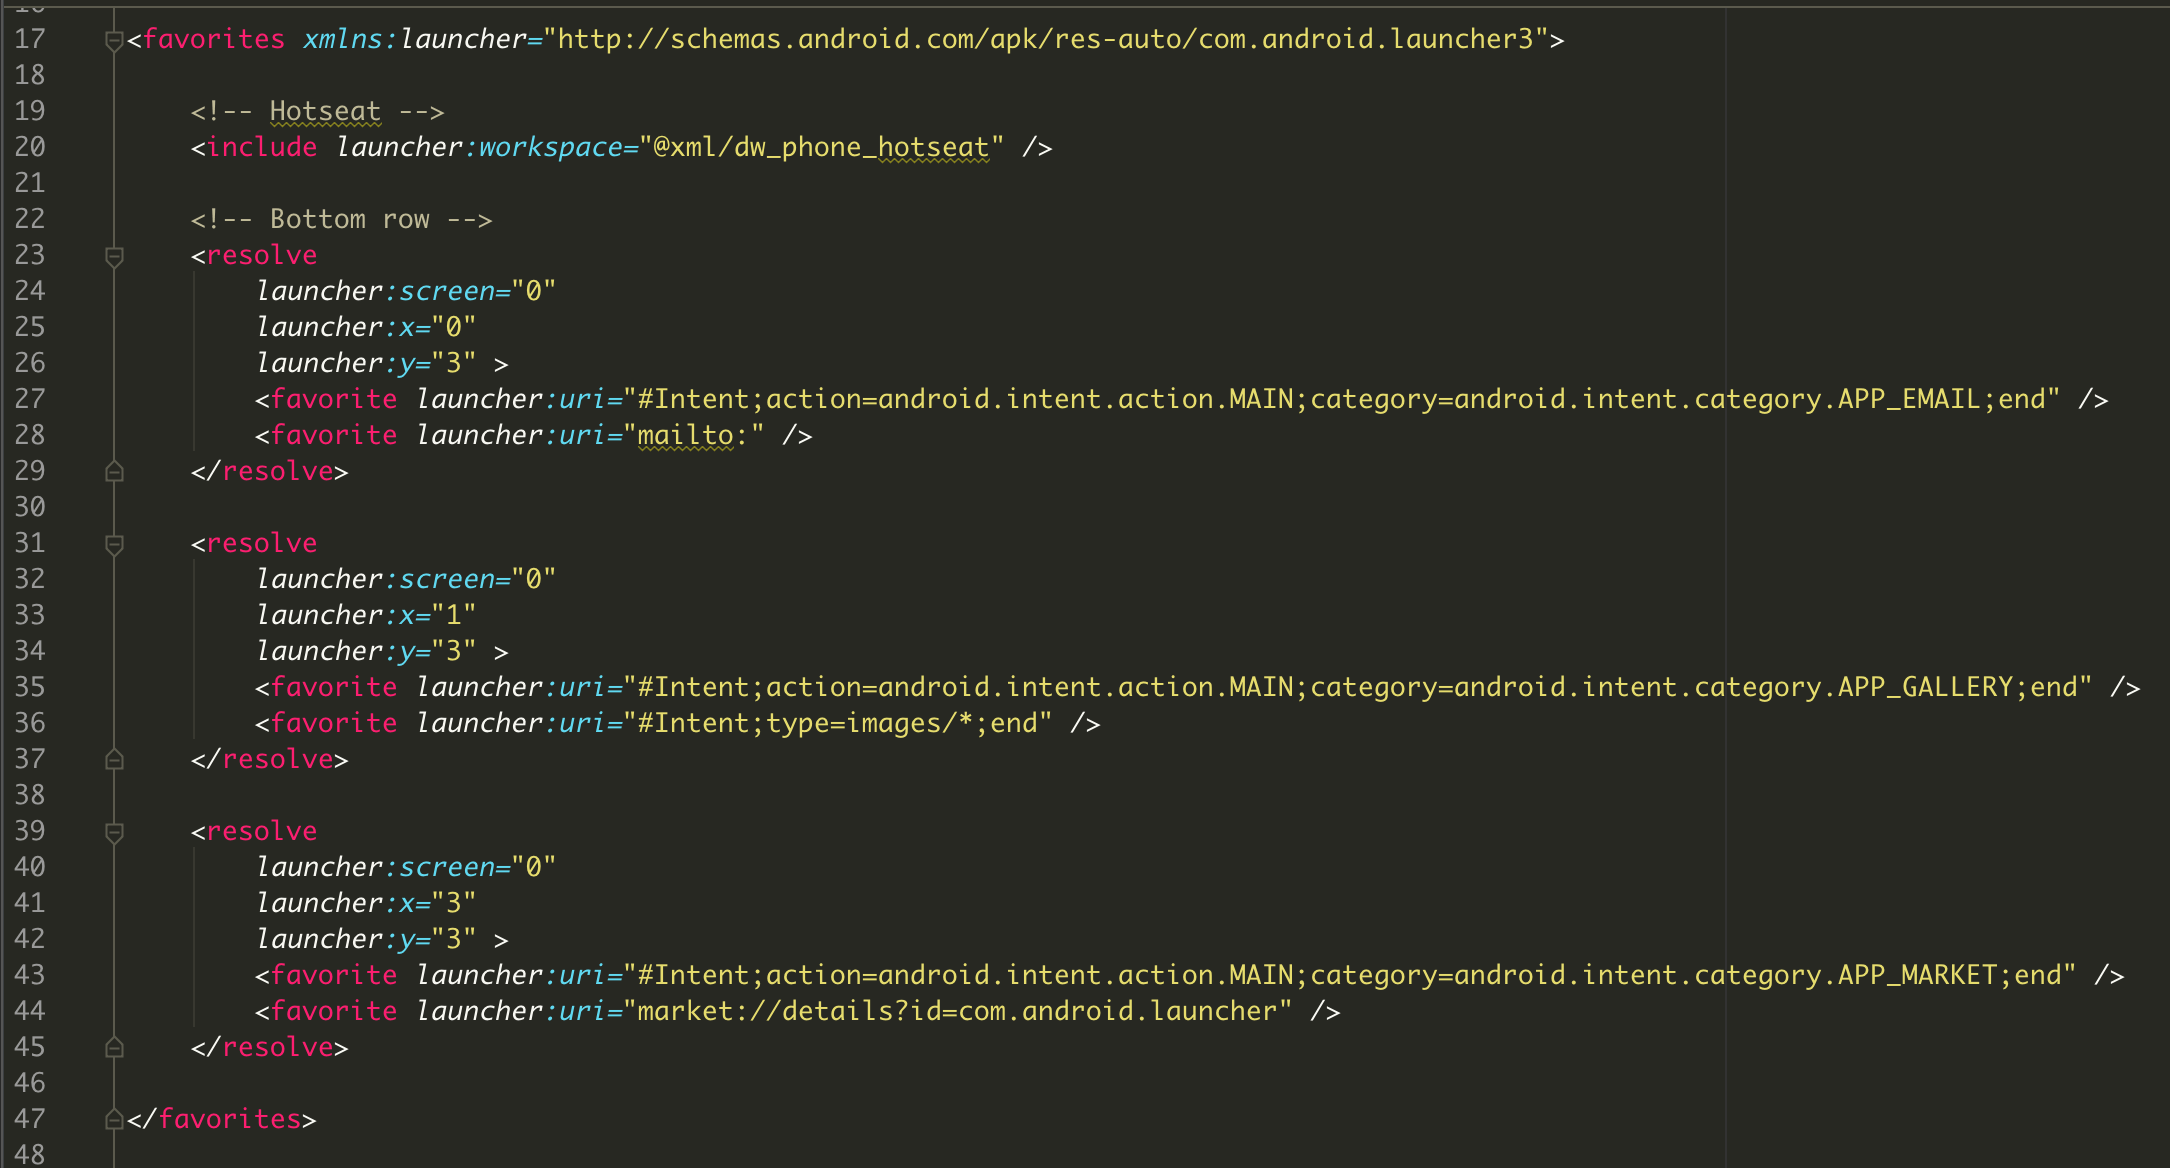
我们先看一下default_workspace_4x4.xml这个文件中的代码:
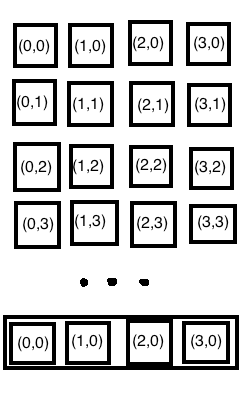
第20行是一个include的文件,在xml文件夹中的名字dw_phone_hotseat文件,我们后面在看,接着看上图的下面的代码,下面是三个resolve文件,里面包含一些信息,screen表示第几屏,x表示横向的位置,y表示纵向的位置,那么这个位置怎定的呢,我来画一个4x4的图你就明白了:
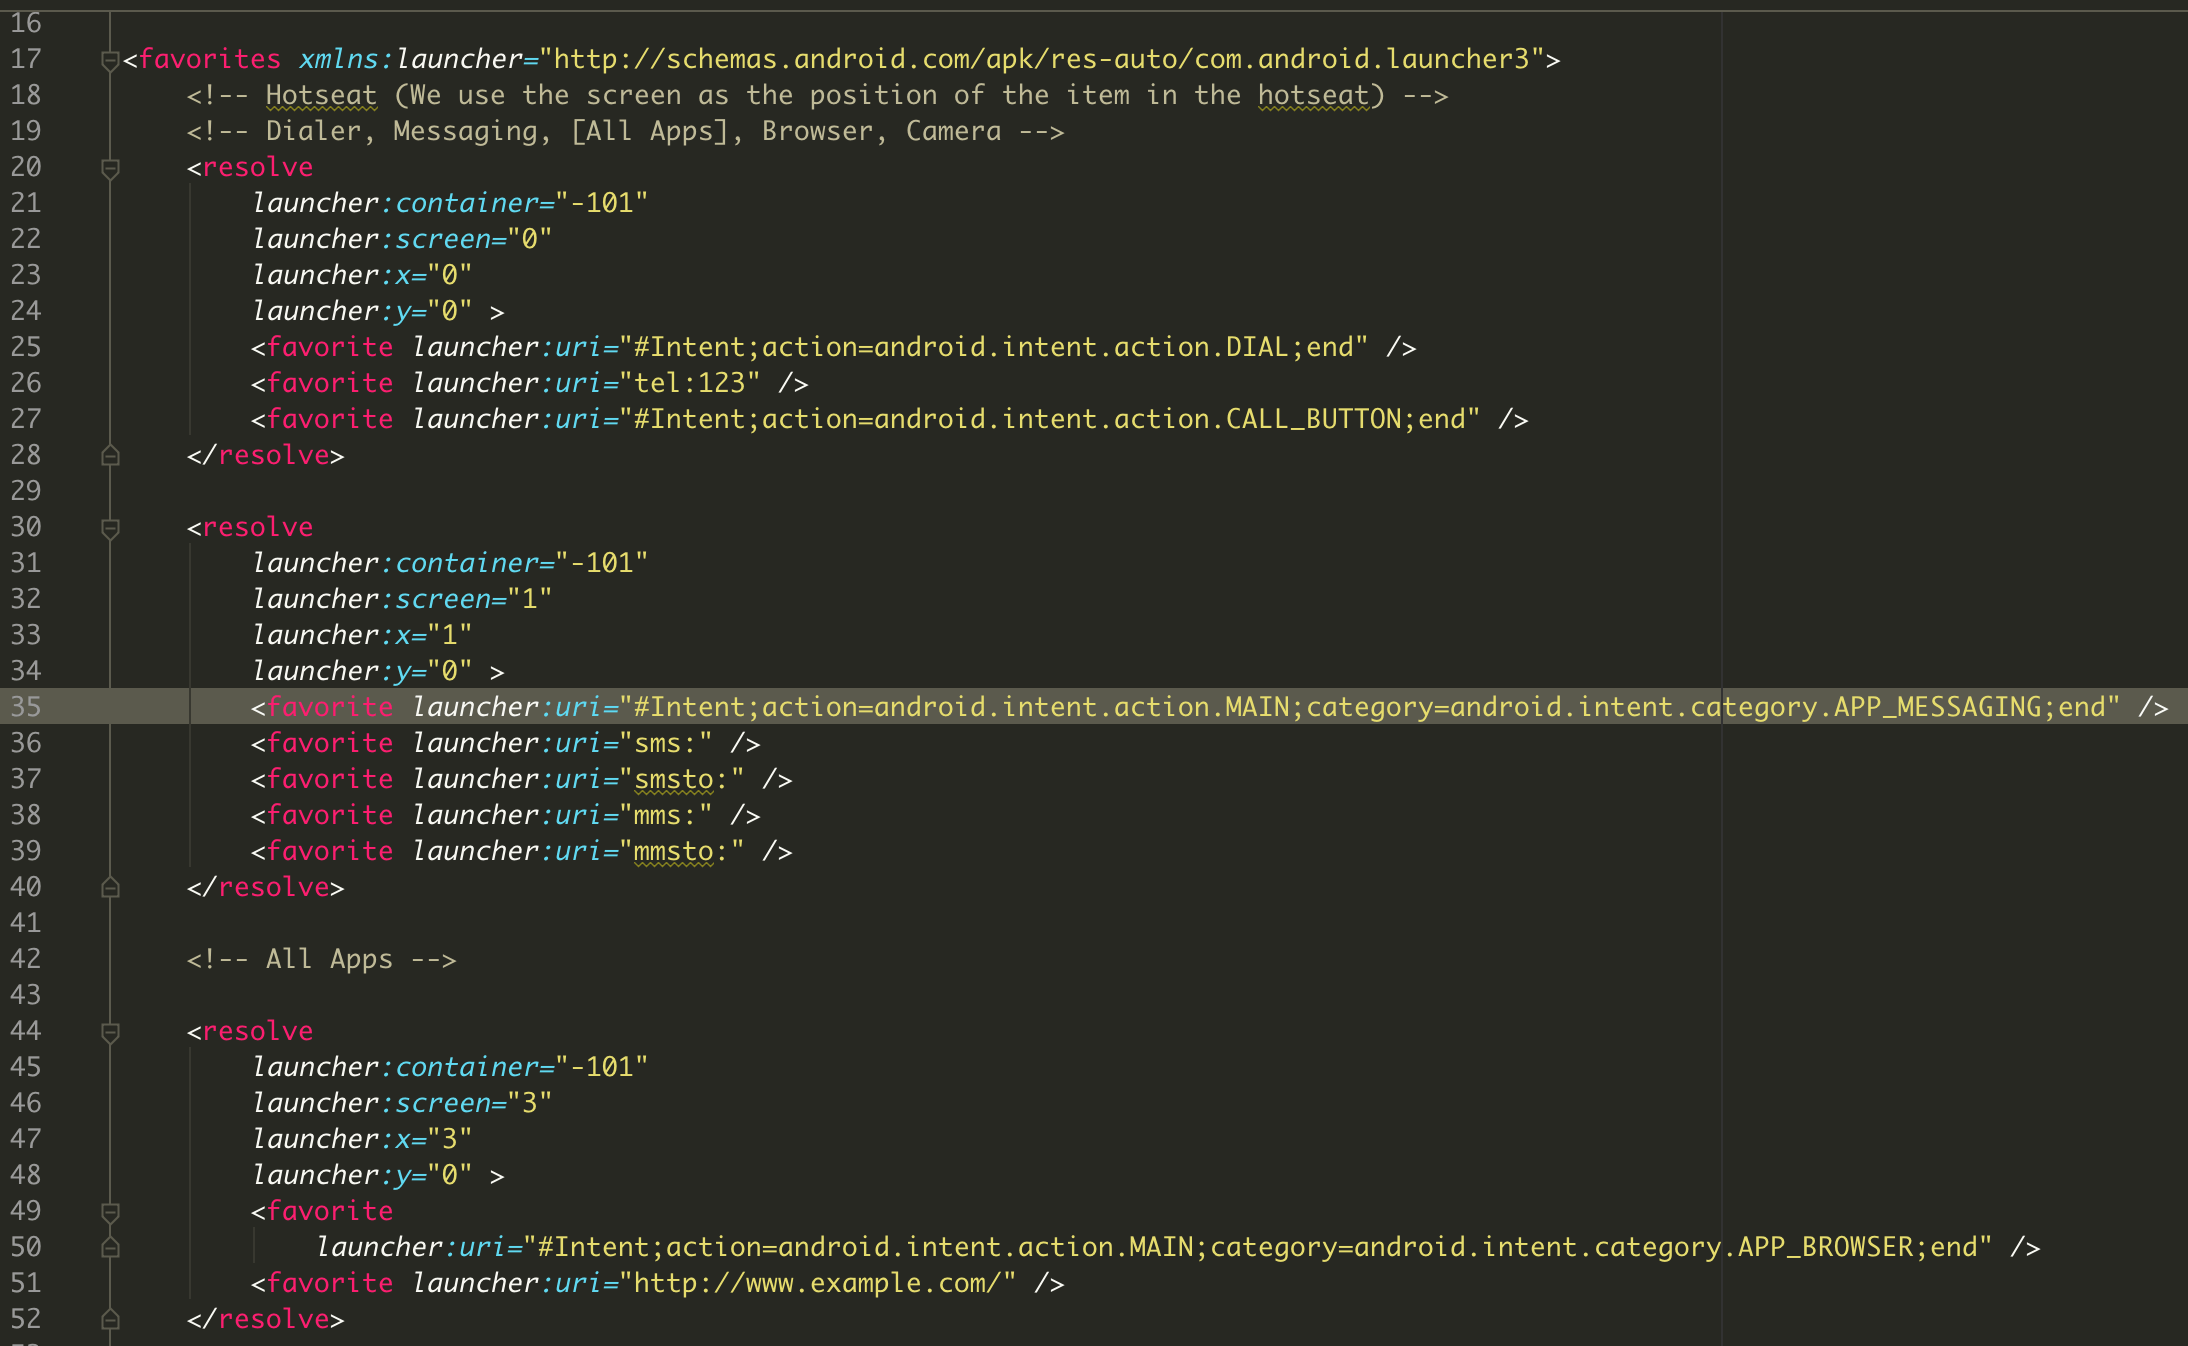
先看上半部分,就是我们说的4x4部分,每一格表示一个图标,在我们绘制图标的时候已经分好了格,每格的大小,只要知道知道他的位置即可绘制图标到相应的位置,那么代码中的x,y就是这个图标的位置.上面resolve中还有两个favorite,在第一个中最后面有个”APP_”,这个我们一看就知道是应用的属性,其实这就表示我们配置了那个app在这个位置,我们再看一下上面介绍的hotseat那个xml文件:
这个图我只截图了一部分,想看全部的可以下载我github上的源码查看,其实只是重复,我介绍一个就知道了,上一章我介绍过hotseat这个概念,其实就是我们手机最下面的那个四个或者五个最常用的app图标,这个就是在这里面配置的,我以第一个为例来介绍这个Hotseat配置,我们先看第21行,这个比我们前面介绍的多个属性就是这个container,之前的是没有的,这个就表示容器,-101就是hotseat,也就是这个图标放置到Hotseat中,Hotseat只有一行,所以只有x在变,而y不变.
到此基本的桌面默认图标显示配置就介绍完了,如果你需要默认显示哪个只需要配置这个文件即可.
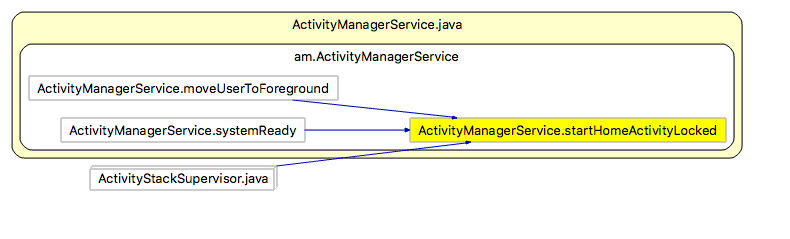
3.Launcher启动过程 下面我们开始介绍Launcher的启动过程.分析Launcher的启动过程要从源码开始分析.在源码中是通过startHomeActivityLocked这个方法调用的启动Launcher,我们先看一下哪里开始调用的这个函数,
从上面的调用图可知有三个地方调用了启动Launcher的方法,这三个方法中首次启动应该是中间的那个systemReady方法,系统准备过程中调用启动Launcher,我们看一下systemReady方法是哪里调用的来验证一下:
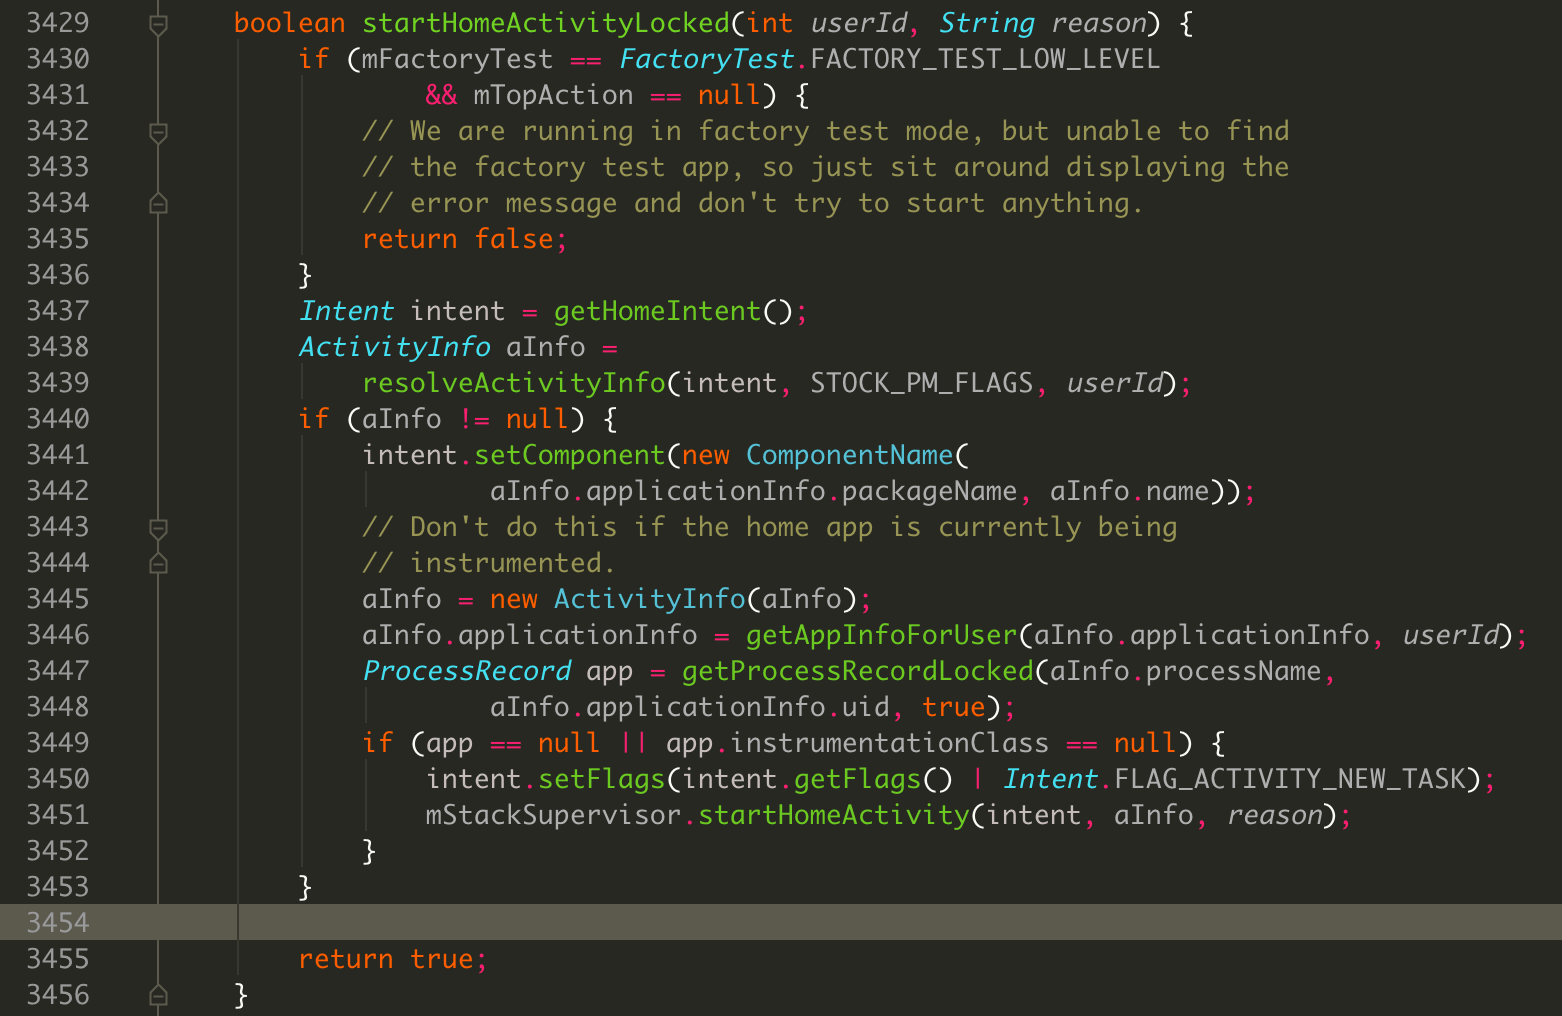
从上代码静态分析图来看最开始是在System.main方法开始的,正好这个方法就是启动系统的一个入口,也就是在这个过程中启动了Launcher,找到调用的地方后,我们来看一下startHomeActivityLocked是怎么启动Launcher的,首先看一下源码:
我们看上面的3437行,获取Intent,再看3451行,如果不为空,则启动HomeActivity,我们看一下这个Intent是什么的Intent:
上面的3424行,有个Intent.CATEGORY_HOME,我们在Intent中找到这个属性的代码:
这个就是我们上一章讲的设置app为launcher的属性值.
通过上面这些分析可以看到系统是怎么启动launcher的.下面我们看是介绍Launcher内部是如何启动的.
4.Launcher初始化 我们知道App的启动是从Application开始的,但是我们最新的Launcher3中,谷歌工程师把这个类移除,再次之前的版本都是有这个类的,我在这提一下就是因为开发以前launcher的时候遇到一个问题,就是在Application和ContentProvider同时存在时,ContentProvider的onCreate方法要比Application的onCreate方法先启动,下面我们通过源码分析来验证这个问题.
启动Application是从ActivityManagerService中的attachApplication方法开始的,代码:
1
2
3
4
5
6
7
8
9
10
public final void attachApplication (IApplicationThread thread) { synchronized (this ) { int callingPid = Binder.getCallingPid(); final long origId = Binder.clearCallingIdentity(); attachApplicationLocked(thread, callingPid); Binder.restoreCallingIdentity(origId); } }
接着调用attachApplicationLocked方法,代码如下:
1
2
3
4
5
6
7
8
9
10
11
12
13
14
15
16
17
18
19
20
21
22
23
24
25
26
27
28
29
30
31
32
33
34
35
36
37
38
39
40
41
42
43
44
45
46
47
48
49
50
51
private final boolean attachApplicationLocked (IApplicationThread thread, int pid) { app.makeActive(thread, mProcessStats); app.curAdj = app.setAdj = -100 ; app.curSchedGroup = app.setSchedGroup = Process.THREAD_GROUP_DEFAULT; app.forcingToForeground = null ; updateProcessForegroundLocked(app, false , false ); app.hasShownUi = false ; app.debugging = false ; app.cached = false ; app.killedByAm = false ; mHandler.removeMessages(PROC_START_TIMEOUT_MSG, app); boolean normalMode = mProcessesReady || isAllowedWhileBooting(app.info); List<ProviderInfo> providers = normalMode ? generateApplicationProvidersLocked(app) : null ; if (!normalMode) { Slog.i(TAG, "Launching preboot mode app: " + app); } if (DEBUG_ALL) Slog.v( TAG, "New app record " + app + " thread=" + thread.asBinder() + " pid=" + pid); try { ... ProfilerInfo profilerInfo = profileFile == null ? null : new ProfilerInfo (profileFile, profileFd, samplingInterval, profileAutoStop); thread.bindApplication(processName, appInfo, providers, app.instrumentationClass, profilerInfo, app.instrumentationArguments, app.instrumentationWatcher, app.instrumentationUiAutomationConnection, testMode, enableOpenGlTrace, isRestrictedBackupMode || !normalMode, app.persistent, new Configuration (mConfiguration), app.compat, getCommonServicesLocked(app.isolated), mCoreSettingsObserver.getCoreSettingsLocked()); updateLruProcessLocked(app, false , null ); app.lastRequestedGc = app.lastLowMemory = SystemClock.uptimeMillis(); } catch (Exception e) { app.resetPackageList(mProcessStats); app.unlinkDeathRecipient(); startProcessLocked(app, "bind fail" , processName); return false ; } ... return true ; }
上面代码中主要有一个thread.bindApplication方法来绑定application,接着看bindApplication代码:
1
2
3
4
5
6
7
8
9
10
11
12
13
14
15
16
17
18
19
20
21
22
23
24
25
26
27
28
public final void bindApplication (String processName, ApplicationInfo appInfo, List<ProviderInfo> providers, ComponentName instrumentationName, ProfilerInfo profilerInfo, Bundle instrumentationArgs, IInstrumentationWatcher instrumentationWatcher, IUiAutomationConnection instrumentationUiConnection, int debugMode, boolean enableOpenGlTrace, boolean isRestrictedBackupMode, boolean persistent, Configuration config, CompatibilityInfo compatInfo, Map<String, IBinder> services, Bundle coreSettings) { ... AppBindData data = new AppBindData (); data.processName = processName; data.appInfo = appInfo; data.providers = providers; data.instrumentationName = instrumentationName; data.instrumentationArgs = instrumentationArgs; data.instrumentationWatcher = instrumentationWatcher; data.instrumentationUiAutomationConnection = instrumentationUiConnection; data.debugMode = debugMode; data.enableOpenGlTrace = enableOpenGlTrace; data.restrictedBackupMode = isRestrictedBackupMode; data.persistent = persistent; data.config = config; data.compatInfo = compatInfo; data.initProfilerInfo = profilerInfo; sendMessage(H.BIND_APPLICATION, data); }
准备data数据,然后发送消息到Handler,Handler中处理消息的代码如下:
1
2
3
4
5
6
7
8
9
10
11
12
13
14
15
16
17
public void handleMessage (Message msg) { if (DEBUG_MESSAGES) Slog.v(TAG, ">>> handling: " + codeToString(msg.what)); switch (msg.what) { case BIND_APPLICATION: Trace.traceBegin(Trace.TRACE_TAG_ACTIVITY_MANAGER, "bindApplication" ); AppBindData data = (AppBindData)msg.obj; handleBindApplication(data); Trace.traceEnd(Trace.TRACE_TAG_ACTIVITY_MANAGER); break ; } if (DEBUG_MESSAGES) Slog.v(TAG, "<<< done: " + codeToString(msg.what)); }
根据消息类型BIND_APPLICATION来判断调用handleBindApplication方法,
1
2
3
4
5
6
7
8
9
10
11
12
13
14
15
16
17
18
19
20
21
22
23
24
25
26
27
28
29
30
31
32
33
34
35
36
37
38
39
40
41
42
private void handleBindApplication (AppBindData data) { ... try { Application app = data.info.makeApplication(data.restrictedBackupMode, null ); mInitialApplication = app; if (!data.restrictedBackupMode) { List<ProviderInfo> providers = data.providers; if (providers != null ) { installContentProviders(app, providers); mH.sendEmptyMessageDelayed(H.ENABLE_JIT, 10 *1000 ); } } ... try { mInstrumentation.callApplicationOnCreate(app); } catch (Exception e) { if (!mInstrumentation.onException(app, e)) { throw new RuntimeException ( "Unable to create application " + app.getClass().getName() + ": " + e.toString(), e); } } } finally { StrictMode.setThreadPolicy(savedPolicy); } }
在上面函数中调用installContentProviders方法来安装ContentProvider,代码如下:
1
2
3
4
5
6
7
8
9
10
11
12
13
14
15
16
17
18
19
20
21
22
23
24
private void installContentProviders ( Context context, List<ProviderInfo> providers) { final ArrayList<IActivityManager.ContentProviderHolder> results = new ArrayList <IActivityManager.ContentProviderHolder>(); for (ProviderInfo cpi : providers) { if (DEBUG_PROVIDER) { StringBuilder buf = new StringBuilder (128 ); buf.append("Pub " ); buf.append(cpi.authority); buf.append(": " ); buf.append(cpi.name); Log.i(TAG, buf.toString()); } IActivityManager.ContentProviderHolder cph = installProvider(context, null , cpi, ... } ... }
调用installProvider返回一个IActivityManager.ContentProviderHolder对象,我们看这个方法里面做了哪些处理,
1
2
3
4
5
6
7
8
9
10
11
12
13
14
15
16
17
18
19
20
21
22
23
24
25
26
27
28
29
30
31
32
33
34
35
36
37
38
39
40
41
42
43
44
45
46
47
48
49
50
51
52
53
54
55
56
57
58
59
60
61
62
63
64
65
66
67
68
private IActivityManager.ContentProviderHolder installProvider (Context context, IActivityManager.ContentProviderHolder holder, ProviderInfo info, boolean noisy, boolean noReleaseNeeded, boolean stable) { ContentProvider localProvider = null ; IContentProvider provider; if (holder == null || holder.provider == null ) { if (DEBUG_PROVIDER || noisy) { Slog.d(TAG, "Loading provider " + info.authority + ": " + info.name); } Context c = null ; ApplicationInfo ai = info.applicationInfo; if (context.getPackageName().equals(ai.packageName)) { c = context; } else if (mInitialApplication != null && mInitialApplication.getPackageName().equals(ai.packageName)) { c = mInitialApplication; } else { try { c = context.createPackageContext(ai.packageName, Context.CONTEXT_INCLUDE_CODE); } catch (PackageManager.NameNotFoundException e) { } } if (c == null ) { Slog.w(TAG, "Unable to get context for package " + ai.packageName + " while loading content provider " + info.name); return null ; } try { final java.lang.ClassLoader cl = c.getClassLoader(); localProvider = (ContentProvider)cl. loadClass(info.name).newInstance(); provider = localProvider.getIContentProvider(); if (provider == null ) { Slog.e(TAG, "Failed to instantiate class " + info.name + " from sourceDir " + info.applicationInfo.sourceDir); return null ; } if (DEBUG_PROVIDER) Slog.v( TAG, "Instantiating local provider " + info.name); localProvider.attachInfo(c, info); } catch (java.lang.Exception e) { if (!mInstrumentation.onException(null , e)) { throw new RuntimeException ( "Unable to get provider " + info.name + ": " + e.toString(), e); } return null ; } } else { provider = holder.provider; if (DEBUG_PROVIDER) Slog.v(TAG, "Installing external provider " + info.authority + ": " + info.name); } ... return retHolder; }
上面代码中有个关键方法:localProvider.attachInfo(c, info),这个方法就是添加Provider的,代码如下:
1
2
3
4
5
6
7
8
9
10
11
12
13
14
15
16
17
18
19
20
21
22
23
private void attachInfo (Context context, ProviderInfo info, boolean testing) { if (mContext == null ) { mContext = context; if (context != null ) { mTransport.mAppOpsManager = (AppOpsManager) context.getSystemService( Context.APP_OPS_SERVICE); } mMyUid = Process.myUid(); if (info != null ) { setReadPermission(info.readPermission); setWritePermission(info.writePermission); setPathPermissions(info.pathPermissions); mExported = info.exported; } ContentProvider.this .onCreate(); } }
我们看到在最后调用了ContentProvider.this.onCreate()这个方法,然后会返回到handleBindApplication方法中执行mInstrumentation.callApplicationOnCreate(app)方法,代码如下:
1
2
3
4
5
public void callApplicationOnCreate (Application app) { app.onCreate(); }
因此我们看到ContentProvider的onCreate方法比Application的onCreate方法调用早。这里只是简单介绍详细过程去看源码。
我现在讲解的是基于最新的Launcher3代码,因此我们这个Launcher中没有Application,所以程序启动最开始的是ContentProvider的onCreate方法,代码如下:
1
2
3
4
5
6
7
8
9
public boolean onCreate () { final Context context = getContext(); StrictMode.ThreadPolicy oldPolicy = StrictMode.allowThreadDiskWrites(); mOpenHelper = new DatabaseHelper (context); StrictMode.setThreadPolicy(oldPolicy); LauncherAppState.setLauncherProvider(this ); return true ; }
代码中处理的事情不多,主要是启动严苛模式和创建数据库,关于严苛模式的具体信息看官方文档或者博客,都有很详细的讲解,然后将ContentProvider放置到整个Launcher的管理类LauncherAppState中,以方便获取。
接下来就是启动Launcher,我么看一下Launcher中的onCreate方法中的代码:
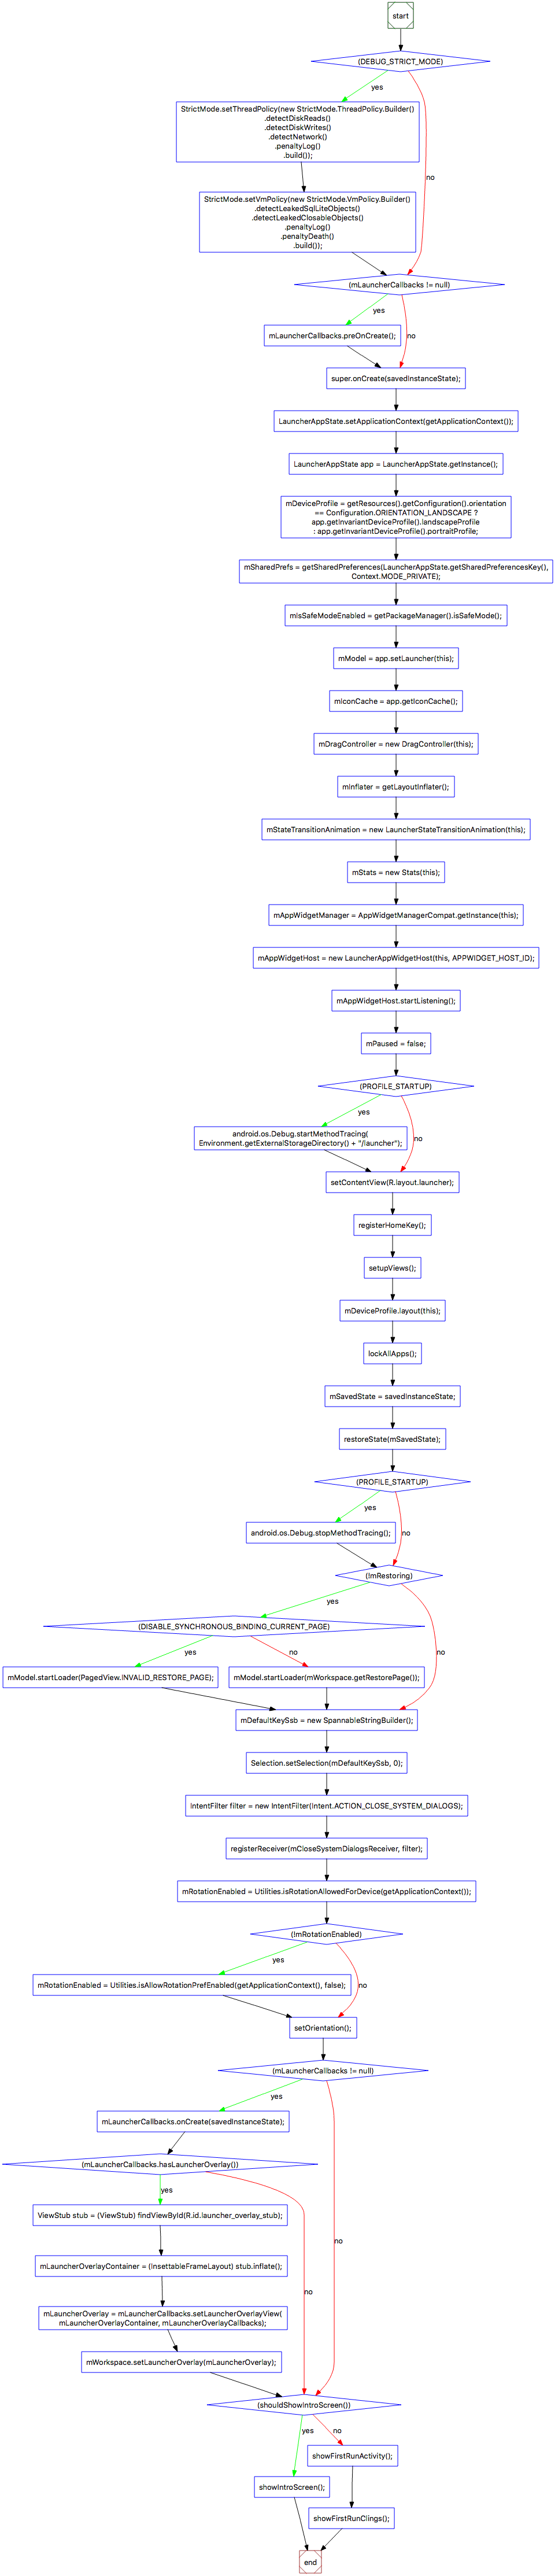
1
2
3
4
5
6
7
8
9
10
11
12
13
14
15
16
17
18
19
20
21
22
23
24
25
26
27
28
29
30
31
32
33
34
35
36
37
38
39
40
41
42
43
44
45
46
47
48
49
50
51
52
53
54
55
56
57
58
59
60
61
62
63
64
65
66
67
68
69
70
71
72
73
74
75
76
77
78
79
80
81
82
83
84
85
86
87
88
89
90
91
92
93
94
95
96
97
98
99
100
101
102
103
104
105
106
107
108
109
110
111
112
113
114
115
116
117
118
119
120
121
122
123
@Override protected void onCreate (Bundle savedInstanceState) { if (DEBUG_STRICT_MODE) { StrictMode.setThreadPolicy(new StrictMode .ThreadPolicy.Builder() .detectDiskReads() .detectDiskWrites() .detectNetwork() .penaltyLog() .build()); StrictMode.setVmPolicy(new StrictMode .VmPolicy.Builder() .detectLeakedSqlLiteObjects() .detectLeakedClosableObjects() .penaltyLog() .penaltyDeath() .build()); } if (mLauncherCallbacks != null ) { mLauncherCallbacks.preOnCreate(); } super .onCreate(savedInstanceState); LauncherAppState.setApplicationContext(getApplicationContext()); LauncherAppState app = LauncherAppState.getInstance(); mDeviceProfile = getResources().getConfiguration().orientation == Configuration.ORIENTATION_LANDSCAPE ? app.getInvariantDeviceProfile().landscapeProfile : app.getInvariantDeviceProfile().portraitProfile; mSharedPrefs = getSharedPreferences(LauncherAppState.getSharedPreferencesKey(), Context.MODE_PRIVATE); mIsSafeModeEnabled = getPackageManager().isSafeMode(); mModel = app.setLauncher(this ); mIconCache = app.getIconCache(); mDragController = new DragController (this ); mInflater = getLayoutInflater(); mStateTransitionAnimation = new LauncherStateTransitionAnimation (this ); mStats = new Stats (this ); mAppWidgetManager = AppWidgetManagerCompat.getInstance(this ); mAppWidgetHost = new LauncherAppWidgetHost (this , APPWIDGET_HOST_ID); mAppWidgetHost.startListening(); mPaused = false ; if (PROFILE_STARTUP) { android.os.Debug.startMethodTracing( Environment.getExternalStorageDirectory() + "/launcher" ); } setContentView(R.layout.launcher); registerHomeKey(); setupViews(); mDeviceProfile.layout(this ); mSavedState = savedInstanceState; restoreState(mSavedState); if (PROFILE_STARTUP) { android.os.Debug.stopMethodTracing(); } if (!mRestoring) { if (DISABLE_SYNCHRONOUS_BINDING_CURRENT_PAGE) { mModel.startLoader(PagedView.INVALID_RESTORE_PAGE); } else { mModel.startLoader(mWorkspace.getRestorePage()); } } mDefaultKeySsb = new SpannableStringBuilder (); Selection.setSelection(mDefaultKeySsb, 0 ); IntentFilter filter = new IntentFilter (Intent.ACTION_CLOSE_SYSTEM_DIALOGS); registerReceiver(mCloseSystemDialogsReceiver, filter); mRotationEnabled = Utilities.isRotationAllowedForDevice(getApplicationContext()); if (!mRotationEnabled) { mRotationEnabled = Utilities.isAllowRotationPrefEnabled(getApplicationContext(), false ); } setOrientation(); if (mLauncherCallbacks != null ) { mLauncherCallbacks.onCreate(savedInstanceState); if (mLauncherCallbacks.hasLauncherOverlay()) { ViewStub stub = (ViewStub) findViewById(R.id.launcher_overlay_stub); mLauncherOverlayContainer = (InsettableFrameLayout) stub.inflate(); mLauncherOverlay = mLauncherCallbacks.setLauncherOverlayView( mLauncherOverlayContainer, mLauncherOverlayCallbacks); mWorkspace.setLauncherOverlay(mLauncherOverlay); } } if (shouldShowIntroScreen()) { showIntroScreen(); } else { showFirstRunActivity(); showFirstRunClings(); } }
代码比较多我们看一下执行过程图:
首先是启动严苛模式,准备回调接口,初始化LauncherAppState:
1
2
3
4
5
6
7
8
9
10
11
12
13
14
15
16
17
18
19
20
21
22
23
24
25
26
27
28
29
30
31
32
33
34
35
36
37
38
39
private LauncherAppState () { if (sContext == null ) { throw new IllegalStateException ("LauncherAppState inited before app context set" ); } if (sContext.getResources().getBoolean(R.bool.debug_memory_enabled)) { MemoryTracker.startTrackingMe(sContext, "L" ); } mInvariantDeviceProfile = new InvariantDeviceProfile (sContext); mIconCache = new IconCache (sContext, mInvariantDeviceProfile); mWidgetCache = new WidgetPreviewLoader (sContext, mIconCache); mAppFilter = AppFilter.loadByName(sContext.getString(R.string.app_filter_class)); mBuildInfo = BuildInfo.loadByName(sContext.getString(R.string.build_info_class)); mModel = new LauncherModel (this , mIconCache, mAppFilter); LauncherAppsCompat.getInstance(sContext).addOnAppsChangedCallback(mModel); IntentFilter filter = new IntentFilter (); filter.addAction(Intent.ACTION_LOCALE_CHANGED); filter.addAction(SearchManager.INTENT_GLOBAL_SEARCH_ACTIVITY_CHANGED); filter.addAction(LauncherAppsCompat.ACTION_MANAGED_PROFILE_ADDED); filter.addAction(LauncherAppsCompat.ACTION_MANAGED_PROFILE_REMOVED); sContext.registerReceiver(mModel, filter); UserManagerCompat.getInstance(sContext).enableAndResetCache(); }
然后初始化手机固件信息对象DeviceProfile,初始化拖拽管理器DragController,然后初始化小部件管理器,加载布局,初始化桌面各个控件,并且设置各个控件的位置:
1
2
3
4
5
6
7
8
9
10
11
12
13
14
15
16
17
18
19
20
21
22
23
24
25
26
27
28
29
30
31
32
33
34
35
public void layout (Launcher launcher) { FrameLayout.LayoutParams lp; boolean hasVerticalBarLayout = isVerticalBarLayout(); final boolean isLayoutRtl = Utilities.isRtl(launcher.getResources()); View searchBar = launcher.getSearchDropTargetBar(); lp = (FrameLayout.LayoutParams) searchBar.getLayoutParams(); if (hasVerticalBarLayout) { lp.gravity = Gravity.LEFT; lp.width = searchBarSpaceHeightPx; LinearLayout targets = (LinearLayout) searchBar.findViewById(R.id.drag_target_bar); targets.setOrientation(LinearLayout.VERTICAL); FrameLayout.LayoutParams targetsLp = (FrameLayout.LayoutParams) targets.getLayoutParams(); targetsLp.gravity = Gravity.TOP; targetsLp.height = LayoutParams.WRAP_CONTENT; } else { lp.gravity = Gravity.TOP; lp.height = searchBarSpaceHeightPx; LinearLayout targets = (LinearLayout) searchBar.findViewById(R.id.drag_target_bar); targets.getLayoutParams().width = searchBarSpaceWidthPx; } searchBar.setLayoutParams(lp); ... }
这里就是动态设置桌面各个控件的位置及宽高等属性。当所有信息初始化完成后,就开始调用mModel.startLoader方法来加载应用数据。下面我们详细来讲数据加载流程。
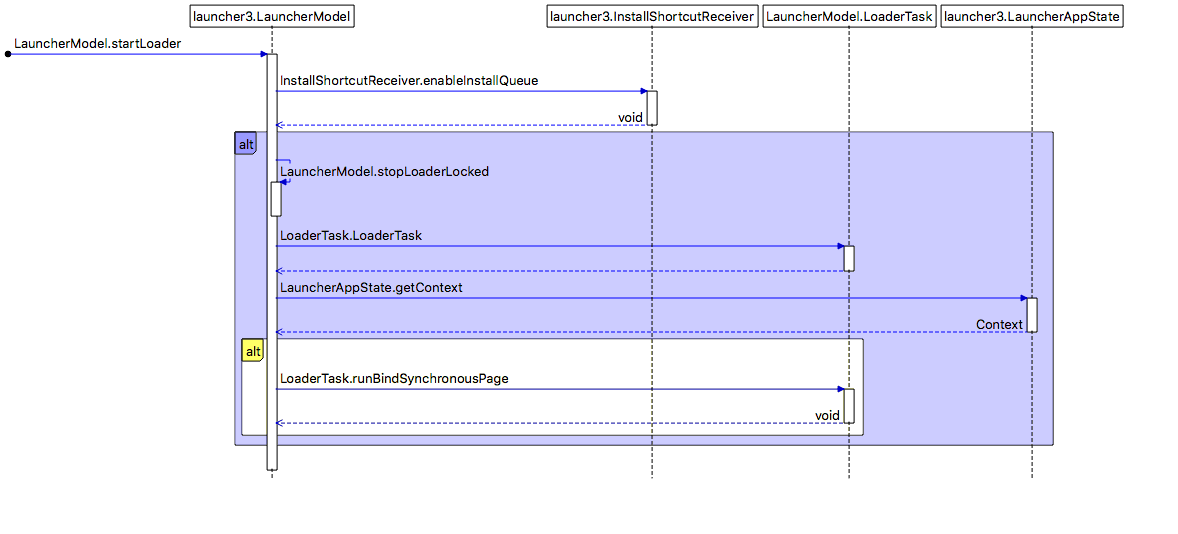
5.Launcher数据加载 数据加载主要是从LauncherModel中的startLoader方法开始,先看一下这个方法做的事情:
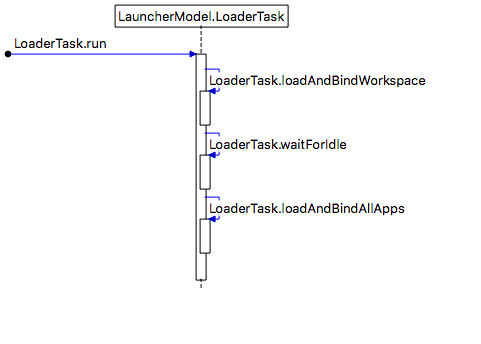
这里的事情不多,主要是调用LoaderTask这个任务,LoaderTask实现了Runnable这个接口,因此首先执行润run方法,我么看一下这个run方法里面做了哪些事情,
1
2
3
4
5
6
7
8
9
10
11
12
13
14
15
16
17
18
19
20
21
22
23
24
public void run () { ... keep_running: { loadAndBindWorkspace(); if (mStopped) { break keep_running; } waitForIdle(); ... loadAndBindAllApps(); } ... }
在这个方法中主要是三件事,我们用时序图表一下:
首先是执行loadAndBindWorkspace方法:
1
2
3
4
5
6
7
8
9
10
11
12
13
14
15
16
17
18
19
private void loadAndBindWorkspace () { ... if (!mWorkspaceLoaded) { loadWorkspace(); synchronized (LoaderTask.this ) { if (mStopped) { return ; } mWorkspaceLoaded = true ; } } bindWorkspace(-1 ); }
这里面主要是执行loadWorkspace和bindWorkspace,也就是加载workspace的应用并且进行绑定。先看loadWorkspace方法,代码很多,我们只贴关键部分:
1
2
3
4
5
6
7
8
9
10
11
12
13
14
15
16
17
18
19
20
21
22
23
24
25
26
27
28
29
30
31
32
33
34
35
36
37
38
39
40
41
42
43
44
45
46
47
48
49
50
51
52
53
54
55
56
57
58
59
60
61
62
63
64
65
66
67
68
69
70
71
72
73
74
75
76
77
78
79
80
81
82
83
84
85
86
87
88
89
90
91
92
93
94
95
96
97
98
99
100
101
102
103
104
105
106
107
108
109
110
111
112
113
114
115
116
117
118
119
120
121
122
123
124
125
126
127
128
129
130
131
132
133
134
135
136
137
138
139
140
141
142
143
144
145
146
147
148
149
150
151
152
153
154
155
156
157
158
159
160
161
162
163
164
165
166
167
168
169
170
171
172
173
174
175
176
177
178
179
180
181
182
183
184
185
private void loadWorkspace () { ... if ((mFlags & LOADER_FLAG_MIGRATE_SHORTCUTS) != 0 ) { Launcher.addDumpLog(TAG, "loadWorkspace: migrating from launcher2" , true ); LauncherAppState.getLauncherProvider().migrateLauncher2Shortcuts(); } else { Launcher.addDumpLog(TAG, "loadWorkspace: loading default favorites" , false ); LauncherAppState.getLauncherProvider().loadDefaultFavoritesIfNecessary(); } synchronized (sBgLock) { ... try { ... while (!mStopped && c.moveToNext()) { try { int itemType = c.getInt(itemTypeIndex); boolean restored = 0 != c.getInt(restoredIndex); boolean allowMissingTarget = false ; container = c.getInt(containerIndex); switch (itemType) { case LauncherSettings.Favorites.ITEM_TYPE_APPLICATION: case LauncherSettings.Favorites.ITEM_TYPE_SHORTCUT: ... try { intent = Intent.parseUri(intentDescription, 0 ); ComponentName cn = intent.getComponent(); if (cn != null && cn.getPackageName() != null ) { boolean validPkg = launcherApps.isPackageEnabledForProfile( cn.getPackageName(), user); boolean validComponent = validPkg && launcherApps.isActivityEnabledForProfile(cn, user); if (validComponent) { ... } else if (validPkg) { ... } else if (restored) { ... } else if (launcherApps.isAppEnabled( manager, cn.getPackageName(), PackageManager.GET_UNINSTALLED_PACKAGES)) { ... } else if (!isSdCardReady) { ... } else { ... } } else if (cn == null ) { restoredRows.add(id); restored = false ; } } catch (URISyntaxException e) { Launcher.addDumpLog(TAG, "Invalid uri: " + intentDescription, true ); itemsToRemove.add(id); continue ; } ... if (info != null ) { info.id = id; info.intent = intent; info.container = container; info.screenId = c.getInt(screenIndex); info.cellX = c.getInt(cellXIndex); info.cellY = c.getInt(cellYIndex); info.rank = c.getInt(rankIndex); info.spanX = 1 ; info.spanY = 1 ; info.intent.putExtra(ItemInfo.EXTRA_PROFILE, serialNumber); ... switch (container) { case LauncherSettings.Favorites.CONTAINER_DESKTOP: case LauncherSettings.Favorites.CONTAINER_HOTSEAT: sBgWorkspaceItems.add(info); break ; default : FolderInfo folderInfo = findOrMakeFolder(sBgFolders, container); folderInfo.add(info); break ; } sBgItemsIdMap.put(info.id, info); } else { throw new RuntimeException ("Unexpected null ShortcutInfo" ); } break ; case LauncherSettings.Favorites.ITEM_TYPE_FOLDER: ... break ; case LauncherSettings.Favorites.ITEM_TYPE_APPWIDGET: case LauncherSettings.Favorites.ITEM_TYPE_CUSTOM_APPWIDGET: ... break ; } } catch (Exception e) { Launcher.addDumpLog(TAG, "Desktop items loading interrupted" , e, true ); } } } finally { ... } ... for (FolderInfo folder : sBgFolders) { Collections.sort(folder.contents, Folder.ITEM_POS_COMPARATOR); int pos = 0 ; for (ShortcutInfo info : folder.contents) { if (info.usingLowResIcon) { info.updateIcon(mIconCache, false ); } pos++; if (pos >= FolderIcon.NUM_ITEMS_IN_PREVIEW) { break ; } } } if (restoredRows.size() > 0 ) { ContentValues values = new ContentValues (); values.put(LauncherSettings.Favorites.RESTORED, 0 ); contentResolver.update(LauncherSettings.Favorites.CONTENT_URI, values, Utilities.createDbSelectionQuery( LauncherSettings.Favorites._ID, restoredRows), null ); } if (!isSdCardReady && !sPendingPackages.isEmpty()) { context.registerReceiver(new AppsAvailabilityCheck (), new IntentFilter (StartupReceiver.SYSTEM_READY), null , sWorker); } ... if (unusedScreens.size() != 0 ) { sBgWorkspaceScreens.removeAll(unusedScreens); updateWorkspaceScreenOrder(context, sBgWorkspaceScreens); } ... } }
首先是调用loadDefaultFavoritesIfNecessary这个方法,来解析我们上面讲的配置默认的桌面图标的xml文件,流程就是:初始化AutoInstallsLayout,然后调用LauncherProvider中的loadFavorites方法,在这个方法中调用AutoInstallsLayout中的loadLayout方法来解析配置的xml文件,在AutoInstallsLayout中通过对小部件,图标,文件夹等分类进行分辨解析,解析过程中如果有include标签,则对相应的xml文件进行解析,解析过程相对简单,不在做详细讲解,解析过程中将解析的各种信息存储到数据库中,以方便后面使用,当xml文件解析完成后,开始读取解析xml配置文件存储到数据库的数据,读取出来后,根据相应的类型(图标,小部件,文件夹等)进行判断,判断系统中这个应用是否存在,是否可用,如果可用则生成相应对象并存储到想定的map中,如果不存在则删除数据库中的数据,这样整个判断完成后数据库中的数据就只剩下系统中存在的配置应用过了。
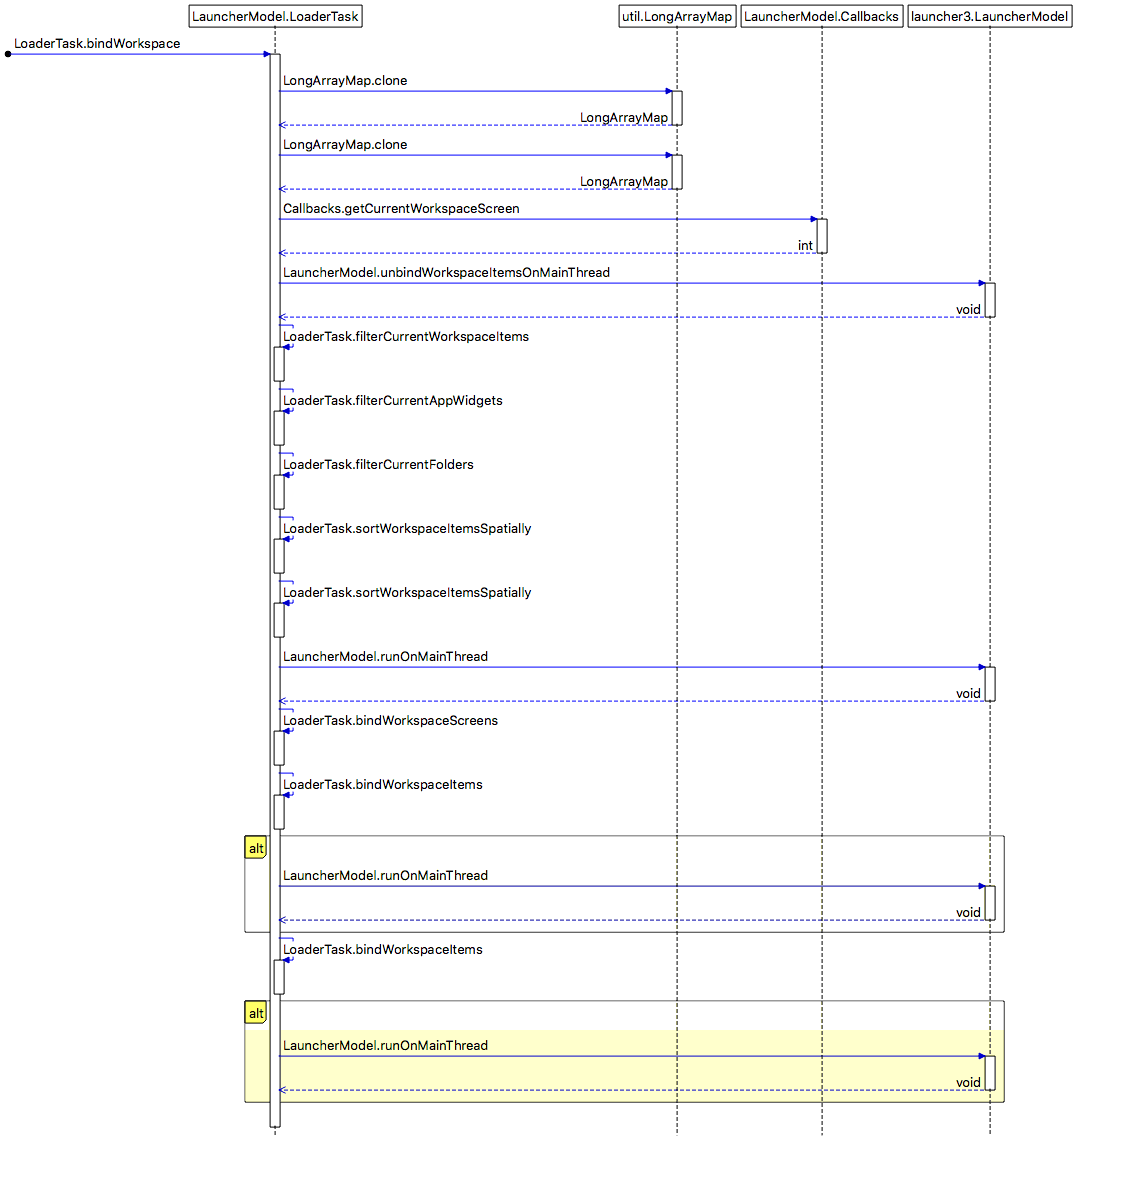
加载完配置应用图标后,开始执行bindWorkspace方法绑定应用图标到桌面,代码略过,我们看一下UML图:
通过上面的时序图,我们看到,首先执行过滤工作,比如这个图标是在workspace中还是在Hotseat中,不同的位置放置不同的分类,然后进行排序处理,然后执行bindWorkspaceScreens方法来绑定手机有几个屏幕,接着调用bindWorkspaceItems方法绑定当前屏幕的图标、文件夹和小插件信息,最后调用绑定其他屏幕的应用图标、文件夹和小插件,关于绑定我们下一章再讲。
接着执行LoadTask中的waitForIdle方法,改方法主要是等待加载数据结束。
最后执行loadAndBindAllApps方法来加载第二层的多有图标信息,看代码:
1
2
3
4
5
6
7
8
9
10
11
12
13
14
15
16
17
18
19
20
21
22
23
private void loadAndBindAllApps () { if (DEBUG_LOADERS) { Log.d(TAG, "loadAndBindAllApps mAllAppsLoaded=" + mAllAppsLoaded); } if (!mAllAppsLoaded) { loadAllApps(); synchronized (LoaderTask.this ) { if (mStopped) { return ; } } updateIconCache(); synchronized (LoaderTask.this ) { if (mStopped) { return ; } mAllAppsLoaded = true ; } } else { onlyBindAllApps(); } }
主要是如果已经加载了所有应用这只是执行绑定应用,如果没有加载则执行加载操作。下面看加载操作:
1
2
3
4
5
6
7
8
9
10
11
12
13
14
15
16
17
18
19
20
21
22
23
24
25
26
27
28
29
30
31
32
33
34
35
36
37
38
39
40
41
42
43
44
45
46
47
48
49
50
51
52
53
54
55
56
private void loadAllApps () { ... final List<UserHandleCompat> profiles = mUserManager.getUserProfiles(); mBgAllAppsList.clear(); for (UserHandleCompat user : profiles) { ... final List<LauncherActivityInfoCompat> apps = mLauncherApps.getActivityList(null , user); if (apps == null || apps.isEmpty()) { return ; } for (int i = 0 ; i < apps.size(); i++) { LauncherActivityInfoCompat app = apps.get(i); mBgAllAppsList.add(new AppInfo (mContext, app, user, mIconCache)); } ... final ArrayList<AppInfo> added = mBgAllAppsList.added; mBgAllAppsList.added = new ArrayList <AppInfo>(); mHandler.post(new Runnable () { public void run () { final long bindTime = SystemClock.uptimeMillis(); final Callbacks callbacks = tryGetCallbacks(oldCallbacks); if (callbacks != null ) { callbacks.bindAllApplications(added); if (DEBUG_LOADERS) { Log.d(TAG, "bound " + added.size() + " apps in " + (SystemClock.uptimeMillis() - bindTime) + "ms" ); } } else { Log.i(TAG, "not binding apps: no Launcher activity" ); } } }); ... loadAndBindWidgetsAndShortcuts(tryGetCallbacks(oldCallbacks), true ); ... }
上面代码中通过mLauncherApps.getActivityList方法获取所有应用启动界面的一个对象列表,然后根据LauncherActivityInfoCompat来初始化对应的app对象,这样就可以获取手机中所有的应用列表。获取完成后就执行绑定操作,最后调用loadAndBindWidgetsAndShortcuts方法加载绑定小部件和快捷方式到小部件界面。
1
2
3
4
5
6
7
8
9
10
11
12
13
14
15
16
17
18
19
20
21
22
23
24
public void loadAndBindWidgetsAndShortcuts (final Callbacks callbacks, final boolean refresh) { runOnWorkerThread(new Runnable () { @Override public void run () { updateWidgetsModel(refresh); final WidgetsModel model = mBgWidgetsModel.clone(); mHandler.post(new Runnable () { @Override public void run () { Callbacks cb = getCallback(); if (callbacks == cb && cb != null ) { callbacks.bindAllPackages(model); } } }); LauncherAppState.getInstance().getWidgetCache().removeObsoletePreviews( model.getRawList()); } }); }
在这个方法中首先调用updateWidgetsModel方法,代码如下:
1
2
3
4
5
6
7
8
9
void updateWidgetsModel (boolean refresh) { PackageManager packageManager = mApp.getContext().getPackageManager(); final ArrayList<Object> widgetsAndShortcuts = new ArrayList <Object>(); widgetsAndShortcuts.addAll(getWidgetProviders(mApp.getContext(), refresh)); Intent shortcutsIntent = new Intent (Intent.ACTION_CREATE_SHORTCUT); widgetsAndShortcuts.addAll(packageManager.queryIntentActivities(shortcutsIntent, 0 )); mBgWidgetsModel.setWidgetsAndShortcuts(widgetsAndShortcuts); }
上面代码中通过调用getWidgetProviders来获取所有小部件,通过shortcutsIntent来获取所有的跨界方式,最后通过mBgWidgetsModel.setWidgetsAndShortcuts方法把小部件和快捷方式放到WidgetsModel对象中,在后期加载中可以从这个里面获取小部件和快捷方式。
到这整个launcher的数据加载基本就完成了,还有很多细节没有讲,xml解析等,这个谷歌工程师设计都是非常好的,有兴趣的可以看看源码。
参考 Android系统默认Home应用程序(Launcher)的启动过程源代码分析
Android应用程序组件Content Provider的启动过程源代码分析
注 本文的源码是基于Android 6.0系统;
Launcher源码:https://github.com/yuchuangu85/Launcher3_mx/tree/launcher3_6.0
Android开发群:192508518
微信公众号:Code_MX
本文原创,转载请注明出处。